docker run --privileged -it -v /var/run/docker.sock:/var/run/docker.sock jongallant/ubuntu-docker-client
docker run --net=host --ipc=host --uts=host --pid=host -it --security-opt=seccomp=unconfined --privileged --rm -v /:/host alpine /bin/sh
chroot /host2019-06-21
使用 SSH 連入 Windows 10 的 docker VM (MobyLinuxVM)
markdown
因為使用 `docker volume create --name voluem_name` 指令建立的內容會儲存在 docker vm 中,上網查到連入 docker vm 的連線方式:


2019-06-20
PostgreSQL 的資料庫名稱帶 \r 的刪除方式
markdown
在 postgresql 命令操作下查資料庫名稱
```
Name |
------------------|
DATABASE_NAME\r |
```
資料庫名後面帶有 `\r`,多出 `\r` 的原因是建立資料時透過 shell script,而這個 shell script 是在 Windows 環境的IDE編輯。所以覆製到 ubuntu 環境執行造成資料庫名稱多帶 `\r`。
`\r` 的 byte 值是數值 `13`,13 轉 16進位(HEX 字串) 是 `0D`,
要移除資料庫的指令是將資料庫名指定 unicode 格式,將 `\r` 轉為 unicode 格式的 `\000D`,完整指令如下:
drop database U&"DATABASE_NAME\000D";或是更改資料庫名稱
alter database U&"DATABASE_NAME\000D" rename to "DATABASE_NAME_NEW";
2019-06-10
javascript 前端,使用 google-protobuf,後端用 asp.net core 2 接收
markdown
這篇是記錄在 Windows 10 環境中的 ASP.Net Core 的 WebAPI 使用 protobuf 取代 json 的資料傳輸
[本文範例程式碼](https://github.com/WenWei/ProtobufWebSample)
系統中需已預安裝:
- 安裝 .NET Core 2.2
- 安裝 protoc.exe
- 安裝 Browserify
## protoc.exe 安裝
到 GitHub 的 [Protocol Buffers Releases](https://github.com/protocolbuffers/protobuf/releases) [下載 protoc-3.8.0-win64.zip](https://github.com/protocolbuffers/protobuf/releases/download/v3.8.0/protoc-3.8.0-win64.zip)
我是解壓到 C:\bin,這裡的 c:\bin 是已加到環境變數 PATH 中。
```
C:\bin
├───include
│ └───google
│ └───protobuf
└───protoc.exe
```
## Browserify 安裝
```
npm install browserify -g
```
## 專案檔案結構
此文建立的範例專案名稱: ProtobufWebSample 省略部份檔案和目錄後結構如下:
```
~/ProtobufWebSample
├───ProtobufWeb
│ ├───Controllers
│ │ └───EchoController.cs
│ └───ProtobufWeb.csproj
└───protos
├───EchoData.proto
└───gen.bat
```
## 新增 asp.net core 的 WebAPI 專案
Post([FromBody] EchoData value)
{
value.Text = $"ECHO: {value.Text}";
return value;
}
}
}
```
## 要能接收和傳送 protobuf 格式,要建立 formatter
`ProtobufWeb/Formatters/ProtobufFormatter.cs`
```
namespace ProtobufWeb.Formatters
{
using Google.Protobuf;
using Microsoft.AspNetCore.Mvc;
using Microsoft.AspNetCore.Mvc.Formatters;
using Microsoft.Extensions.DependencyInjection;
using Microsoft.Net.Http.Headers;
using System.Threading.Tasks;
using System.Collections.Generic;
using System;
public static class ServicesConfiguration
{
public static void AddProtobufFormatter(this IServiceCollection services)
{
services.Configure(options =>
{
options.InputFormatters.Add(new ProtobufInputFormatter(new ProtobufFormatterOptions()));
options.OutputFormatters.Add(new ProtobufOutputFormatter(new ProtobufFormatterOptions()));
options.FormatterMappings.SetMediaTypeMappingForFormat("protobuf", Microsoft.Net.Http.Headers.MediaTypeHeaderValue.Parse("application/x-protobuf"));
});
}
}
public class ProtobufFormatterOptions
{
public HashSet SupportedContentTypes { get; set; } = new HashSet { "application/x-protobuf", "application/protobuf", "application/x-google-protobuf" };
public HashSet SupportedExtensions { get; set; } = new HashSet { "proto" };
public bool SuppressReadBuffering { get; set; } = false;
}
public class ProtobufInputFormatter : InputFormatter
{
private readonly ProtobufFormatterOptions _options;
public ProtobufInputFormatter(ProtobufFormatterOptions protobufFormatterOptions)
{
_options = protobufFormatterOptions ?? throw new ArgumentNullException(nameof(protobufFormatterOptions));
foreach (var contentType in protobufFormatterOptions.SupportedContentTypes)
{
SupportedMediaTypes.Add(new MediaTypeHeaderValue(contentType));
}
}
public override Task ReadRequestBodyAsync(InputFormatterContext context)
{
try
{
var request = context.HttpContext.Request;
var obj = (IMessage)Activator.CreateInstance(context.ModelType);
obj.MergeFrom(request.Body);
return InputFormatterResult.SuccessAsync(obj);
}
catch (Exception ex)
{
Console.WriteLine("Exception: " + ex);
return InputFormatterResult.FailureAsync();
}
}
}
public class ProtobufOutputFormatter : OutputFormatter
{
private readonly ProtobufFormatterOptions _options;
public string ContentType { get; private set; }
public ProtobufOutputFormatter(ProtobufFormatterOptions protobufFormatterOptions)
{
ContentType = "application/x-protobuf";
_options = protobufFormatterOptions ?? throw new ArgumentNullException(nameof(protobufFormatterOptions));
foreach (var contentType in protobufFormatterOptions.SupportedContentTypes)
{
SupportedMediaTypes.Add(new MediaTypeHeaderValue(contentType));
}
}
public override Task WriteResponseBodyAsync(OutputFormatterWriteContext context)
{
var response = context.HttpContext.Response;
// Proto-encode
var protoObj = context.Object as IMessage;
var serialized = protoObj.ToByteArray();
return response.Body.WriteAsync(serialized, 0, serialized.Length);
}
}
}
```
到 startup.cs 加入 `services.AddProtobufFormatter();`,startup.cs 完整內容如下:
```
using System;
using System.Collections.Generic;
using System.Linq;
using System.Threading.Tasks;
using Microsoft.AspNetCore.Builder;
using Microsoft.AspNetCore.Hosting;
using Microsoft.AspNetCore.HttpsPolicy;
using Microsoft.AspNetCore.Mvc;
using Microsoft.Extensions.Configuration;
using Microsoft.Extensions.DependencyInjection;
using Microsoft.Extensions.Logging;
using Microsoft.Extensions.Options;
using ProtobufWeb.Formatters;
namespace ProtobufWeb
{
public class Startup
{
public Startup(IConfiguration configuration)
{
Configuration = configuration;
}
public IConfiguration Configuration { get; }
// This method gets called by the runtime. Use this method to add services to the container.
public void ConfigureServices(IServiceCollection services)
{
services.AddMvc().SetCompatibilityVersion(CompatibilityVersion.Version_2_2);
services.AddProtobufFormatter();
}
// This method gets called by the runtime. Use this method to configure the HTTP request pipeline.
public void Configure(IApplicationBuilder app, IHostingEnvironment env)
{
if (env.IsDevelopment())
{
app.UseDeveloperExceptionPage();
}
else
{
// The default HSTS value is 30 days. You may want to change this for production scenarios, see https://aka.ms/aspnetcore-hsts.
app.UseHsts();
}
DefaultFilesOptions options = new DefaultFilesOptions();
options.DefaultFileNames.Clear();
options.DefaultFileNames.Add("index.html");
app.UseDefaultFiles(options);
app.UseStaticFiles();
app.UseHttpsRedirection();
app.UseMvc();
}
}
}
```
## 建立測試頁 `ProtobufWebSample/ProtobufWeb/wwwroot/index.html`
```
mkdir wwwroot
mkdir wwwroot/scripts
```
將 bundle.js 移到 wwwroot/scripts 資料夾
建立 index.html 內容如下
```
Document
```
## 執行網站,啟動 開發者工具查看結果
啟動網站
```
dotnet run
```
瀏覽器開啟 http://localhost:5001/index.html
使用開發者工具查看 Network 欄位的傳送結果
## 參考資料
* [Protocol Buffers - C# Generated Code](https://developers.google.com/protocol-buffers/docs/reference/csharp-generated)
* [Protocol Buffers - JavaScript Generated Code](https://developers.google.com/protocol-buffers/docs/reference/javascript-generated)
* [protobuf 前端怎么使用 - 蝈蝈250 - 2017/11/21](https://blog.csdn.net/vteihlll/article/details/78592976)
mkdir ProtobufWebSample
cd ProtobufWebSample
mkdir ProtobufWeb
cd ProtobufWeb
dotnet new webapidotnet add package Google.Protobufprotoc.exe --proto_path=路徑\ProtobufWebSample\protos --js_out=路徑\ProtobufWebSample\protos\gen\csharp 路徑\ProtobufWebSample\protos\EchoData.protoprotoc.exe --proto_path=路徑\ProtobufWebSample\protos --csharp_out=路徑\ProtobufWebSample\protos\gen\js路徑\ProtobufWebSample\protos\EchoData.proto2019-05-04
在 Windows 10 的 GoLang 使用 sqlite3 出現 gcc executable file not found in %PATH%
markdown
# go 使用 go-sqlite3 出現錯誤
執行 `go get github.com/mattn/go-sqlite3` 出現以下錯誤
```
exec: "gcc": executable file not found in %PATH%
```
原因是 sqlite3 是個 cgo 庫,需要使用 gcd 編譯 c 的源碼,
所以需要下載安裝tdm-gcc即可正常編譯。
[下載Windows版本 TDM-GCC](http://tdm-gcc.tdragon.net/download)
這裡下載 `tdm64-gcc-5.1.0-2.exe` 後進行安裝,預設安裝到 `C:\TDM-GCC-64`
安裝的介面中預設已有勾選將 `C:\TDM-GCC-64\bin` 加入系統環境變數 `%PATH%` 中
2019-03-29
在 Ubuntu 18.04.1 安裝 dotnet-sdk-2.2 出現依類項目不符無法安裝
markdown
將dotnet-sdk-2.2 安裝到 Ubuntu 18.04.1 時失敗。以
# 官網安裝方法(安裝失敗)
[Install .NET Core SDK on Linux Ubuntu 18.04 - x64](https://dotnet.microsoft.com/download/linux-package-manager/ubuntu18-04/sdk-current)
wget -q https://packages.microsoft.com/config/ubuntu/18.04/packages-microsoft-prod.deb
sudo dpkg -i packages-microsoft-prod.deb
sudo add-apt-repository universe
sudo apt-get install apt-transport-https
sudo apt-get update
sudo apt-get install dotnet-sdk-2.2curl https://packages.microsoft.com/keys/microsoft.asc | gpg --dearmor > microsoft.gpg
sudo mv microsoft.gpg /etc/apt/trusted.gpg.d/microsoft.gpg
sudo sh -c 'echo "deb [arch=amd64] https://packages.microsoft.com/repos/microsoft-ubuntu-bionic-prod bionic main" > /etc/apt/sources.list.d/dotnetdev.list'
sudo apt-get install apt-transport-https
sudo apt-get update
sudo apt-get install dotnet-sdk-2.22019-03-15
在 Ubuntu 18.04.1 的 IBus 上安裝大易(DAYI)輸入法
markdown
# 在 Ubuntu 18.04.1 的 IBus 上安裝大易輸入法
### 下載安裝腳本
```
$ wget https://raw.githubusercontent.com/Alger23/ubuntu_dayi_for_ibus/master/dayisetup.sh
```
### 下載大易三碼字根檔
```
$ wget https://raw.githubusercontent.com/Alger23/ubuntu_dayi_for_ibus/master/dayi3.cin
```
### 執行安裝腳本
```
$ chmod u+x dayisetup.sh
$ sudo ./dayisetup.sh
```
### ibus 設定大易輸入法
```
$ ibus-setup
```
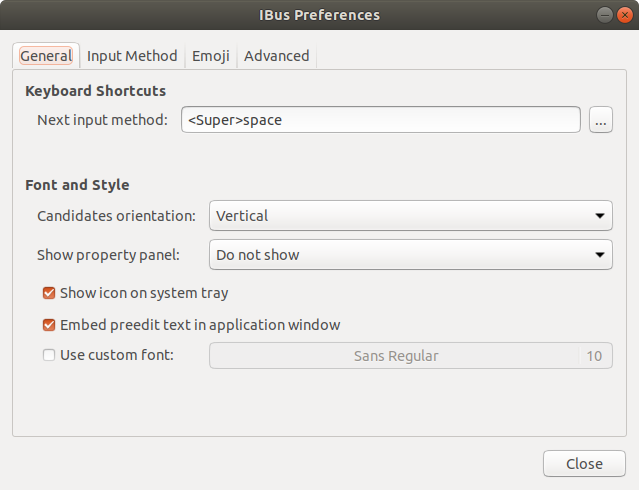
* 經由 ibus-setup 指令開啟的 ibus 設定畫面
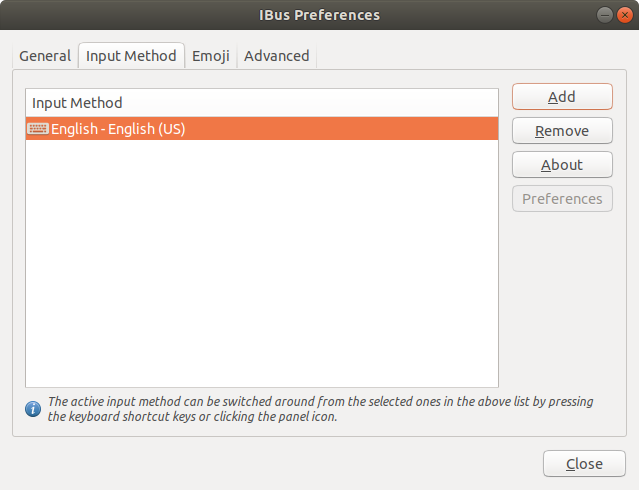
 * 切換到 Input Method 頁籤
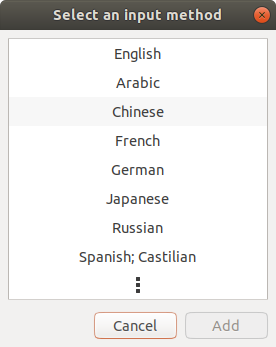
 * 選取 Chinese
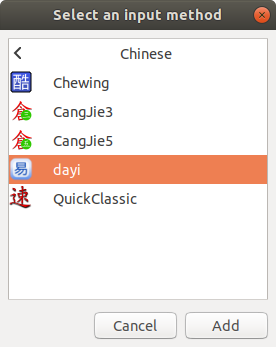
 * 選取 dayi,按下 【Add】
 * 選取 Chinese-dayi ,設定【Preferences】
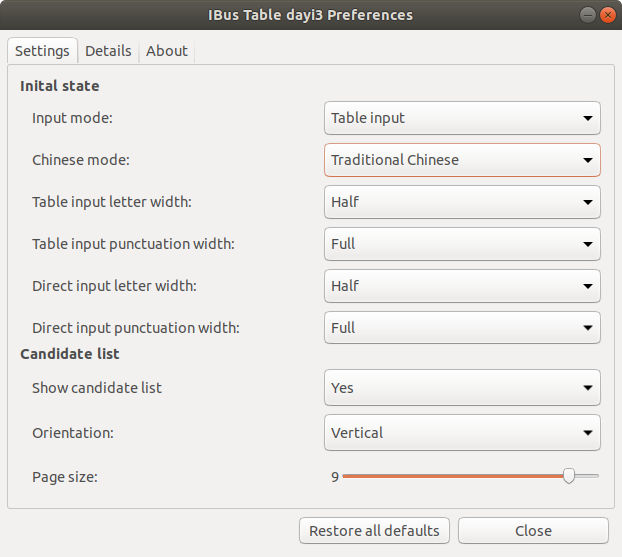
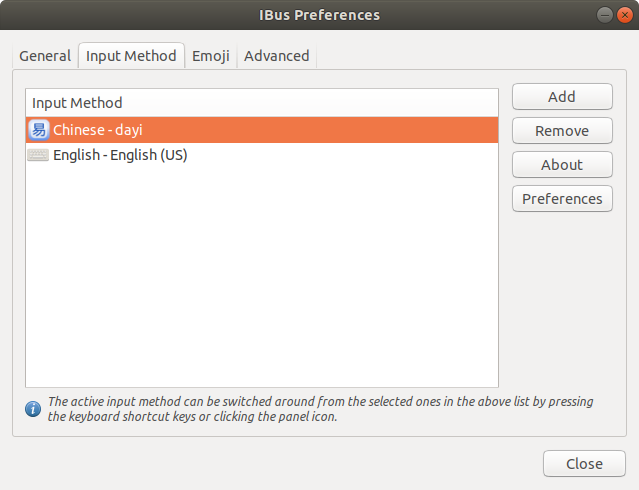 * 將 Chinese mode: 設定為 Traditional Chinese,按下【Close】
 * IBus Preferences 畫面再按下【Close】,完成 ibus 的大易輸入法設定
* 右上角的小工具,展開,選擇設定(Settings)。
* IBus Preferences 畫面再按下【Close】,完成 ibus 的大易輸入法設定
* 右上角的小工具,展開,選擇設定(Settings)。
 * 選取區域和語言(Region & Language),在輸入來源(Input Sources)點選「加號」
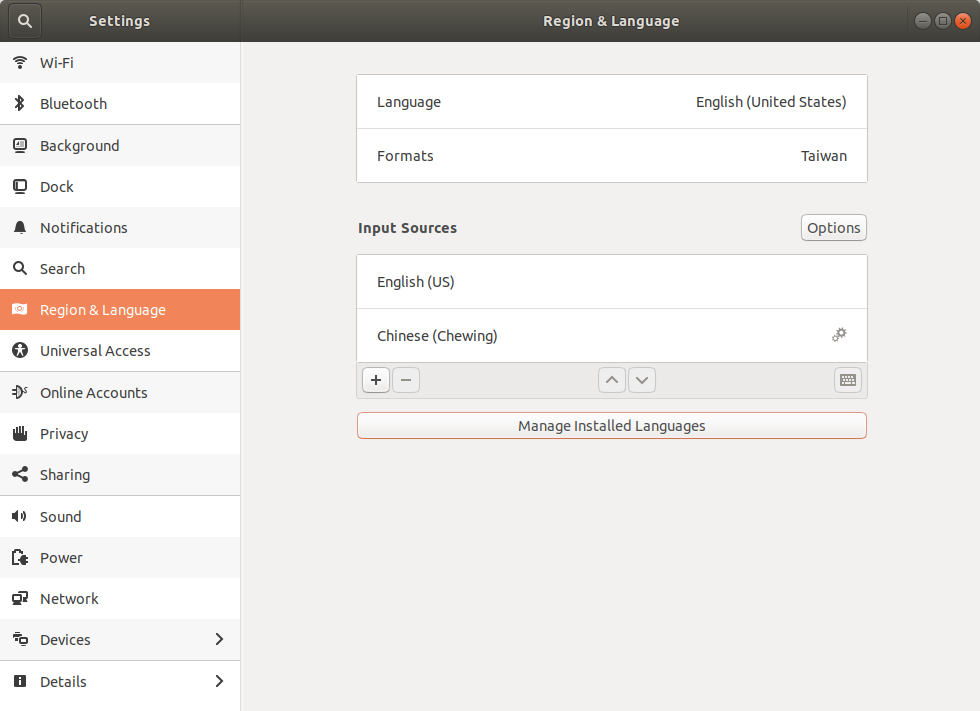 * 選擇輸入來源為「Chinese (Taiwan)」
2019-03-20 補充:此步驟在 Ubuntu 18.04.2 直接查 Chinese,會列出 Chinese(輸入法),國別名稱那層不見了
* 選擇輸入來源為「Chinese (Taiwan)」
2019-03-20 補充:此步驟在 Ubuntu 18.04.2 直接查 Chinese,會列出 Chinese(輸入法),國別名稱那層不見了
 * 選擇 Chinese (dayi),然後按下【Add】
 * 此時可以在 Input Sources 的區域看到新加入的大易輸入法「Chinese (dayi)」,關閉此視窗
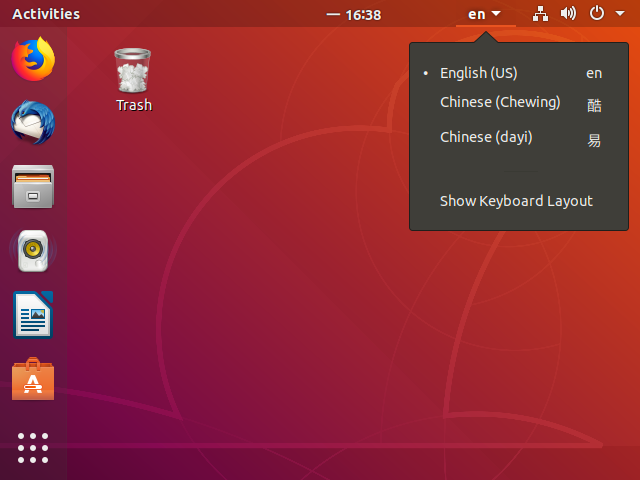
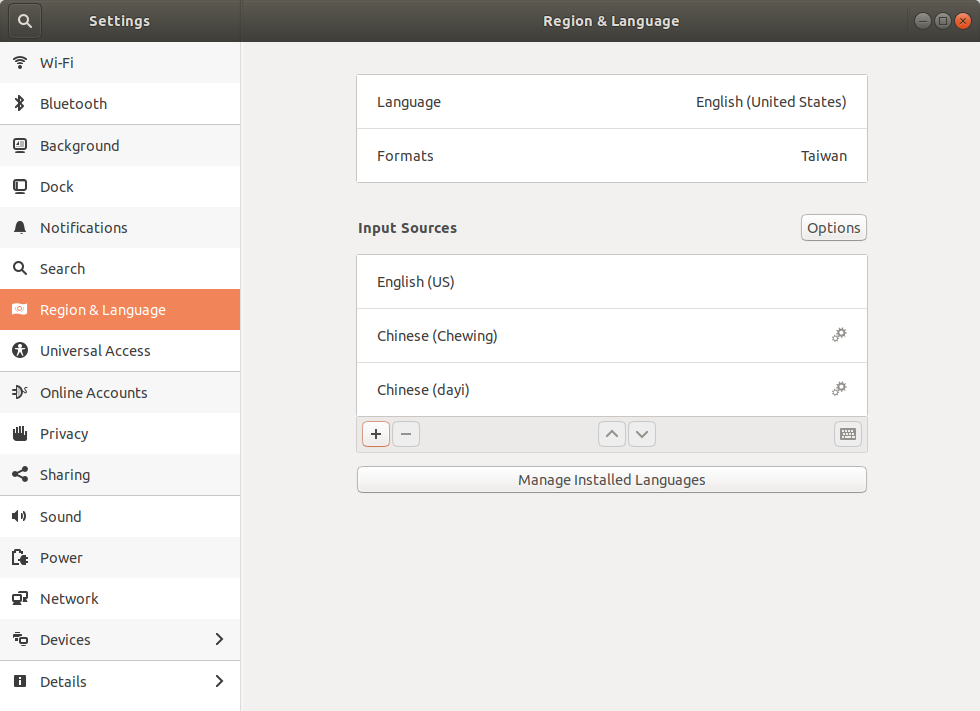 * 在右上角的輸入法已經能切換至大易輸入法了
 ## 己知打不出來的字
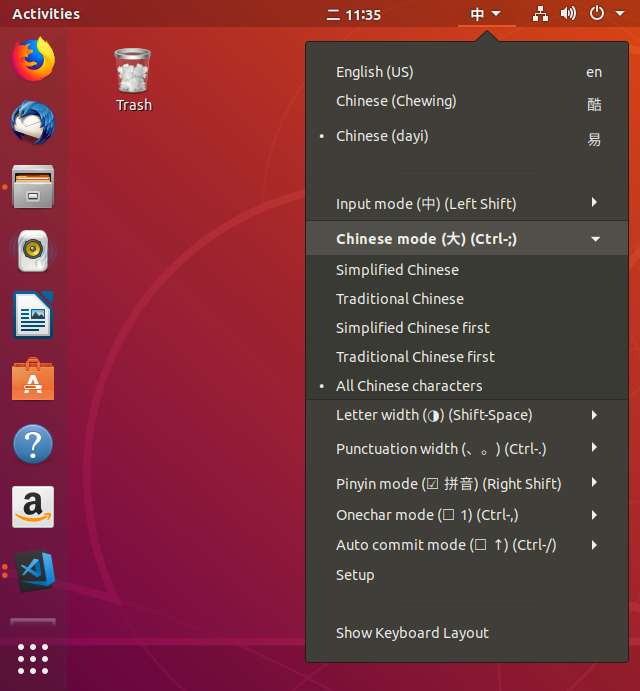
如果在 Chinese mode 選擇繁體中文,已知下列字打不出來
```
/mo 向
o8 只
```
所以將 Chinese mode 選擇 All Chinese Characters,字會出來但排序不同
## 己知打不出來的字
如果在 Chinese mode 選擇繁體中文,已知下列字打不出來
```
/mo 向
o8 只
```
所以將 Chinese mode 選擇 All Chinese Characters,字會出來但排序不同
 ## 已知問題
* 無法用 '[]-\ 選字,要用 Ctrl + 數字
## 已知問題
* 無法用 '[]-\ 選字,要用 Ctrl + 數字
* 切換到 Input Method 頁籤
* 選取 Chinese
* 選取 dayi,按下 【Add】
* 選取 Chinese-dayi ,設定【Preferences】
* 將 Chinese mode: 設定為 Traditional Chinese,按下【Close】
* IBus Preferences 畫面再按下【Close】,完成 ibus 的大易輸入法設定
* 右上角的小工具,展開,選擇設定(Settings)。
* 選取區域和語言(Region & Language),在輸入來源(Input Sources)點選「加號」
* 選擇輸入來源為「Chinese (Taiwan)」
2019-03-20 補充:此步驟在 Ubuntu 18.04.2 直接查 Chinese,會列出 Chinese(輸入法),國別名稱那層不見了
* 選擇 Chinese (dayi),然後按下【Add】
* 此時可以在 Input Sources 的區域看到新加入的大易輸入法「Chinese (dayi)」,關閉此視窗
* 在右上角的輸入法已經能切換至大易輸入法了
## 己知打不出來的字
如果在 Chinese mode 選擇繁體中文,已知下列字打不出來
```
/mo 向
o8 只
```
所以將 Chinese mode 選擇 All Chinese Characters,字會出來但排序不同
## 已知問題
* 無法用 '[]-\ 選字,要用 Ctrl + 數字
2019-03-13
Ubuntu 18.04 設定靜態 IP
markdown
設定 Ubuntu 18.04 靜態 IP
先要查出網卡的名稱
mtu 1500
inet 172.17.0.1 netmask 255.255.0.0 broadcast 172.17.255.255
ether 02:42:54:82:ea:09 txqueuelen 0 (Ethernet)
RX packets 0 bytes 0 (0.0 B)
RX errors 0 dropped 0 overruns 0 frame 0
TX packets 0 bytes 0 (0.0 B)
TX errors 0 dropped 0 overruns 0 carrier 0 collisions 0
eth0: flags=4163 mtu 1500
inet 192.168.88.88 netmask 255.255.240.0 broadcast 192.168.95.255
inet6 fe80::215:5dff:fe58:7316 prefixlen 64 scopeid 0x20
ether 00:15:5d:58:73:16 txqueuelen 1000 (Ethernet)
RX packets 609415 bytes 783165377 (783.1 MB)
RX errors 0 dropped 3521 overruns 0 frame 0
TX packets 94741 bytes 7497987 (7.4 MB)
TX errors 0 dropped 0 overruns 0 carrier 0 collisions 0
lo: flags=73 mtu 65536
inet 127.0.0.1 netmask 255.0.0.0
inet6 ::1 prefixlen 128 scopeid 0x10
loop txqueuelen 1000 (Local Loopback)
RX packets 170 bytes 13177 (13.1 KB)
RX errors 0 dropped 0 overruns 0 frame 0
TX packets 170 bytes 13177 (13.1 KB)
TX errors 0 dropped 0 overruns 0 carrier 0 collisions 0
```
在我的環境中能看到三個網路介面卡,docker0 是安裝 docker 產生的虛擬交換器,是要給docker的容器使用的。lo 是 loop back 的介面卡。這邊實際要設定的網路卡名稱是 eth0。
如果在 /etc/netplan/ 路徑中沒有設定檔,那可能你安裝系統時就沒有網路卡,所以 ubuntu 沒有自動產生。那就要自己用 `sudo netplan generate` 指令產生一個設定檔。
if config -asudo netplan generatecat /etc/netplan/50-cloud-init.yaml# This file is generated from information provided by
# the datasource. Changes to it will not persist across an instance.
# To disable cloud-init's network configuration capabilities, write a file
# /etc/cloud/cloud.cfg.d/99-disable-network-config.cfg with the following:
# network: {config: disabled}
network:
ethernets:
eth0:
dhcp4: true
version: 2sudo netplan apply
訂閱:
文章 (Atom)