顯示具有 Ubuntu 標籤的文章。 顯示所有文章

2019-03-29

在 Ubuntu 18.04.1 安裝 dotnet-sdk-2.2 出現依類項目不符無法安裝

markdown 將dotnet-sdk-2.2 安裝到 Ubuntu 18.04.1 時失敗。以 # 官網安裝方法(安裝失敗) [Install .NET Core SDK on Linux Ubuntu 18.04 - x64](https://dotnet.microsoft.com/download/linux-package-manager/ubuntu18-04/sdk-current)
wget -q https://packages.microsoft.com/config/ubuntu/18.04/packages-microsoft-prod.deb
sudo dpkg -i packages-microsoft-prod.deb
sudo add-apt-repository universe
sudo apt-get install apt-transport-https
sudo apt-get update
sudo apt-get install dotnet-sdk-2.2
安裝失敗,得到以下訊息 ``` Reading package lists... Done Building dependency tree Reading state information... Done Some packages could not be installed. This may mean that you have requested an impossible situation or if you are using the unstable distribution that some required packages have not yet been created or been moved out of Incoming. The following information may help to resolve the situation: The following packages have unmet dependencies: dotnet-sdk-2.2 : Depends: aspnetcore-runtime-2.2 (>= 2.2.3) but it is not going to be installed Depends: dotnet-runtime-2.2 (>= 2.2.3) but it is not going to be installed E: Unable to correct problems, you have held broken packages. ``` # 依 [stackoverflow Derviş Kayımbaşıoğlu](https://stackoverflow.com/questions/54065894/cannot-install-net-core-2-2-on-ubuntu-18-04#answer-54065983) 的方式(安裝成功)
curl https://packages.microsoft.com/keys/microsoft.asc | gpg --dearmor > microsoft.gpg
sudo mv microsoft.gpg /etc/apt/trusted.gpg.d/microsoft.gpg
sudo sh -c 'echo "deb [arch=amd64] https://packages.microsoft.com/repos/microsoft-ubuntu-bionic-prod bionic main" > /etc/apt/sources.list.d/dotnetdev.list'

sudo apt-get install apt-transport-https
sudo apt-get update
sudo apt-get install dotnet-sdk-2.2

2019-03-15

在 Ubuntu 18.04.1 的 IBus 上安裝大易(DAYI)輸入法

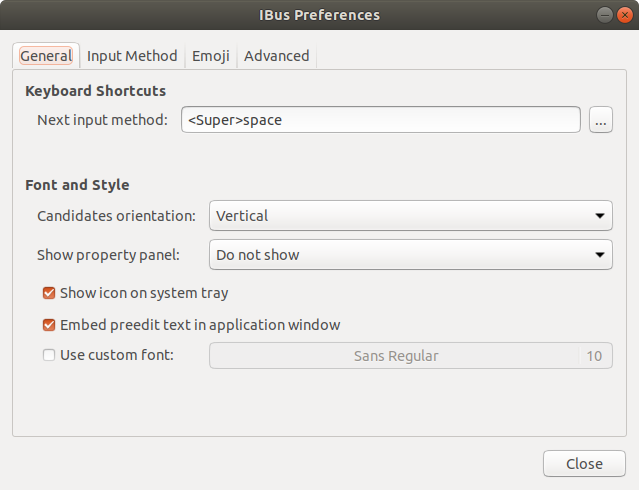
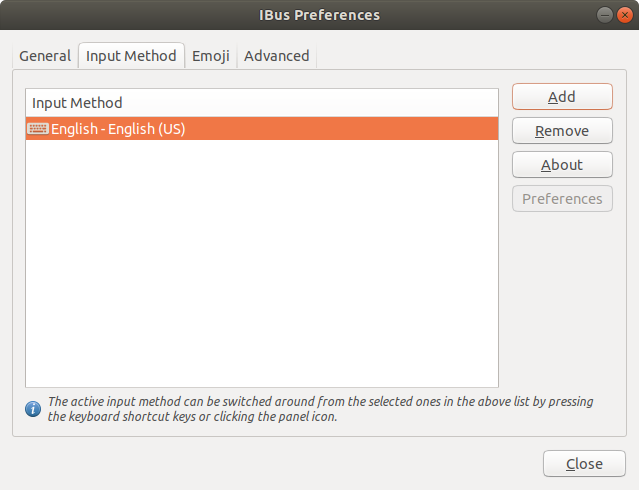
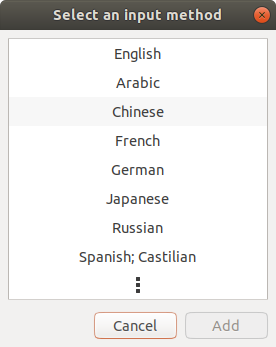
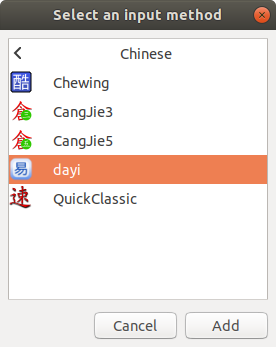
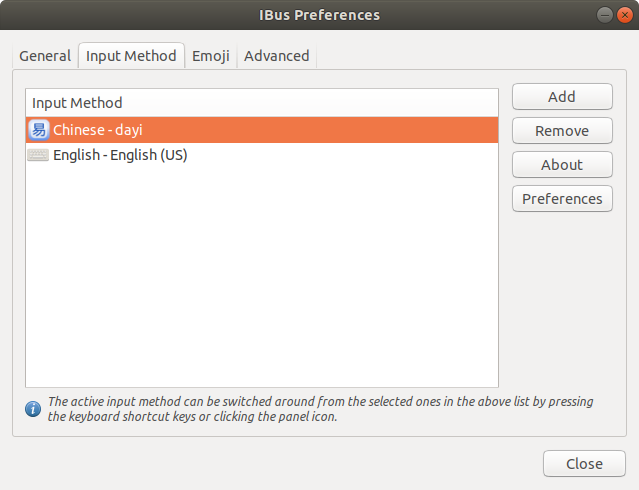
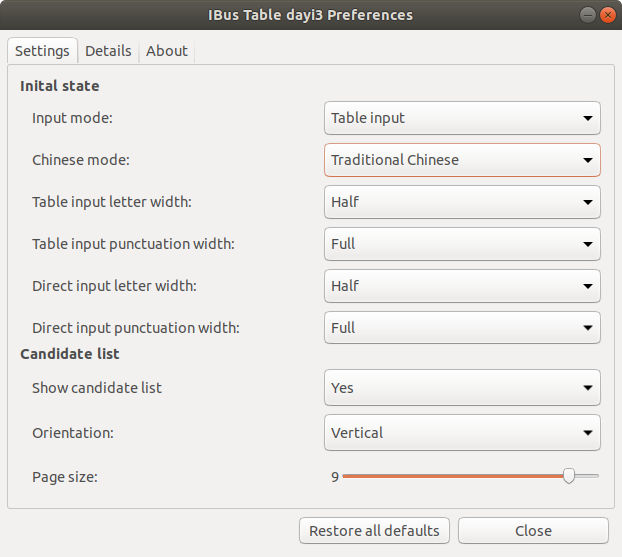
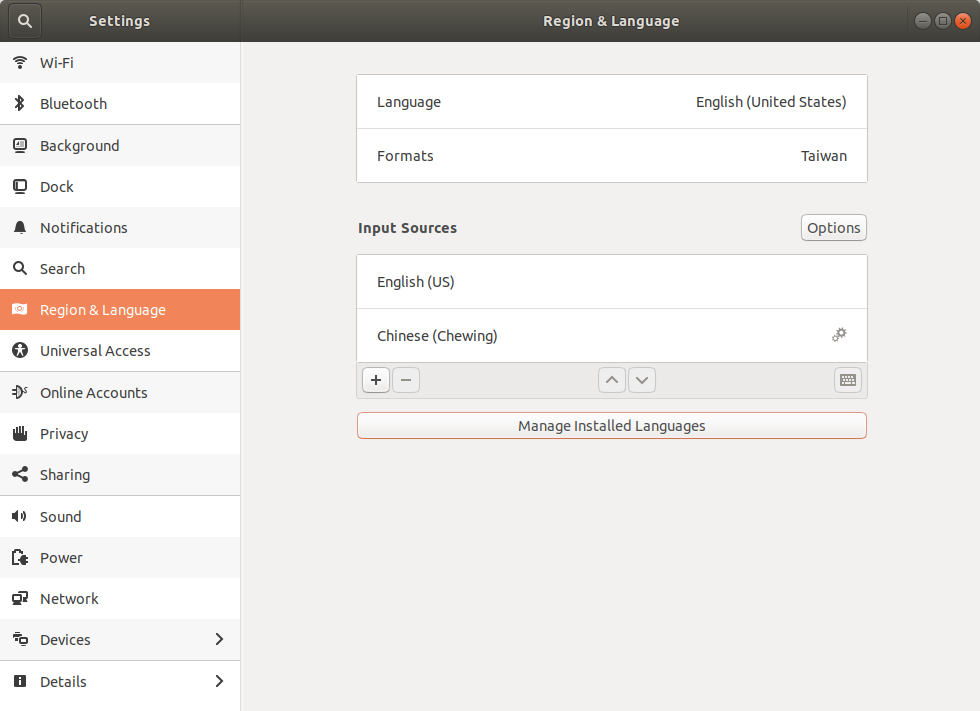
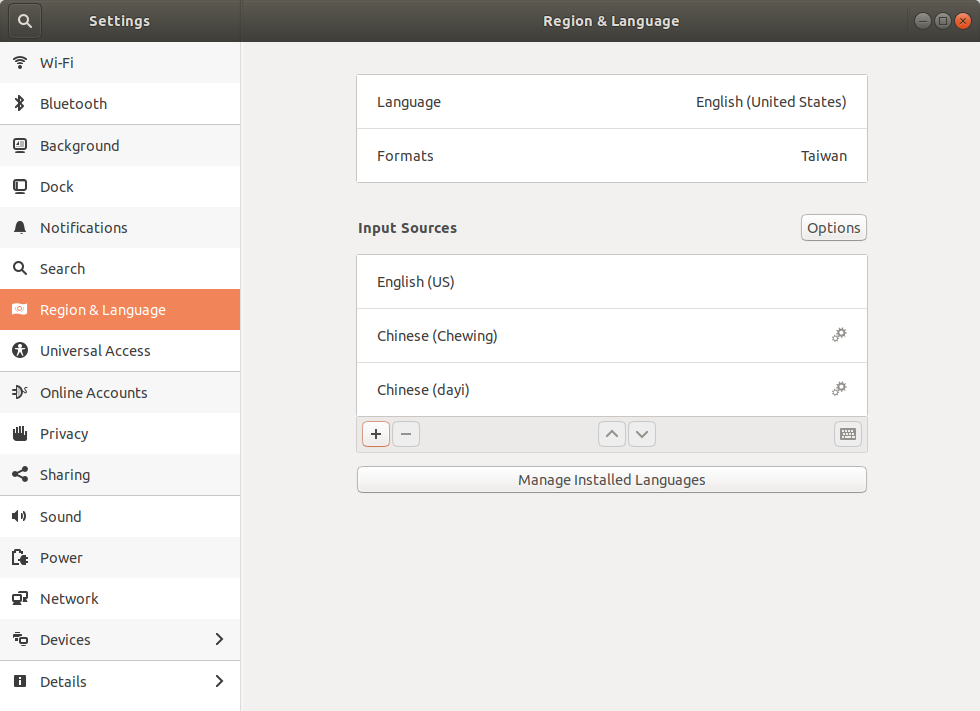
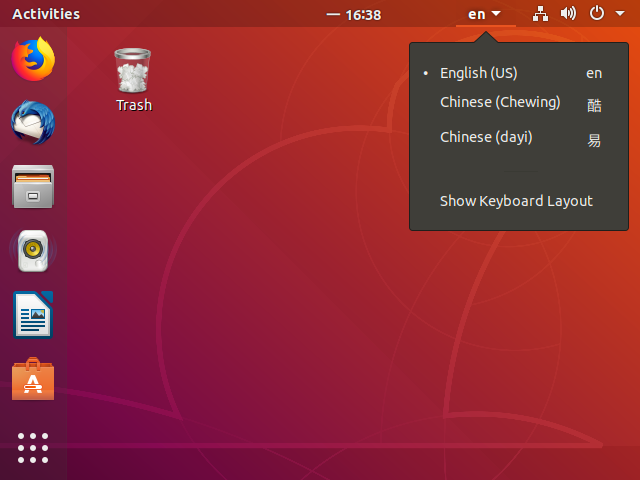
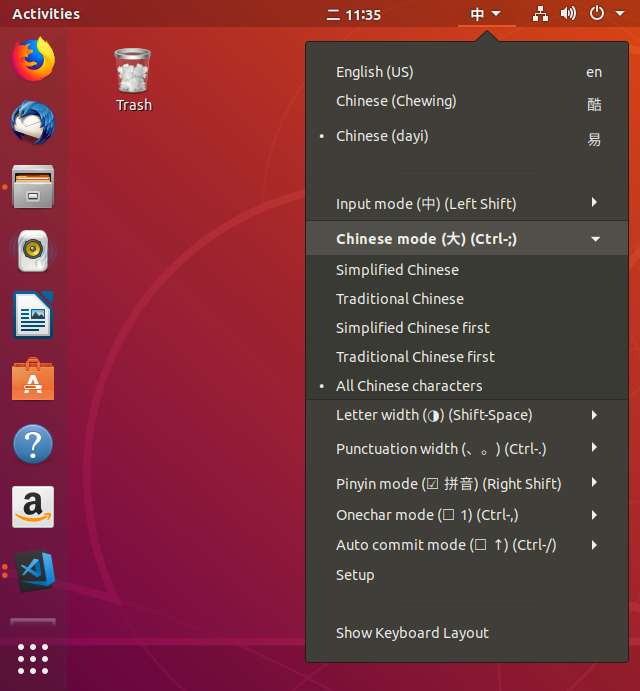
markdown # 在 Ubuntu 18.04.1 的 IBus 上安裝大易輸入法 ### 下載安裝腳本 ``` $ wget https://raw.githubusercontent.com/Alger23/ubuntu_dayi_for_ibus/master/dayisetup.sh ``` ### 下載大易三碼字根檔 ``` $ wget https://raw.githubusercontent.com/Alger23/ubuntu_dayi_for_ibus/master/dayi3.cin ``` ### 執行安裝腳本 ``` $ chmod u+x dayisetup.sh $ sudo ./dayisetup.sh ``` ### ibus 設定大易輸入法 ``` $ ibus-setup ``` * 經由 ibus-setup 指令開啟的 ibus 設定畫面 ibus 設定畫面 * 切換到 Input Method 頁籤 ibus-input method * 選取 Chinese ibus-add input method * 選取 dayi,按下 【Add】 ibus-add dayi * 選取 Chinese-dayi ,設定【Preferences】 Preferences * 將 Chinese mode: 設定為 Traditional Chinese,按下【Close】 Chinese Mode = Traditional Chinese * IBus Preferences 畫面再按下【Close】,完成 ibus 的大易輸入法設定 * 右上角的小工具,展開,選擇設定(Settings)。 Settings * 選取區域和語言(Region & Language),在輸入來源(Input Sources)點選「加號」 Select Plus Symbol Button * 選擇輸入來源為「Chinese (Taiwan)」 2019-03-20 補充:此步驟在 Ubuntu 18.04.2 直接查 Chinese,會列出 Chinese(輸入法),國別名稱那層不見了 Select Taiwan * 選擇 Chinese (dayi),然後按下【Add】 Select dayi * 此時可以在 Input Sources 的區域看到新加入的大易輸入法「Chinese (dayi)」,關閉此視窗 dayi * 在右上角的輸入法已經能切換至大易輸入法了 input method ## 己知打不出來的字 如果在 Chinese mode 選擇繁體中文,已知下列字打不出來 ``` /mo 向 o8 只 ``` 所以將 Chinese mode 選擇 All Chinese Characters,字會出來但排序不同 chinese mode ## 已知問題 * 無法用 '[]-\ 選字,要用 Ctrl + 數字

2019-03-13

Ubuntu 18.04 設定靜態 IP

markdown 設定 Ubuntu 18.04 靜態 IP 先要查出網卡的名稱
if config -a
查出來的結果: ```text docker0: flags=4099 mtu 1500 inet 172.17.0.1 netmask 255.255.0.0 broadcast 172.17.255.255 ether 02:42:54:82:ea:09 txqueuelen 0 (Ethernet) RX packets 0 bytes 0 (0.0 B) RX errors 0 dropped 0 overruns 0 frame 0 TX packets 0 bytes 0 (0.0 B) TX errors 0 dropped 0 overruns 0 carrier 0 collisions 0 eth0: flags=4163 mtu 1500 inet 192.168.88.88 netmask 255.255.240.0 broadcast 192.168.95.255 inet6 fe80::215:5dff:fe58:7316 prefixlen 64 scopeid 0x20 ether 00:15:5d:58:73:16 txqueuelen 1000 (Ethernet) RX packets 609415 bytes 783165377 (783.1 MB) RX errors 0 dropped 3521 overruns 0 frame 0 TX packets 94741 bytes 7497987 (7.4 MB) TX errors 0 dropped 0 overruns 0 carrier 0 collisions 0 lo: flags=73 mtu 65536 inet 127.0.0.1 netmask 255.0.0.0 inet6 ::1 prefixlen 128 scopeid 0x10 loop txqueuelen 1000 (Local Loopback) RX packets 170 bytes 13177 (13.1 KB) RX errors 0 dropped 0 overruns 0 frame 0 TX packets 170 bytes 13177 (13.1 KB) TX errors 0 dropped 0 overruns 0 carrier 0 collisions 0 ``` 在我的環境中能看到三個網路介面卡,docker0 是安裝 docker 產生的虛擬交換器,是要給docker的容器使用的。lo 是 loop back 的介面卡。這邊實際要設定的網路卡名稱是 eth0。 如果在 /etc/netplan/ 路徑中沒有設定檔,那可能你安裝系統時就沒有網路卡,所以 ubuntu 沒有自動產生。那就要自己用 `sudo netplan generate` 指令產生一個設定檔。
sudo netplan generate
我的環境在安裝時就已經有一個檔案`50-cloud-init.yaml`,所以直接編輯。原始內容如下:
cat /etc/netplan/50-cloud-init.yaml
# This file is generated from information provided by
# the datasource.  Changes to it will not persist across an instance.
# To disable cloud-init's network configuration capabilities, write a file
# /etc/cloud/cloud.cfg.d/99-disable-network-config.cfg with the following:
# network: {config: disabled}
network:
    ethernets:
        eth0:
            dhcp4: true
    version: 2
這裡我透過編輯器將內容修改如下: ``` # This file is generated from information provided by # the datasource. Changes to it will not persist across an instance. # To disable cloud-init's network configuration capabilities, write a file # /etc/cloud/cloud.cfg.d/99-disable-network-config.cfg with the following: # network: {config: disabled} network: ethernets: eth0: dhcp4: no addresses: [192.168.88.88/24] gateway4: 192.168.88.254 nameservers: addresses: [168.95.1.1, 8.8.8.8] version: 2 ``` * eth0: 網路介面卡名稱 * dhcp4 或 dhcp6: dhcp 設定,各別是 IPv4 或 IPv6。yes|no * addresses: 靜態IP設定 * gateway4: IPv4 的網路閘道 * nameservers: 域名解析伺服器 設定完後後要將設定套用
sudo netplan apply

2011-06-03

Ubuntu 安裝 PostgreSQL 8.04

安裝 postgresql
sudo apt-get install postgresql postgresql-client postgresql-contrib
如需要 GUI 管理工具可以安裝 pgadmin3
sudo apt-get install pgadmin3


更改資料庫 postgres 預設密碼 方法一
sudo su postgres -c psql template1
template1=# ALTER USER postgres WITH PASSWORD 'newpassword';
template1=# \q

更改資料庫 postgres 預設密碼 方法二
sudo su postgres
postgres@local:/$ psql
psql (8.4.8)
Type "help" for help.

postgres=#
select * from pg_shadow;
密碼欄位應該是空值
postgres=# alter user postgres with password 'newpassword';
postgres=# \q
離開psql
postgres@local:/$ exit
離開 postgres 帳號


更改系統帳號 postgres 密碼
sudo passwd -d postgres
sudo su postgres -c passwd
輸入新密碼

經過上面步驟之後就可以透過 command-line 和 pgAdmin 使用新的密碼連入資料庫伺服器。但在使用pgAdmin之前還應該將 PostgresSQL admin pack 設定好,以啟用 pgAdmin 更好的 logging 和 monitoring 工具,使用下面命令設定:
sudo su postgres -c psql < /usr/share/postgresql/8.4/contrib/adminpack.sql


修改設定,讓資料庫能接受遠端連線(Access from Remotely)(非必需)
sudo vi /etc/postgresql/8.4/main/postgresql.conf

#listen_addresses = 'localhost'
to
listen_addresses = '*'


#password_encryption = on
to
password_encryption = on

儲存並關閉檔案


設定誰可以連線

Now for the final step, we must define who can access the server. This is all done using the pg_hba.conf file. (The following advice can also be given to you - plus you don’t even need to figure out IP addresses and subnet masks - from the latest versions of pgAdmin (1.6.x). But it doesn’t hurt to know how things work).
sudo vi /etc/postgresql/8.4/main/pg_hba.conf

Comment out, or delete the current contents of the file, then add this text to the bottom of the file:
# DO NOT DISABLE!
# If you change this first entry you will need to make sure that the
# database
# super user can access the database using some other method.
# Noninteractive
# access to all databases is required during automatic maintenance
# (autovacuum, daily cronjob, replication, and similar tasks).
#
# Database administrative login by UNIX sockets
local   all         postgres                          ident sameuser
# TYPE  DATABASE    USER        CIDR-ADDRESS          METHOD

# "local" is for Unix domain socket connections only
local   all         all                               md5
# IPv4 local connections:
host    all         all         127.0.0.1/32          md5
# IPv6 local connections:
host    all         all         ::1/128               md5

# Connections for all PCs on the subnet
#
# TYPE DATABASE USER IP-ADDRESS IP-MASK METHOD
host    all         all         [ip address]          [subnet mask]  md5

and in the last line, add in your subnet mask (i.e. 255.255.255.0) and the IP address of the machine that you would like to access your server (i.e. 125.232.82.46). However, if you would like to enable access to a range of IP addresses, just substitute the last number for a zero and all machines within that range will be allowed access (i.e. 125.232.192.0 would allow all machines with an IP address 125.232.192.x to use the database server).

That’s it, now all you have to do is restart the server:

to
sudo /etc/init.d/postgresql restart

And all should be working.


原文:
http://hocuspokus.net/2008/05/install-postgresql-on-ubuntu-804/

2011-06-01

Ubuntu 設定 PPPOE 播接 ADSL

輸入以下指令設定 ADSL 播接帳號、密碼
$sudo pppoeconf

2011-05-31

Ubuntu Server i386 安裝完 CLI 中文顯示亂碼

修改
$sudo vi /var/lib/locales/supported.d/local
改為
en_US.UTF-8 UTF-8

修改
$sudo /etc/default/locale
改為
LANG="en_US.UTF-8"
LANGUAGE="en_US:en"

adsense