2026-08-17
2026 Gmail SMTP 寄信設定教學
markdown
2026年 Gmail SMTP 寄信設定,兩步驟驗證與應用程式密碼指南
完整教學如何設定 Gmail SMTP 讓網站自動寄信,含 2026 最新 UI 路徑、應用程式密碼產生、OAuth 2.0 與 App Password 選擇
---
### 📌 1. 為什麼網站要設定 Gmail SMTP?
* **解決核心痛點**:網站若使用主機預設 `mail()` 函式發信,極易被判定為垃圾郵件甚至漏信。
* **主要好處**:透過 Google 伺服器寄信能大幅提升**信件送達率**,免費享有穩定安全的可靠基礎設施。
* **適用場景**:網站表單通知、訂單確認信、密碼重設信等。
---
### ⏳ 2. 重要背景:舊版認證已全面停用
* **歷史轉折**:Google 已於 2025 年 3 月 14 日全面禁用傳統基本驗證(Basic Authentication)與低安全性應用程式(LSA)。
* **現行機制**:2026 年起,網站寄信**僅能使用 OAuth 2.0 或「應用程式密碼(App Password)」**。
---
### 🛠️ 3. Gmail SMTP 三步驟設定流程
```
[步驟 1] 啟用兩步驟驗證
↓
[步驟 2] 產生 16 位數應用程式密碼
↓
[步驟 3] 於網站後台填入 SMTP 參數
```
#### **第一步:開啟 Google 兩步驟驗證**
1. 登入 Google 帳戶 ➔ 進入「管理你的 Google 帳戶」。
2. 點選左側「安全性」 ➔ 找到「兩步驟驗證」並完成開啟。
#### **第二步:取得應用程式密碼**
1. 前往 `[myaccount.google.com/apppasswords](https://myaccount.google.com/apppasswords)`(或在安全性頁面搜尋「應用程式密碼」)。
2. 輸入名稱(例如:`官網 SMTP`)並點選「建立」。
3. 複製產生的 **16 位數密碼**(⚠️ 此密碼僅顯示一次,請妥善保存)。
#### **第三步:填入網站後台設定**
* **SMTP 主機**:`smtp.gmail.com`
* **SMTP 埠號 (Port)**:`587` (TLS) 或 `465` (SSL)
* **安全性加密**:`TLS` 或 `SSL`
* **登入帳號**:你的完整 Gmail 信箱
* **登入密碼**:剛產生的 **16 位數應用程式密碼**(請勿填寫一般 Gmail 登入密碼)
---
### ⚠️ 4. 發信限制與常見問題排查
#### 📊 每日發信上限 (Rolling 24 Hours)
* **免費版 Gmail**:約 **500 封/日**(寄給 20 人即扣 20 封額度)。
* **Google Workspace(付費版)**:高達 **2,000 封/日**。
#### 🔍 常見寄信失敗原因與檢查點
1. **密碼填錯**:錯填成 Gmail 帳戶登入密碼,而非 16 位數應用程式密碼。
2. **埠號與加密不搭配**:Port 587 需搭 TLS;Port 465 需搭 SSL。
3. **主機防火牆阻擋**:虛擬主機封鎖了 465 或 587 連線埠。
4. **超過發信上限**:當日觸及發信張數限制被暫時鎖定。


2022-01-26
Seq 硬碟滿了處理方式
markdown
# Seq 硬碟滿了處理方式
硬碟使用量100%時無法使用Web介面刪除紀錄
1.停止Seq container
```
docker stop seq
```
2.將docker掛載的data目錄過舊的資料刪除
```
cd /data/Stream
ls -lah|grep M|grep Dec|awk {'system("rm -f " $NF)'}
```
3.啟動Seq container
此時連線web會產生錯誤
```
// 20220126100328
// http://192.168.30.245:5880/#/events
{
"Error": "Seq is unavailable. Failed to initialize storage: Flare native
storage failed (InternalError), data file
`\"/data/Stream/stream.08d9cbdb889e7c00_08d9cbe81b451800.eeb0800c543741ada6e
96cbebcfc30a4.span\"` is missing."
}
```
4.在docker中執行 修復
```
/bin/seq-server/Native/flaretl repair /data/Stream/
#可能需要執行多次
#直到出現 No storage problems were found
```
5.重啟Seq
修復完成後沒重啟頁面依然會顯示錯誤
## 參考:
https://github.com/datalust/seq-tickets/discussions/1354
https://docs.datalust.co/docs/exporting-log-data
2021-09-30
React Custom hook - useQueryString
markdown
Custom hook for simple get and set QueryString
[demo](tps://codesandbox.io/s/react-custom-hooks-usequerystring-vmc2g)
install package `react-router-dom`
```js
// src/index.js
import { StrictMode } from "react";
import ReactDOM from "react-dom";
+ import { BrowserRouter as Router } from "react-router-dom";
import App from "./App";
const rootElement = document.getElementById("root");
ReactDOM.render(
+
,
rootElement
);
```
Add useQueryString.js
```
// src/hooks/useQueryString.js
import React from "react";
import { useLocation, useHistory } from "react-router-dom";
import { shallowEqual } from "react-redux";
const useQueryString = () => {
const location = useLocation();
const history = useHistory();
const { search } = location;
const [value, setValue] = React.useState({});
React.useEffect(() => {
let qs = Object.fromEntries(new URLSearchParams(search));
if (!shallowEqual(qs, value)) {
setValue(qs);
}
}, [search]); // eslint-disable-line react-hooks/exhaustive-deps
return {
value,
set: (params) =>
history.push({
pathname: location.pathname,
search: new URLSearchParams({ ...value, ...params }).toString()
})
};
};
export default useQueryString;
```
I use shallowEqual function check queryString is changed.
```
// shallowEqual.js in react-redux
function is(x, y) {
if (x === y) {
return x !== 0 || y !== 0 || 1 / x === 1 / y;
} else {
return x !== x && y !== y;
}
}
export default function shallowEqual(objA, objB) {
if (is(objA, objB)) return true;
if (typeof objA !== 'object' || objA === null || typeof objB !== 'object' || objB === null) {
return false;
}
var keysA = Object.keys(objA);
var keysB = Object.keys(objB);
if (keysA.length !== keysB.length) return false;
for (var i = 0; i < keysA.length; i++) {
if (!Object.prototype.hasOwnProperty.call(objB, keysA[i]) || !is(objA[keysA[i]], objB[keysA[i]])) {
return false;
}
}
return true;
}
```
## How to use useQueryString()
```
const qs = useQueryString();
```
#### set value to url
```
qs.set({"name": "value"});
qs.set({"age": "19"});
```
#### get value
```
console.log(qs.value.name);
console.log(qs.value.age);
```
## References
* [QueryString - Wikipedia](https://en.wikipedia.org/wiki/Query_string)
* [React 中優雅使用網址參數 Query String - Jul 7, 2020 · Ryan Hsu](https://medium.com/itsoktomakemistakes/react-%E4%B8%AD%E5%84%AA%E9%9B%85%E4%BD%BF%E7%94%A8%E7%B6%B2%E5%9D%80%E5%8F%83%E6%95%B8-query-string-540bacd08486)
* [React Router, why useLocation and useHistory might return undefined](https://flaviocopes.com/react-router-uselocation-usehistory-undefined/)
* [React Router](https://reactrouter.com/web/guides/quick-start)
* [React Redux](https://react-redux.js.org/)
2021-04-07
ValueObject as Entity ID, EntityTypeConfiguration Sample
markdown
問題:https://stackoverflow.com/questions/53328201/ef-core-non-primitive-type-value-object-as-primary-key
參考來源:https://github.com/dotnet/efcore/issues/13669
```
public class User
{
public UserId Id { get; set; }
public Credentials Credentials { get; set; }
}
public class UserId
{
private UserId()
{
}
private UserId(long id)
{
Id = id;
}
public long Id { get; private set; }
public static implicit operator long(UserId beaconId)
{
return beaconId.Id;
}
public static implicit operator UserId(long id)
{
return new UserId(id);
}
public override bool Equals(object obj)
{
if (obj == null)
{
return false;
}
var userId = (UserId) obj;
return this.Id == userId.Id;
}
public override int GetHashCode()
{
return Id.GetHashCode();
}
}
public class TestDbContext: DbContext
{
public TestDbContext(DbContextOptions options): base(options)
{
}
public DbSet Users { get; set; }
protected override void OnModelCreating(ModelBuilder modelBuilder)
{
var userModelBuilder = modelBuilder.Entity();
userModelBuilder.Property(x => x.Id).HasConversion(x => x.Id, value => new UserId(value)).HasColumnName("Id").IsRequired();
userModelBuilder.OwnsOne(x => x.Credentials, c =>
{
c.Property(x => x.Email);
c.Property(x => x.Password);
});
}
}
```
2021-03-31
dotnet core get k8s self POD name
markdown
k8s 中的 dotnet core 應用取得 POD name
三種方式取得的結果相同
```
class Program
{
static async Task Main(string[] args)
{
Console.WriteLine("MachineName:"+Environment.MachineName);
Console.WriteLine("HostName:"+ System.Net.Dns.GetHostName());
Console.WriteLine("ENV K8S_POD_NAME:"+Environment.GetEnvironmentVariable("K8S_POD_NAME"));
await Task.Run(() =〉 Thread.Sleep(Timeout.Infinite));
}
}
```
result on dotnet 3.1.11-alpine3.12
```
MachineName:mqsend-7d9579cc47-kld6v
HostName:mqsend-7d9579cc47-kld6v
ENV K8S_POD_NAME:mqsend-7d9579cc47-kld6v
```
ENV需要在deployment時額外加入參考
```
spec:
containers:
- env:
- name: K8S_POD_NAME
valueFrom:
fieldRef:
fieldPath: metadata.name
```
ref
- https://kubernetes.io/docs/tasks/inject-data-application/environment-variable-expose-pod-information/#use-container-fields-as-values-for-environment-variablesƒ
2021-01-29
Adding Git-Bash to the new Windows Terminal
markdown
在 Terminal 按下 `ctrl` + `,`,會開啟 `settings.json`
```
{
"$schema": "https://aka.ms/terminal-profiles-schema",
"defaultProfile": "{00000000-0000-0000-ba54-000000000001}",
"profiles":
{
"defaults":
{
// Put settings here that you want to apply to all profiles
},
"list":
[
// put one of the configuration below right here
]
}
}
```
在 list 的區段中加入,依據正確git安裝路徑取消`commandline`和`icon`的註解
```
{
"guid": "{00000000-0000-0000-ba54-000000000002}",
//"commandline": "%PROGRAMFILES%/git/usr/bin/bash.exe -i -l",
//"commandline": "%USERPROFILE%/AppData/Local/Programs/Git/git-bash.exe -l -i",
"commandline": "%USERPROFILE%/AppData/Local/Programs/Git/bin/sh.exe --login",
//"commandline": "%USERPROFILE%/AppData/Local/Programs/Git/bin/bash.exe -l -i",
//"commandline": "%USERPROFILE%/scoop/apps/git/current/usr/bin/bash.exe -l -i",
//"icon": "%PROGRAMFILES%/Git/mingw64/share/git/git-for-windows.ico",
"icon": "%USERPROFILE%/AppData/Local/Programs/Git/mingw64/share/git/git-for-windows.ico",
// "icon": "%USERPROFILE%/apps/git/current/usr/share/git/git-for-windows.ico",
"name": "Bash",
"startingDirectory": "%USERPROFILE%"
}
```
# Reference
# [Adding Git-Bash to the new Windows Terminal](https://stackoverflow.com/questions/56839307/adding-git-bash-to-the-new-windows-terminal)
2020-10-20
新的 Windows Terminal 視窗分割
markdown
# New Windows Terminal
Windows 終端機是一種現代化、快速、高效、功能強大且具生產力的終端應用程式,適合命令列工具和 Shell (像是命令提示字元、PowerShell 和 WSL) 的使用者。主要功能包括多個索引標籤、窗格、Unicode 和 UTF-8 字元支援、GPU 加速的文字呈現引擎,以及自訂主題、樣式和設定。
可以直接在 Window 10 的 Microsoft Store 下載。
* 下載安裝[Windows Terminal](https://www.microsoft.com/zh-tw/p/windows-terminal/9n0dx20hk701?activetab=pivot:overviewtab)
* [Source Code](https://github.com/microsoft/terminal)
# 視窗分割
* 自動分割視窗:Alt + Shift + D
* 建立一個新的水平分割:Alt + Shift + -(英文鍵上排的減號)
* 建立一個新的垂直分割:Alt + Shift + +(英文鍵上排的加號)
* 移動遊標至其它視窗:Alt + Left, Alt + Right, Alt + Up, Alt + Down
* 調整遊標所在視窗的大小:Alt + Shift + Left, Alt + Shift + Right, Alt + Shift + Up, Alt + Shift + Down
## 或是 Ctrl + Shift + P 開啟輸入命令名稱的快捷輸入框
1. 選擇 Split Pane...
2. 選擇要開啟的Shell環境「Azure Cloud Shell、Windows PowerShell、命令提示字元、或是自己安裝的 WSL 子系統(Linux)」
3. 選擇要分割的視窗方向,「自動,水平、垂直」
* 自動:依視窗大小自動做水平或垂直分割
* 水平:分割成上和下
* 垂直:分割成左和右
# 關閉分割
* 將遊標所在的視窗關閉:Ctrl + Shift + W
# 透過指令啟動一個視窗,裡面已經分割成三個
```
wt -p "Command Prompt" `; split-pane -p "Windows PowerShell" `; split-pane -H wsl.exe
```
# 參考
* [Using command-line arguments for Windows Terminal](https://github.com/MicrosoftDocs/terminal/blob/master/TerminalDocs/command-line-arguments.md)
* [The New Windows Terminal Is Ready; Here’s Why It’s Amazing](https://www.howtogeek.com/673729/heres-why-the-new-windows-10-terminal-is-amazing/) - Chris Hoffman, May 19, 2020
2020-06-17
查 Windows Port 被哪一個程式使用
markdown
查 Windows Port 被哪一個程式使用
```
netstat -ano | findstr "0.0.0.0:443"
```
```
tasklist|findstr "4836"
```


VMware Workstation and Hyper-V are not compatible.
markdown
當 Windows 作業系統啟用 Hyper-V 時,會無法使用 VMware Workstation。所以會出現以下的訊息
> VMware Workstation and Hyper-V are not compatible. Remove the Hyper-V role from the system before running VMware Workstation.
Disable Hyper-V
1. Open cmd in admin mode
2. bcdedit /set hypervisorlaunchtype off
3. restart!?
To enable the Hyper-V role again use the following command:
1. Open cmd in admin mode
2. bcdedit /set hypervisorlaunchtype auto
3. restart!?
2020-06-04
Jupyter Notebooks 使用 .NET C# 進行交互開發
markdown
# 安裝步驟
* 安裝好 .NET Core 3.1 SDK
* 安裝好 Python 3 (預設已裝 pip)
* 安裝 Jupyter
```
pip install jupyter
```
* 確認 Jupyter 安裝是否正確
```
jupyter kernelspec list
```
* 安裝 .NET Interactive
方法1.
```
dotnet tool install -g --add-source "https://dotnet.myget.org/F/dotnet-try/api/v3/index.json" Microsoft.dotnet-interactive
dotnet interactive jupyter install
```
方法2.
>請注意:如果此前已經安裝了dotnet try全局工具,需要先卸載舊版本的軟體再安裝。
```
dotnet tool install --global dotnet-try
```
在Anaconda提示符下通過命令安裝.NET內核:
```
dotnet try jupyter install
```
* 再次使用 `jupyter kernelspec list` 命令檢查安裝好的 .NET 版本 Jupyter 支援
顯示結果
```
.net-csharp ~\jupyter\kernels\.net-csharp
.net-fsharp ~\jupyter\kernels\.net-fsharp
.net-powershell ~\jupyter\kernels\.net-powershell
python3 ~\jupyter\kernels\python3
```
# 使用 Jupyter Notebooks
```
mkdir yourapp
cd yourapp
jupyter notebook
```
然後就可以在瀏覽器使用 jupyter 了。
開啟 jupyter 的右側可以新增 「NET(C#)、NET (F#)、NET (PowerShell)、Python 3」
## 功能介紹
### HTML解析和輸出
```
display(HTML("Hello, alger!"));
```
### 使用 JavaScript
```
Javascript(@"alert(""Hello, Alger!"")");
```
### 使用 pocketView
```
display(
span(
img[src:"https://www.google.com/favicon.ico",style:"height:4.5em"],
a[href: @"http://www.google.com", target: "blank", style: "color:green"](b("諸事不宜"))
)
);
```
### 使用 markdown
```
%%markdown
* 一
* 二
* 三
| one | two |
|-----|-----|
| 一 | 二 |
| 臺 | 貮 |
```
### 類庫導入
可以支持對 C# 類庫的導入,使用 #r語法,從 nuget 導入程式庫
```
#r "nuget:[,]"
```
例如:
```
#r "nuget:System.Reactive.Linq, 4.1.5"
```
導入程式庫時需要等待。
### 對像格式化
情況下,.NET Notebook使用戶能夠以表格式顯示有關對象的有用信息。比如對一個Ienumerable對象display顯示如下:
```
display(new[]{"hello", "world"});
Enumerable.Range(1,5);
```
### Formatter API
### 繪圖
.net notebook的繪圖功能都使用XPlot.Plotly 可視化包。
```
//Install XPlot package
#r "nuget:XPlot.Plotly"
//Plotting functionalities
using XPlot.Plotly;
var chart = Chart.Plot(
new Graph.Scattergl()
{
x = housingData["logitude"],
y = housingData["latitude"],
mode = "markers",
marker = new Graph.Marker()
{
color = housingData["median_house_value"],
colorscale = "Jet"
}
}
);
chart.Width = 600;
chart.Height = 600;
display(chart);
```
NET (F#)、NET (PowerShell)、Python 3」
2020-01-15
移動 DockerDesktop.vhdx 到其他磁碟
markdown
原資料路徑 `C:\Users\[UserName]\Public\Documents\Hyper-V\Virtual hard disks\DockerDesktop.vhdx`
移動後路徑 `D:\Hyper-V\Public\DockerDesktop.vhdx`
修改 `C:\Users\[UserName]\AppData\Roaming\Docker\settings.json` 的 `dataFolder`,設定成 `D:\Hyper-V\Public\`
## 參考
[Move Docker for Windows Hyper-V Disk VHDX to another drive](https://wp.sjkp.dk/move-docker-for-windows-hyper-v-disk-vhdx-to-another-drive/)
2020-01-09
Kali Linux 網路連線失敗
markdown
```
cd /etc/NetworkManager
```
修改 `NetworkManager.conf`,將 managed=false 改成 managed=true
```
[main]
plugins=ifupdown,keyfile
[ifupdown]
managed=true
```
將 network-manager 重啟,網路即可正常連線
```
service network-manager restart
```
2019-10-04
openvas image for docker 的安裝和掃描
markdown
這篇文章介紹使用 OpenVAS 作為系統的弱點掃描工具,掃描單一IP 或是 IP 區段,這裡使用建立在 Docker 環境的 openvas 容器執行弱點掃描。
# OpenVAS image for Docker
在資訊安全領域中 Nessus 是被人熟知的系統弱點掃描工具,CVE 的涵蓋範圍和掃描準確度都高於業界的類似軟體,我們在工作中有可能會需要這樣的工具協助我們發現問題。大家一定都知道:「錢能解決的問題都不是問題」,這在資訊領域也通用,像是機器負荷不了,花錢提昇機器硬體。
 就是因為常常沒有足夠的經費給我們購買好用的工具,所以需要尋找替代方案,這裡就用 OpenVAS 來進行系統弱點掃描。
詳細圖文看 [OpenVAS Docker Image](https://github.com/WenWei/docs/blob/master/OpenVAS_Docker_Image/OpenVAS_Docker_Image.md)
就是因為常常沒有足夠的經費給我們購買好用的工具,所以需要尋找替代方案,這裡就用 OpenVAS 來進行系統弱點掃描。
詳細圖文看 [OpenVAS Docker Image](https://github.com/WenWei/docs/blob/master/OpenVAS_Docker_Image/OpenVAS_Docker_Image.md)
 就是因為常常沒有足夠的經費給我們購買好用的工具,所以需要尋找替代方案,這裡就用 OpenVAS 來進行系統弱點掃描。
詳細圖文看 [OpenVAS Docker Image](https://github.com/WenWei/docs/blob/master/OpenVAS_Docker_Image/OpenVAS_Docker_Image.md)
就是因為常常沒有足夠的經費給我們購買好用的工具,所以需要尋找替代方案,這裡就用 OpenVAS 來進行系統弱點掃描。
詳細圖文看 [OpenVAS Docker Image](https://github.com/WenWei/docs/blob/master/OpenVAS_Docker_Image/OpenVAS_Docker_Image.md)
2019-06-21
使用 SSH 連入 Windows 10 的 docker VM (MobyLinuxVM)
markdown
因為使用 `docker volume create --name voluem_name` 指令建立的內容會儲存在 docker vm 中,上網查到連入 docker vm 的連線方式:
docker run --privileged -it -v /var/run/docker.sock:/var/run/docker.sock jongallant/ubuntu-docker-client
docker run --net=host --ipc=host --uts=host --pid=host -it --security-opt=seccomp=unconfined --privileged --rm -v /:/host alpine /bin/sh
chroot /host2019-06-20
PostgreSQL 的資料庫名稱帶 \r 的刪除方式
markdown
在 postgresql 命令操作下查資料庫名稱
```
Name |
------------------|
DATABASE_NAME\r |
```
資料庫名後面帶有 `\r`,多出 `\r` 的原因是建立資料時透過 shell script,而這個 shell script 是在 Windows 環境的IDE編輯。所以覆製到 ubuntu 環境執行造成資料庫名稱多帶 `\r`。
`\r` 的 byte 值是數值 `13`,13 轉 16進位(HEX 字串) 是 `0D`,
要移除資料庫的指令是將資料庫名指定 unicode 格式,將 `\r` 轉為 unicode 格式的 `\000D`,完整指令如下:
drop database U&"DATABASE_NAME\000D";或是更改資料庫名稱
alter database U&"DATABASE_NAME\000D" rename to "DATABASE_NAME_NEW";
2019-06-10
javascript 前端,使用 google-protobuf,後端用 asp.net core 2 接收
markdown
這篇是記錄在 Windows 10 環境中的 ASP.Net Core 的 WebAPI 使用 protobuf 取代 json 的資料傳輸
[本文範例程式碼](https://github.com/WenWei/ProtobufWebSample)
系統中需已預安裝:
- 安裝 .NET Core 2.2
- 安裝 protoc.exe
- 安裝 Browserify
## protoc.exe 安裝
到 GitHub 的 [Protocol Buffers Releases](https://github.com/protocolbuffers/protobuf/releases) [下載 protoc-3.8.0-win64.zip](https://github.com/protocolbuffers/protobuf/releases/download/v3.8.0/protoc-3.8.0-win64.zip)
我是解壓到 C:\bin,這裡的 c:\bin 是已加到環境變數 PATH 中。
```
C:\bin
├───include
│ └───google
│ └───protobuf
└───protoc.exe
```
## Browserify 安裝
```
npm install browserify -g
```
## 專案檔案結構
此文建立的範例專案名稱: ProtobufWebSample 省略部份檔案和目錄後結構如下:
```
~/ProtobufWebSample
├───ProtobufWeb
│ ├───Controllers
│ │ └───EchoController.cs
│ └───ProtobufWeb.csproj
└───protos
├───EchoData.proto
└───gen.bat
```
## 新增 asp.net core 的 WebAPI 專案
Post([FromBody] EchoData value)
{
value.Text = $"ECHO: {value.Text}";
return value;
}
}
}
```
## 要能接收和傳送 protobuf 格式,要建立 formatter
`ProtobufWeb/Formatters/ProtobufFormatter.cs`
```
namespace ProtobufWeb.Formatters
{
using Google.Protobuf;
using Microsoft.AspNetCore.Mvc;
using Microsoft.AspNetCore.Mvc.Formatters;
using Microsoft.Extensions.DependencyInjection;
using Microsoft.Net.Http.Headers;
using System.Threading.Tasks;
using System.Collections.Generic;
using System;
public static class ServicesConfiguration
{
public static void AddProtobufFormatter(this IServiceCollection services)
{
services.Configure(options =>
{
options.InputFormatters.Add(new ProtobufInputFormatter(new ProtobufFormatterOptions()));
options.OutputFormatters.Add(new ProtobufOutputFormatter(new ProtobufFormatterOptions()));
options.FormatterMappings.SetMediaTypeMappingForFormat("protobuf", Microsoft.Net.Http.Headers.MediaTypeHeaderValue.Parse("application/x-protobuf"));
});
}
}
public class ProtobufFormatterOptions
{
public HashSet SupportedContentTypes { get; set; } = new HashSet { "application/x-protobuf", "application/protobuf", "application/x-google-protobuf" };
public HashSet SupportedExtensions { get; set; } = new HashSet { "proto" };
public bool SuppressReadBuffering { get; set; } = false;
}
public class ProtobufInputFormatter : InputFormatter
{
private readonly ProtobufFormatterOptions _options;
public ProtobufInputFormatter(ProtobufFormatterOptions protobufFormatterOptions)
{
_options = protobufFormatterOptions ?? throw new ArgumentNullException(nameof(protobufFormatterOptions));
foreach (var contentType in protobufFormatterOptions.SupportedContentTypes)
{
SupportedMediaTypes.Add(new MediaTypeHeaderValue(contentType));
}
}
public override Task ReadRequestBodyAsync(InputFormatterContext context)
{
try
{
var request = context.HttpContext.Request;
var obj = (IMessage)Activator.CreateInstance(context.ModelType);
obj.MergeFrom(request.Body);
return InputFormatterResult.SuccessAsync(obj);
}
catch (Exception ex)
{
Console.WriteLine("Exception: " + ex);
return InputFormatterResult.FailureAsync();
}
}
}
public class ProtobufOutputFormatter : OutputFormatter
{
private readonly ProtobufFormatterOptions _options;
public string ContentType { get; private set; }
public ProtobufOutputFormatter(ProtobufFormatterOptions protobufFormatterOptions)
{
ContentType = "application/x-protobuf";
_options = protobufFormatterOptions ?? throw new ArgumentNullException(nameof(protobufFormatterOptions));
foreach (var contentType in protobufFormatterOptions.SupportedContentTypes)
{
SupportedMediaTypes.Add(new MediaTypeHeaderValue(contentType));
}
}
public override Task WriteResponseBodyAsync(OutputFormatterWriteContext context)
{
var response = context.HttpContext.Response;
// Proto-encode
var protoObj = context.Object as IMessage;
var serialized = protoObj.ToByteArray();
return response.Body.WriteAsync(serialized, 0, serialized.Length);
}
}
}
```
到 startup.cs 加入 `services.AddProtobufFormatter();`,startup.cs 完整內容如下:
```
using System;
using System.Collections.Generic;
using System.Linq;
using System.Threading.Tasks;
using Microsoft.AspNetCore.Builder;
using Microsoft.AspNetCore.Hosting;
using Microsoft.AspNetCore.HttpsPolicy;
using Microsoft.AspNetCore.Mvc;
using Microsoft.Extensions.Configuration;
using Microsoft.Extensions.DependencyInjection;
using Microsoft.Extensions.Logging;
using Microsoft.Extensions.Options;
using ProtobufWeb.Formatters;
namespace ProtobufWeb
{
public class Startup
{
public Startup(IConfiguration configuration)
{
Configuration = configuration;
}
public IConfiguration Configuration { get; }
// This method gets called by the runtime. Use this method to add services to the container.
public void ConfigureServices(IServiceCollection services)
{
services.AddMvc().SetCompatibilityVersion(CompatibilityVersion.Version_2_2);
services.AddProtobufFormatter();
}
// This method gets called by the runtime. Use this method to configure the HTTP request pipeline.
public void Configure(IApplicationBuilder app, IHostingEnvironment env)
{
if (env.IsDevelopment())
{
app.UseDeveloperExceptionPage();
}
else
{
// The default HSTS value is 30 days. You may want to change this for production scenarios, see https://aka.ms/aspnetcore-hsts.
app.UseHsts();
}
DefaultFilesOptions options = new DefaultFilesOptions();
options.DefaultFileNames.Clear();
options.DefaultFileNames.Add("index.html");
app.UseDefaultFiles(options);
app.UseStaticFiles();
app.UseHttpsRedirection();
app.UseMvc();
}
}
}
```
## 建立測試頁 `ProtobufWebSample/ProtobufWeb/wwwroot/index.html`
```
mkdir wwwroot
mkdir wwwroot/scripts
```
將 bundle.js 移到 wwwroot/scripts 資料夾
建立 index.html 內容如下
```
Document
```
## 執行網站,啟動 開發者工具查看結果
啟動網站
```
dotnet run
```
瀏覽器開啟 http://localhost:5001/index.html
使用開發者工具查看 Network 欄位的傳送結果
## 參考資料
* [Protocol Buffers - C# Generated Code](https://developers.google.com/protocol-buffers/docs/reference/csharp-generated)
* [Protocol Buffers - JavaScript Generated Code](https://developers.google.com/protocol-buffers/docs/reference/javascript-generated)
* [protobuf 前端怎么使用 - 蝈蝈250 - 2017/11/21](https://blog.csdn.net/vteihlll/article/details/78592976)
mkdir ProtobufWebSample
cd ProtobufWebSample
mkdir ProtobufWeb
cd ProtobufWeb
dotnet new webapidotnet add package Google.Protobufprotoc.exe --proto_path=路徑\ProtobufWebSample\protos --js_out=路徑\ProtobufWebSample\protos\gen\csharp 路徑\ProtobufWebSample\protos\EchoData.protoprotoc.exe --proto_path=路徑\ProtobufWebSample\protos --csharp_out=路徑\ProtobufWebSample\protos\gen\js路徑\ProtobufWebSample\protos\EchoData.proto2019-05-04
在 Windows 10 的 GoLang 使用 sqlite3 出現 gcc executable file not found in %PATH%
markdown
# go 使用 go-sqlite3 出現錯誤
執行 `go get github.com/mattn/go-sqlite3` 出現以下錯誤
```
exec: "gcc": executable file not found in %PATH%
```
原因是 sqlite3 是個 cgo 庫,需要使用 gcd 編譯 c 的源碼,
所以需要下載安裝tdm-gcc即可正常編譯。
[下載Windows版本 TDM-GCC](http://tdm-gcc.tdragon.net/download)
這裡下載 `tdm64-gcc-5.1.0-2.exe` 後進行安裝,預設安裝到 `C:\TDM-GCC-64`
安裝的介面中預設已有勾選將 `C:\TDM-GCC-64\bin` 加入系統環境變數 `%PATH%` 中
2019-03-29
在 Ubuntu 18.04.1 安裝 dotnet-sdk-2.2 出現依類項目不符無法安裝
markdown
將dotnet-sdk-2.2 安裝到 Ubuntu 18.04.1 時失敗。以
# 官網安裝方法(安裝失敗)
[Install .NET Core SDK on Linux Ubuntu 18.04 - x64](https://dotnet.microsoft.com/download/linux-package-manager/ubuntu18-04/sdk-current)
wget -q https://packages.microsoft.com/config/ubuntu/18.04/packages-microsoft-prod.deb
sudo dpkg -i packages-microsoft-prod.deb
sudo add-apt-repository universe
sudo apt-get install apt-transport-https
sudo apt-get update
sudo apt-get install dotnet-sdk-2.2curl https://packages.microsoft.com/keys/microsoft.asc | gpg --dearmor > microsoft.gpg
sudo mv microsoft.gpg /etc/apt/trusted.gpg.d/microsoft.gpg
sudo sh -c 'echo "deb [arch=amd64] https://packages.microsoft.com/repos/microsoft-ubuntu-bionic-prod bionic main" > /etc/apt/sources.list.d/dotnetdev.list'
sudo apt-get install apt-transport-https
sudo apt-get update
sudo apt-get install dotnet-sdk-2.22019-03-15
在 Ubuntu 18.04.1 的 IBus 上安裝大易(DAYI)輸入法
markdown
# 在 Ubuntu 18.04.1 的 IBus 上安裝大易輸入法
### 下載安裝腳本
```
$ wget https://raw.githubusercontent.com/Alger23/ubuntu_dayi_for_ibus/master/dayisetup.sh
```
### 下載大易三碼字根檔
```
$ wget https://raw.githubusercontent.com/Alger23/ubuntu_dayi_for_ibus/master/dayi3.cin
```
### 執行安裝腳本
```
$ chmod u+x dayisetup.sh
$ sudo ./dayisetup.sh
```
### ibus 設定大易輸入法
```
$ ibus-setup
```
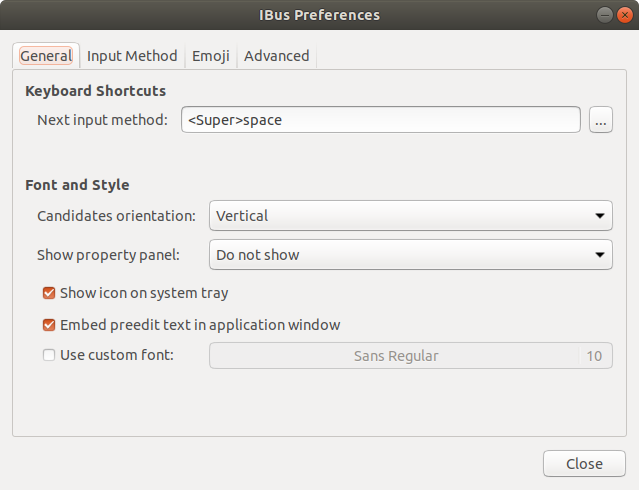
* 經由 ibus-setup 指令開啟的 ibus 設定畫面
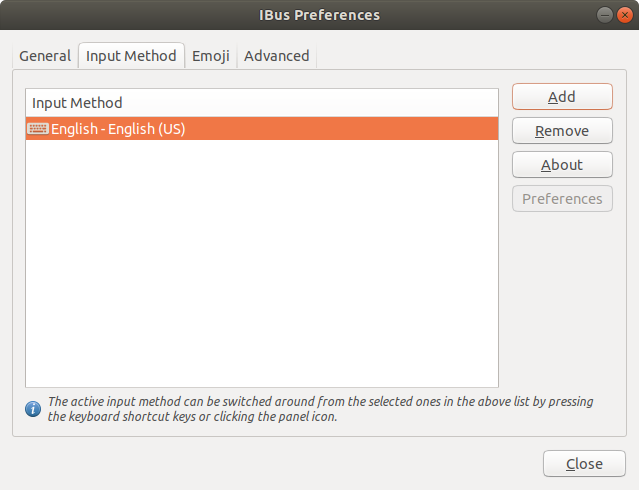
 * 切換到 Input Method 頁籤
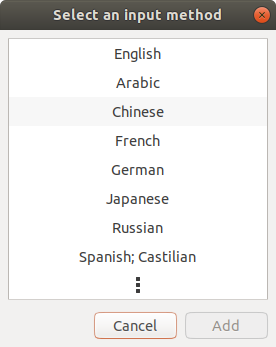
 * 選取 Chinese
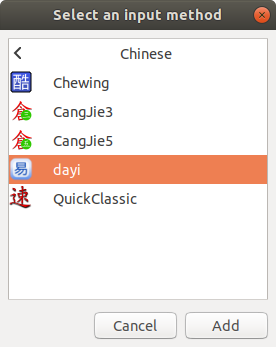
 * 選取 dayi,按下 【Add】
 * 選取 Chinese-dayi ,設定【Preferences】
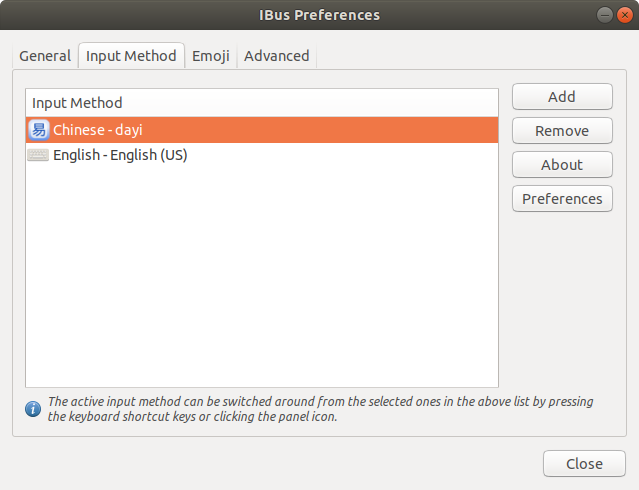 * 將 Chinese mode: 設定為 Traditional Chinese,按下【Close】
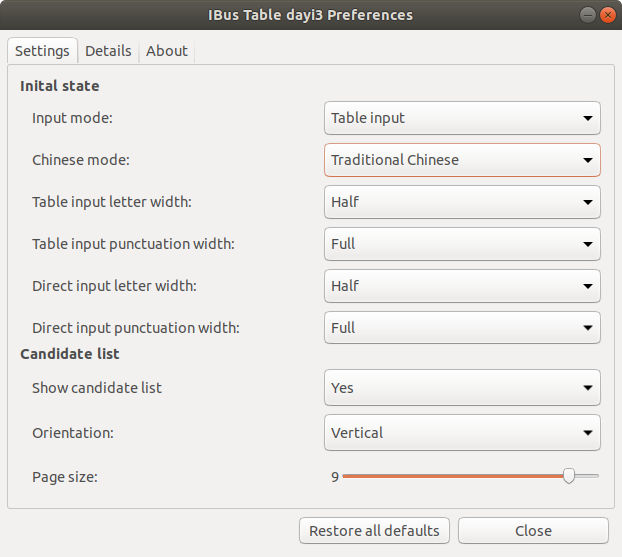 * IBus Preferences 畫面再按下【Close】,完成 ibus 的大易輸入法設定
* 右上角的小工具,展開,選擇設定(Settings)。
* IBus Preferences 畫面再按下【Close】,完成 ibus 的大易輸入法設定
* 右上角的小工具,展開,選擇設定(Settings)。
 * 選取區域和語言(Region & Language),在輸入來源(Input Sources)點選「加號」
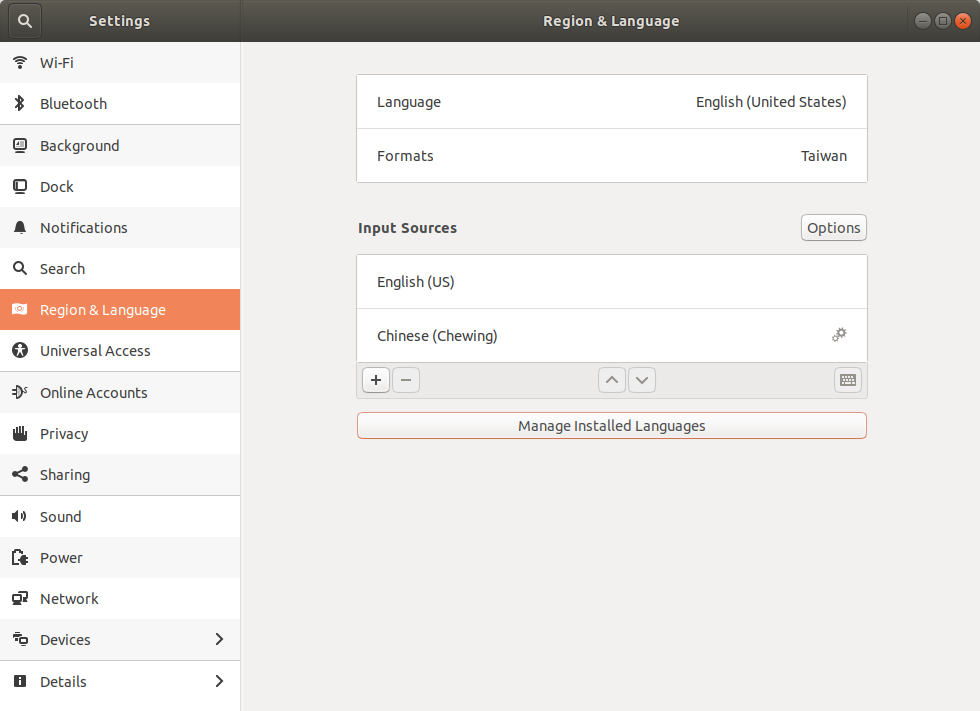 * 選擇輸入來源為「Chinese (Taiwan)」
2019-03-20 補充:此步驟在 Ubuntu 18.04.2 直接查 Chinese,會列出 Chinese(輸入法),國別名稱那層不見了
* 選擇輸入來源為「Chinese (Taiwan)」
2019-03-20 補充:此步驟在 Ubuntu 18.04.2 直接查 Chinese,會列出 Chinese(輸入法),國別名稱那層不見了
 * 選擇 Chinese (dayi),然後按下【Add】
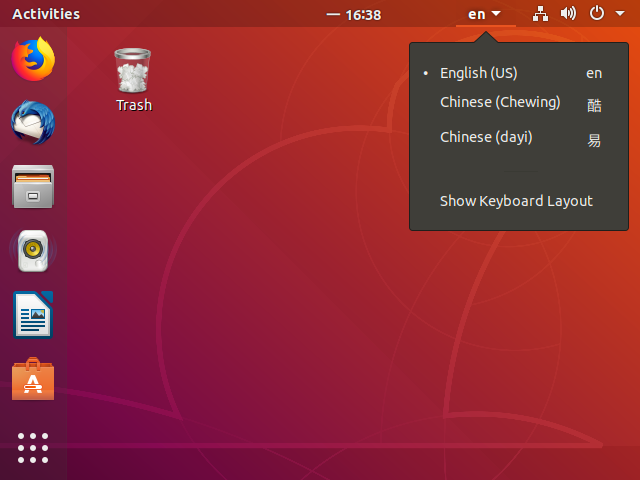
 * 此時可以在 Input Sources 的區域看到新加入的大易輸入法「Chinese (dayi)」,關閉此視窗
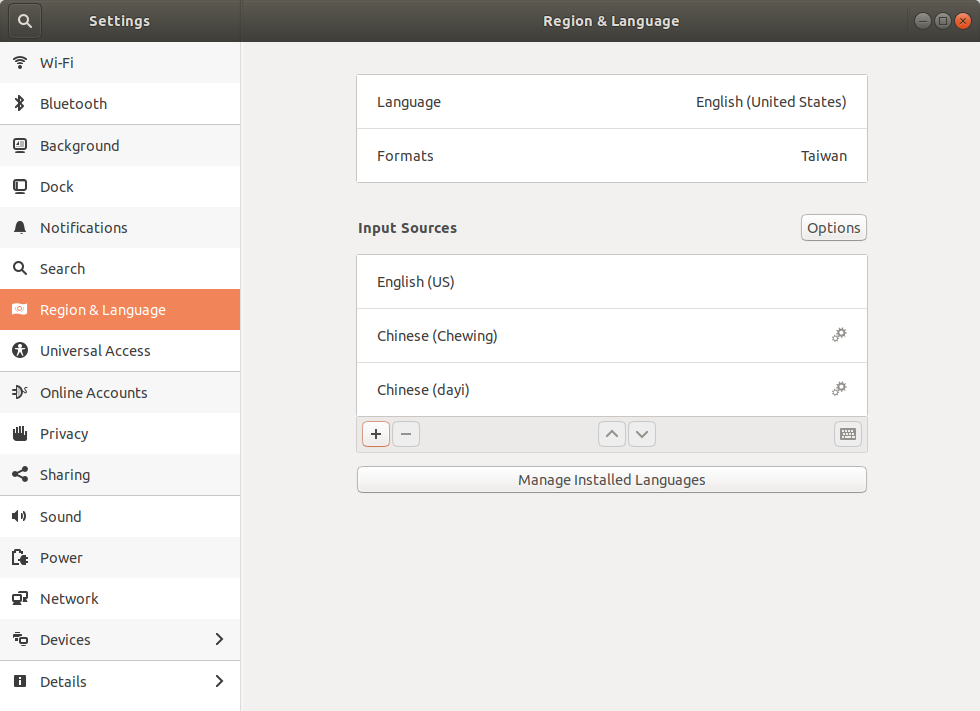 * 在右上角的輸入法已經能切換至大易輸入法了
 ## 己知打不出來的字
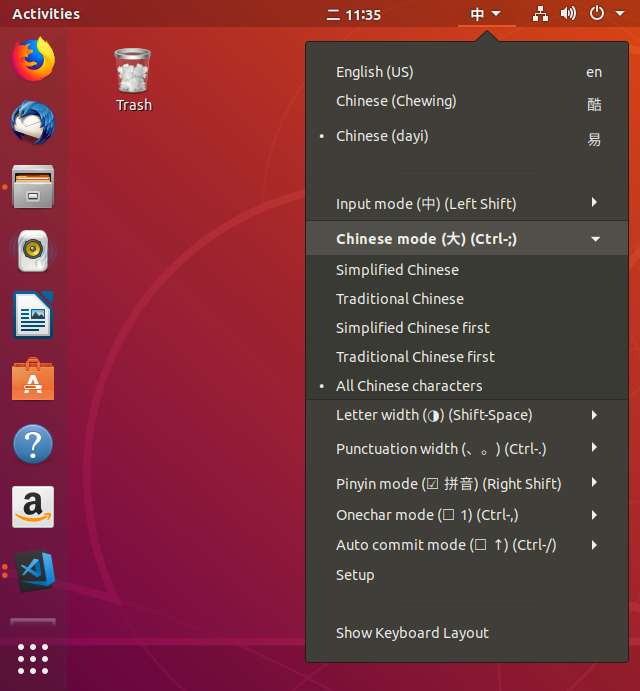
如果在 Chinese mode 選擇繁體中文,已知下列字打不出來
```
/mo 向
o8 只
```
所以將 Chinese mode 選擇 All Chinese Characters,字會出來但排序不同
## 己知打不出來的字
如果在 Chinese mode 選擇繁體中文,已知下列字打不出來
```
/mo 向
o8 只
```
所以將 Chinese mode 選擇 All Chinese Characters,字會出來但排序不同
 ## 已知問題
* 無法用 '[]-\ 選字,要用 Ctrl + 數字
## 已知問題
* 無法用 '[]-\ 選字,要用 Ctrl + 數字
* 切換到 Input Method 頁籤
* 選取 Chinese
* 選取 dayi,按下 【Add】
* 選取 Chinese-dayi ,設定【Preferences】
* 將 Chinese mode: 設定為 Traditional Chinese,按下【Close】
* IBus Preferences 畫面再按下【Close】,完成 ibus 的大易輸入法設定
* 右上角的小工具,展開,選擇設定(Settings)。
* 選取區域和語言(Region & Language),在輸入來源(Input Sources)點選「加號」
* 選擇輸入來源為「Chinese (Taiwan)」
2019-03-20 補充:此步驟在 Ubuntu 18.04.2 直接查 Chinese,會列出 Chinese(輸入法),國別名稱那層不見了
* 選擇 Chinese (dayi),然後按下【Add】
* 此時可以在 Input Sources 的區域看到新加入的大易輸入法「Chinese (dayi)」,關閉此視窗
* 在右上角的輸入法已經能切換至大易輸入法了
## 己知打不出來的字
如果在 Chinese mode 選擇繁體中文,已知下列字打不出來
```
/mo 向
o8 只
```
所以將 Chinese mode 選擇 All Chinese Characters,字會出來但排序不同
## 已知問題
* 無法用 '[]-\ 選字,要用 Ctrl + 數字
2019-03-13
Ubuntu 18.04 設定靜態 IP
markdown
設定 Ubuntu 18.04 靜態 IP
先要查出網卡的名稱
mtu 1500
inet 172.17.0.1 netmask 255.255.0.0 broadcast 172.17.255.255
ether 02:42:54:82:ea:09 txqueuelen 0 (Ethernet)
RX packets 0 bytes 0 (0.0 B)
RX errors 0 dropped 0 overruns 0 frame 0
TX packets 0 bytes 0 (0.0 B)
TX errors 0 dropped 0 overruns 0 carrier 0 collisions 0
eth0: flags=4163 mtu 1500
inet 192.168.88.88 netmask 255.255.240.0 broadcast 192.168.95.255
inet6 fe80::215:5dff:fe58:7316 prefixlen 64 scopeid 0x20
ether 00:15:5d:58:73:16 txqueuelen 1000 (Ethernet)
RX packets 609415 bytes 783165377 (783.1 MB)
RX errors 0 dropped 3521 overruns 0 frame 0
TX packets 94741 bytes 7497987 (7.4 MB)
TX errors 0 dropped 0 overruns 0 carrier 0 collisions 0
lo: flags=73 mtu 65536
inet 127.0.0.1 netmask 255.0.0.0
inet6 ::1 prefixlen 128 scopeid 0x10
loop txqueuelen 1000 (Local Loopback)
RX packets 170 bytes 13177 (13.1 KB)
RX errors 0 dropped 0 overruns 0 frame 0
TX packets 170 bytes 13177 (13.1 KB)
TX errors 0 dropped 0 overruns 0 carrier 0 collisions 0
```
在我的環境中能看到三個網路介面卡,docker0 是安裝 docker 產生的虛擬交換器,是要給docker的容器使用的。lo 是 loop back 的介面卡。這邊實際要設定的網路卡名稱是 eth0。
如果在 /etc/netplan/ 路徑中沒有設定檔,那可能你安裝系統時就沒有網路卡,所以 ubuntu 沒有自動產生。那就要自己用 `sudo netplan generate` 指令產生一個設定檔。
if config -asudo netplan generatecat /etc/netplan/50-cloud-init.yaml# This file is generated from information provided by
# the datasource. Changes to it will not persist across an instance.
# To disable cloud-init's network configuration capabilities, write a file
# /etc/cloud/cloud.cfg.d/99-disable-network-config.cfg with the following:
# network: {config: disabled}
network:
ethernets:
eth0:
dhcp4: true
version: 2sudo netplan apply
訂閱:
文章 (Atom)