2019-03-29

在 Ubuntu 18.04.1 安裝 dotnet-sdk-2.2 出現依類項目不符無法安裝

將dotnet-sdk-2.2 安裝到 Ubuntu 18.04.1 時失敗。以

官網安裝方法(安裝失敗)

Install .NET Core SDK on Linux Ubuntu 18.04 - x64

wget -q https://packages.microsoft.com/config/ubuntu/18.04/packages-microsoft-prod.deb
sudo dpkg -i packages-microsoft-prod.deb
sudo add-apt-repository universe
sudo apt-get install apt-transport-https
sudo apt-get update
sudo apt-get install dotnet-sdk-2.2

安裝失敗,得到以下訊息

Reading package lists... Done
Building dependency tree       
Reading state information... Done
Some packages could not be installed. This may mean that you have
requested an impossible situation or if you are using the unstable
distribution that some required packages have not yet been created
or been moved out of Incoming.
The following information may help to resolve the situation:

The following packages have unmet dependencies:
 dotnet-sdk-2.2 : Depends: aspnetcore-runtime-2.2 (>= 2.2.3) but it is not going to be installed
                  Depends: dotnet-runtime-2.2 (>= 2.2.3) but it is not going to be installed
E: Unable to correct problems, you have held broken packages.

stackoverflow Derviş Kayımbaşıoğlu 的方式(安裝成功)

curl https://packages.microsoft.com/keys/microsoft.asc | gpg --dearmor > microsoft.gpg
sudo mv microsoft.gpg /etc/apt/trusted.gpg.d/microsoft.gpg
sudo sh -c 'echo "deb [arch=amd64] https://packages.microsoft.com/repos/microsoft-ubuntu-bionic-prod bionic main" > /etc/apt/sources.list.d/dotnetdev.list'

sudo apt-get install apt-transport-https
sudo apt-get update
sudo apt-get install dotnet-sdk-2.2

2019-03-15

在 Ubuntu 18.04.1 的 IBus 上安裝大易(DAYI)輸入法

在 Ubuntu 18.04.1 的 IBus 上安裝大易輸入法

下載安裝腳本

$ wget https://raw.githubusercontent.com/Alger23/ubuntu_dayi_for_ibus/master/dayisetup.sh

下載大易三碼字根檔

$ wget https://raw.githubusercontent.com/Alger23/ubuntu_dayi_for_ibus/master/dayi3.cin

執行安裝腳本

$ chmod u+x dayisetup.sh
$ sudo ./dayisetup.sh

ibus 設定大易輸入法

$ ibus-setup
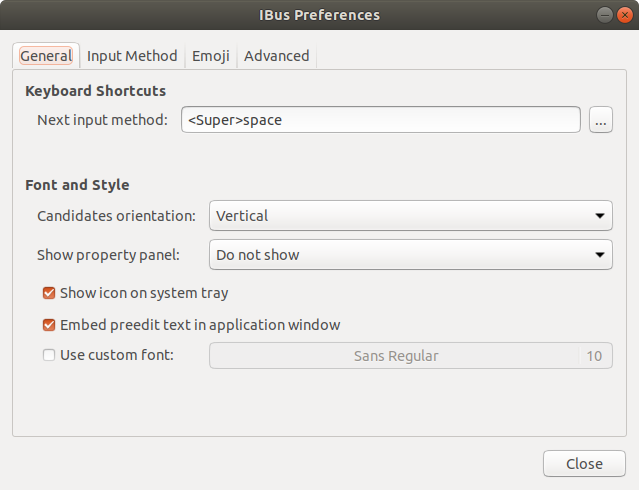
  • 經由 ibus-setup 指令開啟的 ibus 設定畫面

ibus 設定畫面

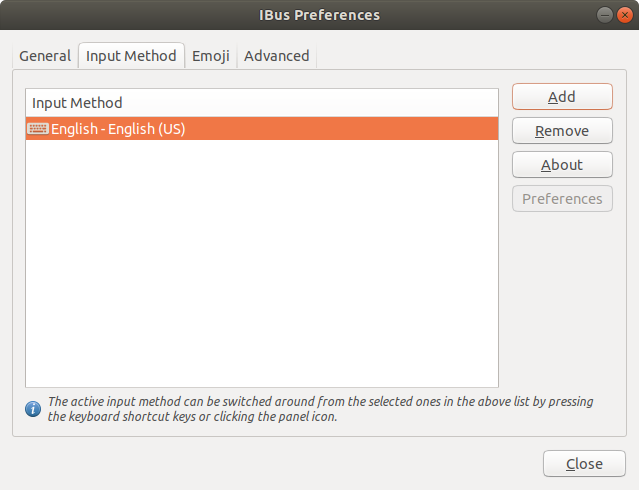
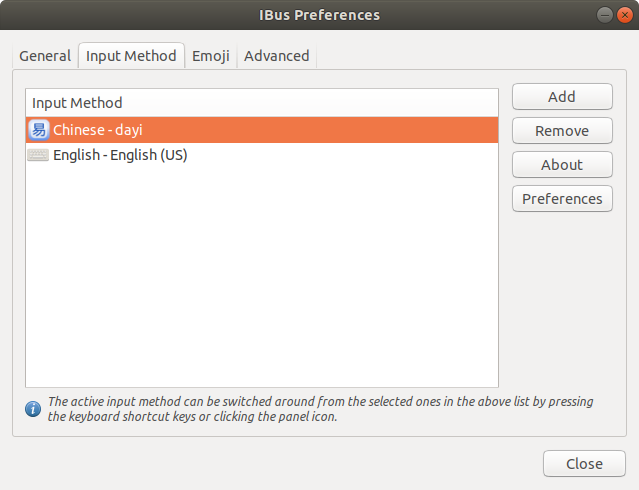
  • 切換到 Input Method 頁籤

ibus-input method

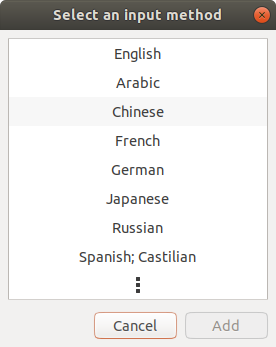
  • 選取 Chinese

ibus-add input method

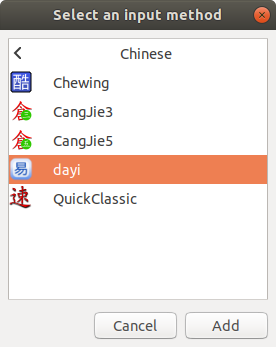
  • 選取 dayi,按下 【Add】

ibus-add dayi

  • 選取 Chinese-dayi ,設定【Preferences】

Preferences

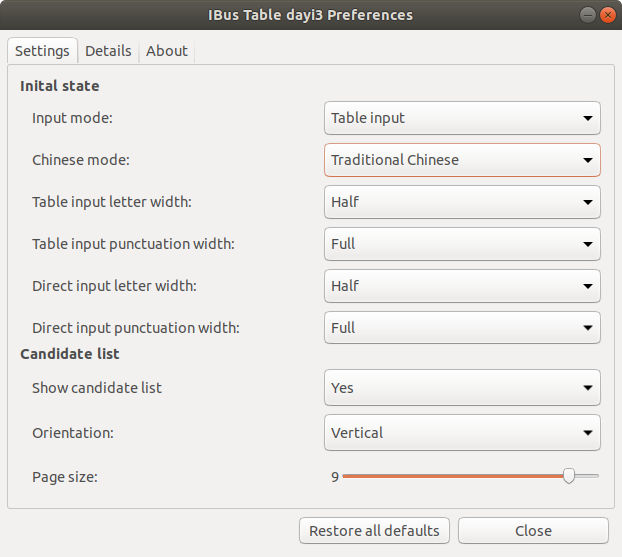
  • 將 Chinese mode: 設定為 Traditional Chinese,按下【Close】

Chinese Mode = Traditional Chinese

  • IBus Preferences 畫面再按下【Close】,完成 ibus 的大易輸入法設定

  • 右上角的小工具,展開,選擇設定(Settings)。

Settings

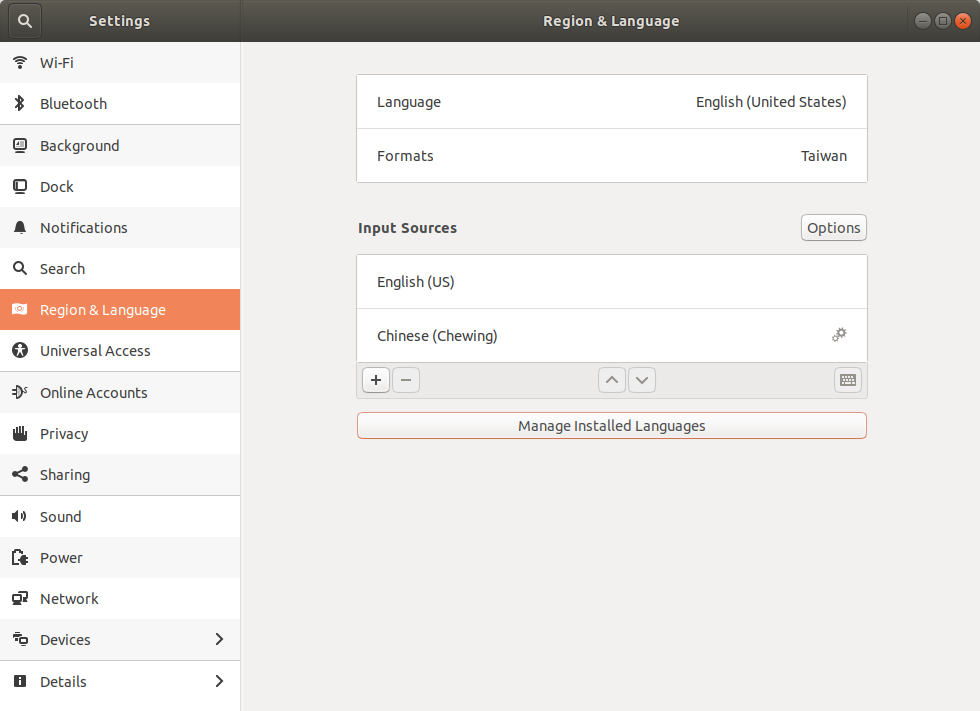
  • 選取區域和語言(Region & Language),在輸入來源(Input Sources)點選「加號」

Select Plus Symbol Button

  • 選擇輸入來源為「Chinese (Taiwan)」

2019-03-20 補充:此步驟在 Ubuntu 18.04.2 直接查 Chinese,會列出 Chinese(輸入法),國別名稱那層不見了

Select Taiwan

  • 選擇 Chinese (dayi),然後按下【Add】

Select dayi

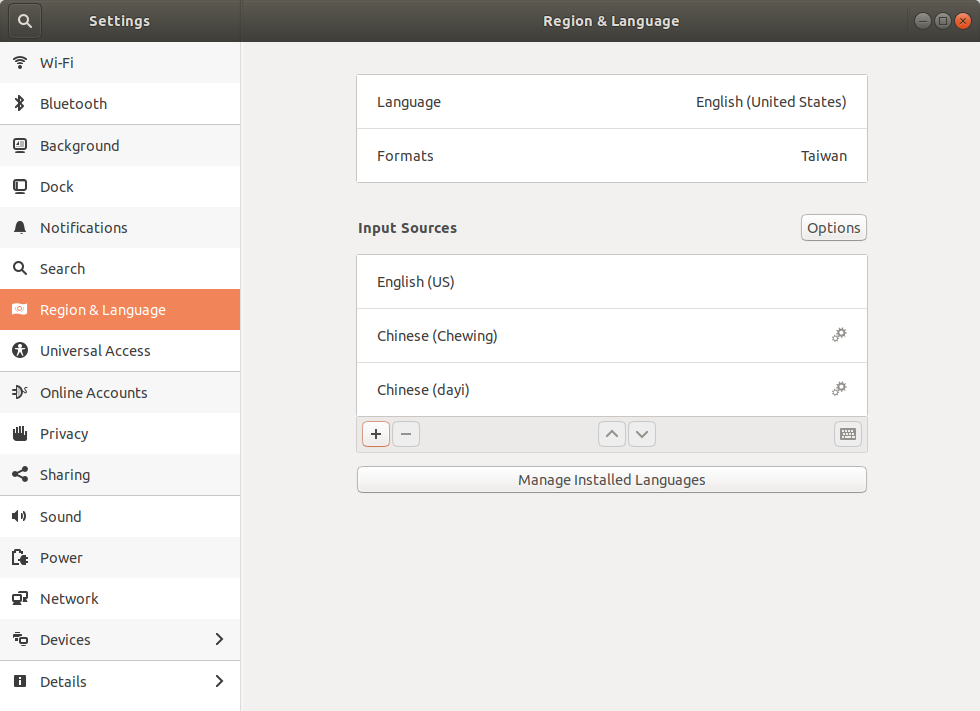
  • 此時可以在 Input Sources 的區域看到新加入的大易輸入法「Chinese (dayi)」,關閉此視窗

dayi

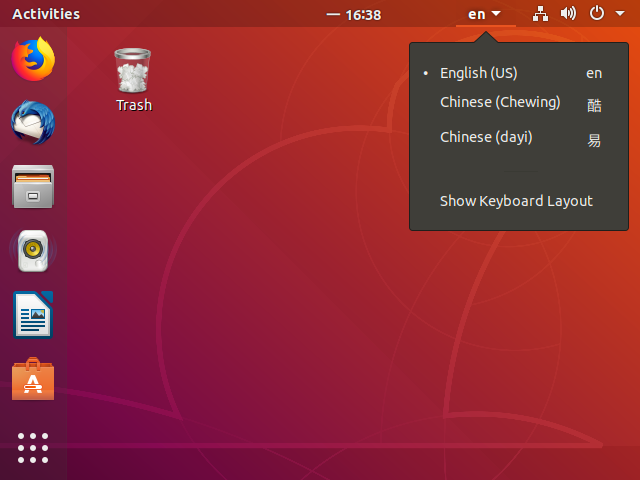
  • 在右上角的輸入法已經能切換至大易輸入法了

input method

己知打不出來的字

如果在 Chinese mode 選擇繁體中文,已知下列字打不出來

/mo 
o8  

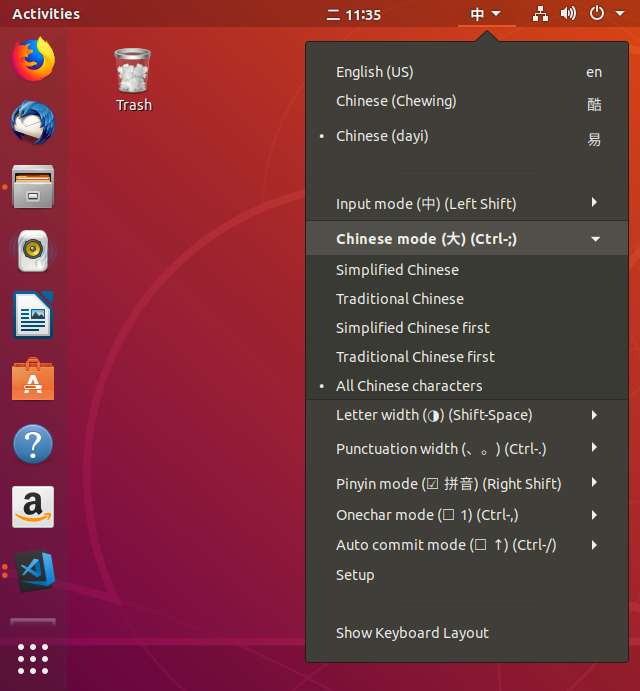
所以將 Chinese mode 選擇 All Chinese Characters,字會出來但排序不同

chinese mode

已知問題

  • 無法用 '[]-\ 選字,要用 Ctrl + 數字

2019-03-13

Ubuntu 18.04 設定靜態 IP

設定 Ubuntu 18.04 靜態 IP

先要查出網卡的名稱

if config -a

查出來的結果:

docker0: flags=4099<up,broadcast,multicast>  mtu 1500
        inet 172.17.0.1  netmask 255.255.0.0  broadcast 172.17.255.255
        ether 02:42:54:82:ea:09  txqueuelen 0  (Ethernet)
        RX packets 0  bytes 0 (0.0 B)
        RX errors 0  dropped 0  overruns 0  frame 0
        TX packets 0  bytes 0 (0.0 B)
        TX errors 0  dropped 0 overruns 0  carrier 0  collisions 0

eth0: flags=4163<up,broadcast,running,multicast>  mtu 1500
        inet 192.168.88.88  netmask 255.255.240.0  broadcast 192.168.95.255
        inet6 fe80::215:5dff:fe58:7316  prefixlen 64  scopeid 0x20<link>
        ether 00:15:5d:58:73:16  txqueuelen 1000  (Ethernet)
        RX packets 609415  bytes 783165377 (783.1 MB)
        RX errors 0  dropped 3521  overruns 0  frame 0
        TX packets 94741  bytes 7497987 (7.4 MB)
        TX errors 0  dropped 0 overruns 0  carrier 0  collisions 0

lo: flags=73<up,loopback,running>  mtu 65536
        inet 127.0.0.1  netmask 255.0.0.0
        inet6 ::1  prefixlen 128  scopeid 0x10<host>
        loop  txqueuelen 1000  (Local Loopback)
        RX packets 170  bytes 13177 (13.1 KB)
        RX errors 0  dropped 0  overruns 0  frame 0
        TX packets 170  bytes 13177 (13.1 KB)
        TX errors 0  dropped 0 overruns 0  carrier 0  collisions 0

在我的環境中能看到三個網路介面卡,docker0 是安裝 docker 產生的虛擬交換器,是要給docker的容器使用的。lo 是 loop back 的介面卡。這邊實際要設定的網路卡名稱是 eth0。

如果在 /etc/netplan/ 路徑中沒有設定檔,那可能你安裝系統時就沒有網路卡,所以 ubuntu 沒有自動產生。那就要自己用 sudo netplan generate 指令產生一個設定檔。

sudo netplan generate

我的環境在安裝時就已經有一個檔案50-cloud-init.yaml,所以直接編輯。原始內容如下:

cat /etc/netplan/50-cloud-init.yaml
# This file is generated from information provided by
# the datasource.  Changes to it will not persist across an instance.
# To disable cloud-init's network configuration capabilities, write a file
# /etc/cloud/cloud.cfg.d/99-disable-network-config.cfg with the following:
# network: {config: disabled}
network:
    ethernets:
        eth0:
            dhcp4: true
    version: 2

這裡我透過編輯器將內容修改如下:

# This file is generated from information provided by
# the datasource.  Changes to it will not persist across an instance.
# To disable cloud-init's network configuration capabilities, write a file
# /etc/cloud/cloud.cfg.d/99-disable-network-config.cfg with the following:
# network: {config: disabled}
network:
    ethernets:
        eth0:
            dhcp4: no
            addresses: [192.168.88.88/24]
            gateway4: 192.168.88.254
            nameservers:
                    addresses: [168.95.1.1, 8.8.8.8]
    version: 2
  • eth0: 網路介面卡名稱
  • dhcp4 或 dhcp6: dhcp 設定,各別是 IPv4 或 IPv6。yes|no
  • addresses: 靜態IP設定
  • gateway4: IPv4 的網路閘道
  • nameservers: 域名解析伺服器

設定完後後要將設定套用

sudo netplan apply

2019-03-08

Docker 基本操作指令

映像檔(Image)

$ docker search ubuntu
$ docker search --automated=true -s 3 ubuntu
Flag --automated has been deprecated, use --filter=is-automated=true instead
Flag --stars has been deprecated, use --filter=stars=3 instead
NAME                                                   DESCRIPTION                                     STARS               OFFICIAL            AUTOMATED
dorowu/ubuntu-desktop-lxde-vnc                         Docker image to provide HTML5 VNC interface    275                                     [OK]
rastasheep/ubuntu-sshd                                 Dockerized SSH service, built on top of offi   205                                     [OK]
consol/ubuntu-xfce-vnc                                 Ubuntu container with "headless" VNC session   158                                     [OK]
ansible/ubuntu14.04-ansible                            Ubuntu 14.04 LTS with ansible                   96                                      [OK]
1and1internet/ubuntu-16-nginx-php-phpmyadmin-mysql-5   ubuntu-16-nginx-php-phpmyadmin-mysql-5          49                                      [OK]
nuagebec/ubuntu                                        Simple always updated Ubuntu docker images w   23                                      [OK]
1and1internet/ubuntu-16-apache-php-7.0                 ubuntu-16-apache-php-7.0                        13                                      [OK]
eclipse/ubuntu_jdk8                                    Ubuntu, JDK8, Maven 3, git, curl, nmap, mc,    8                                       [OK]
codenvy/ubuntu_jdk8                                    Ubuntu, JDK8, Maven 3, git, curl, nmap, mc,    5                                       [OK]
darksheer/ubuntu                                       Base Ubuntu Image -- Updated hourly             5                                       [OK]

取得映像檔 pull

$ docker pull ubuntu
$ docker pull ubuntu:latest
$ docker pull ubuntu:18.04

查看映像檔訊息 images

$ docker images
REPOSITORY          TAG                 IMAGE ID            CREATED             SIZE
ubuntu              18.04               47b19964fb50        4 weeks ago         88.1MB
ubuntu              latest              47b19964fb50        4 weeks ago         88.1MB

增加映像檔標籤 tag

$ docker tag ubuntu:latest newtagubuntu:latest

$ docker images
REPOSITORY          TAG                 IMAGE ID            CREATED             SIZE
ubuntu              18.04               47b19964fb50        4 weeks ago         88.1MB
ubuntu              latest              47b19964fb50        4 weeks ago         88.1MB
newtagubuntu        latest              47b19964fb50        4 weeks ago         88.1MB

查看詳細資訊 inspect

$ docker inspect ubuntu:18.04
[
    {
        "Id": "sha256:47b19964fb500f3158ae57f20d16d8784cc4af37c52c49d3b4f5bc5eede49541",
        "RepoTags": [
            "ubuntu:18.04",
            "ubuntu:latest"
        ],
        "RepoDigests": [
            "ubuntu@sha256:7a47ccc3bbe8a451b500d2b53104868b46d60ee8f5b35a24b41a86077c650210"
        ],
        "Parent": "",
        "Comment": "",
        "Created": "2019-02-06T03:37:51.599085524Z",
        "Container": "4fcabd24a4d0668c251f05105af1d986b1841713e7af90bf51df172ecefae2fa",
        "ContainerConfig": {
            "Hostname": "4fcabd24a4d0",
            "Domainname": "",
            "User": "",
            "AttachStdin": false,
            "AttachStdout": false,
            "AttachStderr": false,
            "Tty": false,
            "OpenStdin": false,
            "StdinOnce": false,
            "Env": [
                "PATH=/usr/local/sbin:/usr/local/bin:/usr/sbin:/usr/bin:/sbin:/bin"
            ],
            "Cmd": [
                "/bin/sh",
                "-c",
                "#(nop) ",
                "CMD [\"/bin/bash\"]"
            ],
            "ArgsEscaped": true,
            "Image": "sha256:5bbf4643e91ac20eb0ec60930e6d56e36eedab0ae09930a4bd414bb227590d28",
            "Volumes": null,
            "WorkingDir": "",
            "Entrypoint": null,
            "OnBuild": null,
            "Labels": {}
        },
        "DockerVersion": "18.06.1-ce",
        "Author": "",
        "Config": {
            "Hostname": "",
            "Domainname": "",
            "User": "",
            "AttachStdin": false,
            "AttachStdout": false,
            "AttachStderr": false,
            "Tty": false,
            "OpenStdin": false,
            "StdinOnce": false,
            "Env": [
                "PATH=/usr/local/sbin:/usr/local/bin:/usr/sbin:/usr/bin:/sbin:/bin"
            ],
            "Cmd": [
                "/bin/bash"
            ],
            "ArgsEscaped": true,
            "Image": "sha256:5bbf4643e91ac20eb0ec60930e6d56e36eedab0ae09930a4bd414bb227590d28",
            "Volumes": null,
            "WorkingDir": "",
            "Entrypoint": null,
            "OnBuild": null,
            "Labels": null
        },
        "Architecture": "amd64",
        "Os": "linux",
        "Size": 88140808,
        "VirtualSize": 88140808,
        "GraphDriver": {
            "Data": null,
            "Name": "aufs"
        },
        "RootFS": {
            "Type": "layers",
            "Layers": [
                "sha256:bebe7ce6215aee349bee5d67222abeb5c5a834bbeaa2f2f5d05363d9fd68db41",
                "sha256:283fb404ea9415ab48456fd8a82b153b1a719491cdf7b806d1853b047d00f27f",
                "sha256:663e8522d78b5b767f15b2e43885da5975068e3195bbbfa8fc3a082297a361c1",
                "sha256:4b7d93055d8781d27259ba5780938e6a78d8ef691c94ee9abc3616c1b009ec4a"
            ]
        },
        "Metadata": {
            "LastTagTime": "0001-01-01T00:00:00Z"
        }
    }
]

查看建置歷史 history

$ docker history ubuntu:18.04
Got permission denied while trying to connect to the Docker daemon socket at unix:///var/run/docker.sock: Get http://%2Fvar%2Frun%2Fdocker.sock/v1.38/images/ubuntu:18.04/history: dial unix /var/run/docker.sock: connect: permission denied
alger@ocr:~$ sudo docker history ubuntu:18.04
IMAGE               CREATED             CREATED BY                                      SIZE                COMMENT
47b19964fb50        4 weeks ago         /bin/sh -c #(nop)  CMD ["/bin/bash"]            0B
<missing>           4 weeks ago         /bin/sh -c mkdir -p /run/systemd &amp;&amp; echo 'do…   7B
<missing>           4 weeks ago         /bin/sh -c rm -rf /var/lib/apt/lists/*          0B
<missing>           4 weeks ago         /bin/sh -c set -xe   &amp;&amp; echo '#!/bin/sh' &gt; /…   745B
<missing>           4 weeks ago         /bin/sh -c #(nop) ADD file:529264c6593975a61…   88.1MB

刪除映像檔 rmi

$ docker images
REPOSITORY          TAG                 IMAGE ID            CREATED             SIZE
ubuntu              18.04               47b19964fb50        4 weeks ago         88.1MB
ubuntu              latest              47b19964fb50        4 weeks ago         88.1MB

$ docker rmi ubuntu:latest
$ docker rmi 47b19964fb50

建立映像檔 commit

1. 從現有映像檔建立

步驟是先啟動一個映像檔,在其中進行修改操作,然後退出;再來使用 commit 命令建立一個新映像檔。

$ sudo docker run -it ubuntu:18.04 /bin/bash
root@f4aa7204185f:/# cd ~
root@f4aa7204185f:~# ls
root@f4aa7204185f:~# touch test
root@f4aa7204185f:~# exit
exit
$ sudo docker commit -m "Added a new file" -a "cww" f4aa7204185f test:0.1
sha256:15917e0e189ccb879ef19989046f132b2ddadd1ddb0674ce397baafe6951e9d7

commit 的選項:

  • -a, --author="": 作者資訊
  • -c, --change=[]:commit 的時候執行 Dockerfile 指令,包括 CMD|ENTRYPOINT|ENV|EXPOSE|LABEL|ONBUILD|USER|VOLUME|WORKDIR 等
  • -m, --message="":新增訊息
  • -p, --pause=true:commit 時暫停容器運作

2. 基於 Linux 容器 (LXC) 範例匯入

docker import [OPTIONS] file|URL|-[REPOSITORY[:tag]]

使用 OpenVZ 提供的範本來建立,OpenVZ 的範本下載位址 http://openvz.org/Download/templates/precreated

$ cat ubuntu-18.04-x86_64-minimal.tar.gz | docker import - ubuntu:18.04

$ docker import http://download.openvz.org/template/precreated/ubuntu-18.04-x86_64-minimal.tar.gz ubuntu:18.04

然後查看新匯入的映像檔,會看到已存在本地端了。

$ docker images

儲存和載入映像檔 save & load

本機上的 ubuntu:18.04 映像檔儲存為 ubuntu_18.04.tar 檔案

$ docker save -o ubuntu_18.04.tar ubuntu:18.04

載入映像檔,將儲存的 tar 檔案匯入本機的映像檔中

$ docker load --input ubuntu_18.04.tar

$ docker load &lt; ubuntu_18.04.tar

> 可以透過 ssh 將映像檔傳送到遠端伺服器 >$ sudo docker save ubuntu:latest | ssh user@remote-server sudo docker load

上傳映像檔 push

指令語法

> docker push NAME[:TAG] | [REGISTRYHOST[:REGISTRYPORT]/]NAME[:TAG]

dockerhub

先在docker hub註冊帳號,我這裡注冊的名稱是 alger23,然後用命令方式登入

$ docker login
Login with your Docker ID to push and pull images from Docker Hub. If you don't have a Docker ID, head over to https://hub.docker.com to create one.
Username: alger23
Password:

Login Succeeded

然後透過以下命令上傳映像檔到 docker hub 倉庫中

可先在 docker hub 網頁操作建立 Repository 後上傳到倉庫。 也可以不在網頁上建立倉庫,直接上傳。這裡先把要上傳的 test:映像檔建立新的 tag 名稱 alger23/test:0.1,然後再將用 push 指令上傳到倉庫。

$ docker tag test:0.1 alger23/test:0.1
$ docker push alger23/test:0.1

容器 (Container)

查看容器 ps

查看本機上存在的所有容器

$ docker ps -a
CONTAINER ID        IMAGE               COMMAND             CREATED             STATUS                   PORTS               NAMES
f4aa7204185f        ubuntu:18.04        "/bin/bash"         2 hours ago         Exited (0) 2 hours ago                       epic_keller
$ docker container ls -a
CONTAINER ID        IMAGE               COMMAND             CREATED             STATUS                   PORTS               NAMES
f4aa7204185f        ubuntu:18.04        "/bin/bash"         2 hours ago         Exited (0) 2 hours ago                       epic_keller

建立容器 create

$ docker create -it ubuntu:18.04
192aa1379e21446c1b2668fdb32bca24fef0dee2d847ed2afe84231cede38559

使用 docker create 命令建立的容器處於停止狀態,可以使用 docker start 指令來啟動它。

$ docker container ls -a
CONTAINER ID        IMAGE               COMMAND             CREATED             STATUS              PORTS               NAMES
192aa1379e21        ubuntu:18.04        "/bin/bash"         11 seconds ago      Created                                 infallible_bohr
$ docker start 192aa1379e21
192aa1379e21
$ docker container ls -a
CONTAINER ID        IMAGE               COMMAND             CREATED              STATUS              PORTS               NAMES
192aa1379e21        ubuntu:18.04        "/bin/bash"         About a minute ago   Up 55 seconds                           infallible_bohr

建立並啟動容器 run

利用 Image ubuntu:18.04 執行文字輸出

$ docker run ubuntu:18.04 echo 'hello!'
hello!

添加 -d 參數讓容易背景執行

$ docker run -d ubuntu /bin/sh -c "while true; do echo hello world; sleep 1; done"
264a8dce7deb5de83dcd3f198b56d1cba169988e6f1c214f43020633261e271c

要查看容易的輸出資訊

$ docker log 264a8dce7
hello world
hello world
...

停止容器 stop

$ docker stop 264a8dce7

重啟容器 restart

$ docker restart 264a8dce7

進入容器進行操作

1. attach

> 指令格式 > docker attach [--detach-keys[=[]]] [--no-stdin] [--sig-proxy[=true]] CONTAINER

使用範例

$ sudo docker run -itd ubuntu
b210e0160499a48494c0f0e04b5b927cd62477c2122ff66121ef3b64d0776b99
$ sudo docker ps
CONTAINER ID        IMAGE               COMMAND             CREATED             STATUS              PORTS               NAMES
b210e0160499        ubuntu              "/bin/bash"         6 seconds ago       Up 4 seconds                            condescending_payne
$ sudo docker attach condescending_payne
root@b210e0160499:/#

使用 attach 指令有時候並不方便,當多個視窗同時用 attach 到同一個容器時,所有視窗都會同步顯示。當某個視窗因命令雍塞時,其它視窗也無法執行操作。

2. exec

Docker 1.3.0 版起提供 exec 指令,可以在容器內直接執行任意命令

> 指令格式 > docker exec [-d|--detach] [--detach-keys[=[]]] [-i|--interactive] [--privileged] [-t|--tty] [-u|--user[=USER]] CONTAINER COMMAND [ARG...]

例如

$ docker exec -it b210 /bin/bash
root@b210e0160499:/# exit

3. nsenter

在 util-linux 套件版本 2.23 之後包含 nsenter 工具。

要使用 nsenter 連接到容器,需要容器程序的 PID,透過以下指令取得:

> PID=$(docker inspect --format "{{ .State.Pid }}" )

完整範例

$ docker ps
CONTAINER ID        IMAGE               COMMAND             CREATED             STATUS              PORTS               NAMES
b210e0160499        ubuntu              "/bin/bash"         28 minutes ago      Up 18 minutes                           condescending_payne
$ docker inspect --format "{{ .State.Pid }}" b210e0160499
18903
$ nsenter --target 18903 --mount --uts --ipc --net --pid
root@b210e0160499:/#

查看使用者和程序資訊

root@b210e0160499:/# w
 07:04:48 up 20:35,  0 users,  load average: 0.01, 0.01, 0.00
USER     TTY      FROM             LOGIN@   IDLE   JCPU   PCPU WHAT
root@b210e0160499:/# ps -ef
UID         PID   PPID  C STIME TTY          TIME CMD
root          1      0  0 06:44 pts/0    00:00:00 /bin/bash
root         26      0  0 07:03 pts/0    00:00:00 -bash
root         32     26  0 07:05 pts/0    00:00:00 ps -ef

移除容器

> docker rm [-f|--force] [-l|--link] [-v|--volumes] CONTAINER [CONTAINER...]

  • -f, --force=false: 是否強制停止並刪除執行中的容器
  • -l, --link=false: 刪除容器連接,但保留容器
  • -v, --volumes=false: 刪除容器掛載的 volume
$ docker container rm f4aa7204185f
f4aa7204185f

$ docker rm f4aa7204185f
f4aa7204185f

匯入和匯出容器 import & export

要將容器搬遷至另一個系統時可以使用Docker 的匯出和匯入功能。

1. 匯出容器 export

> docker export [-o|--output[=""]] CONTAINER

範例

$ docker ps
CONTAINER ID        IMAGE               COMMAND             CREATED             STATUS              PORTS               NAMES
b210e0160499        ubuntu              "/bin/bash"         41 minutes ago      Up 31 minutes                           condescending_payne

$ docker export -o test.tar b210

$ docker export b210 &gt; test.tar

2. 匯入容器 import

> docker import [-c|--change[=[]]] [-m|--message[=MESSAGE]] file|URL|-[REPOSITORY[:TAG]]

$ cat test.tar | docker import - test/ubuntu:123

倉庫 (Repository)

搜尋

$ docker search ubuntu

2019-03-07

Hyper-V 內部虛擬交換器 NAT Static Mapping

在Hyper-V 中安裝好虛擬機後,若是使用內部虛擬交換器(Internal Virtual Switch)則需要將 Host 的 port 對應到虛擬機的 port,外部的主機才能透過 Host 的 IP:port 連線到虛擬機的服務。這裡透過 Powershell 命令建立 NAT 的規則。

建立 NAT Static Mapping

實驗環境

  • Host: Windows 10 Pro (IP:192.168.100.1)
  • Hyper-V: 二台虛擬機
    1. win2019: Windows 2019 Standard (IP: 192.168.200.2)
    2. ubuntu1804: Ubuntu 18.04.1 (IP: 192.168.200.3)

虛擬交換器的建立方式,請參考Hyper-V 虛擬網路交換器設定,此文中 Step 2.2 有使用 New-NetNAT 指令建立 NAT,在此文中有用到。

我在 Hyper-V 已建立內部虛擬交換器,名稱InternalSwitch

   IPv4 Address. . . . . . . . . . . : 192.168.200.1
   Subnet Mask . . . . . . . . . . . : 255.255.255.0

新增 NetNAT

先確認是否有已有建立好與網路介面卡名稱vEthernet(InternalSwitch) 所設定的私有地址範圍相同的 NAT。 我這裡 vEthernet(InternalSwitch) 設定的地址範圍是 192.168.200.0/24

Get-NetNat

取回的NAT設定結果

如果 Get-NetNat 的結果為空的,需要配置一個NAT網路的地址範圍, -Name "NATNetwork" 的 NATNetwork 可以更改為易於識別的名稱。

New-NetNAT -Name "NATNetwork" -InternalIPInterfaceAddressPrefix 192.168.200.0/24

配置將在虛擬交換器上運行的NAT網路的網路地址; 這是虛擬機將在抽象虛擬交換機中使用的私有地址範圍。請注意,上一步中的IPv4地址必須在此範圍內

NAT 規則範例

如果要讓外部能連到虛擬機的網頁服務,則要能連到虛擬機的 port:80,參閱以下範例:

  • 外部IP(ExternalIPAddress): 0.0.0.0
  • 外部通訊埠(ExternalPort): 80
  • 內部IP(InternalIPAddress): 192.168.200.2
  • 內部通訊埠(InternalPort): 80
Add-NetNatStaticMapping -ExternalIPAddress "0.0.0.0/0" -ExternalPort 80 -Protocol TCP -InternalIPAddress "192.168.200.2" -InternalPort 80 -NatName NATNetwork
  • ExternalIPAddress: 這是指定要轉送的來源IP,這裡指的是 Host 主機設定的 IP;這可以是特定的實體 IP 或是 0.0.0.0/0 這是 Host 主機上全部 IP 。
  • ExternalPort: 這是要接收轉送的通訊埠,例如 Web 是 80,遠端桌面是 3389.
  • Protocol: 這只能是 TCP 或 UDP.
  • InternalIPAddress: 這是指定要轉送給已啟用 NAT 對應的虛擬機的IP.
  • InternalPort: 這是指定虛擬機的通訊埠.

通訊埠轉送

在前一個例子中,只建立了一個使用 TCP 80 的 NAT 規則,此時只有虛擬交換器只有轉送監聽單一個 80 port。 以下我們使用二台虛擬機將外部的通訊埠請求轉送到內部,這裡 VM1 的遠端桌面(3389) 和 VM2 的 SSH(22) 要設定可連入:

  • VM1 win2019: Windows 2019 Standard (IP: 192.168.200.2 通訊埠 3389) 外部通訊埠 60002
  • VM2 ubuntu1804: Ubuntu 18.04.1 (IP: 192.168.200.3 通訊埠 22) 外部通訊埠 60003
Add-NetNatStaticMapping -ExternalIPAddress "0.0.0.0/24" -ExternalPort 60002 -Protocol TCP -InternalIPAddress "192.168.200.2" -InternalPort 3389 -NatName NATNetwork

Add-NetNatStaticMapping -ExternalIPAddress "0.0.0.0/24" -ExternalPort 60003 -Protocol TCP -InternalIPAddress "192.168.200.3" -InternalPort 22 -NatName NATNetwork

就可以從其它主機連線,使用遠端桌面連線到 VM1

mstsc /v:192.168.88.82:60002

使用 win10 的 ssh 指令連到 VM2

ssh username@192.168.88.82 -p 60003

這裡 ubuntu 記得要開防火牆允許連入 port 22

開啟防火牆 允許 192.168.100.8 連入 22

sudo ufw allow from 192.168.100.8 to any port 22 proto tcp

刪除防火牆設定

sudo ufw delete allow from 192.168.100.8 to any port 22 proto tcp

參考:

2019-03-06

Hyper-V 虛擬網路交換器設定

說明 hyper-v 裡的三種虛擬網路設定差異,實作三個虛擬網路交換器實驗,讓虛擬機器互連。

  1. 私人虛擬交換器:二台虛擬機互連
  2. 內部虛擬交換器:二台虛擬機互連且 Host 也可連 二台虛擬機
  3. 外部虛擬交換器:讓虛擬機設定跟 Host 主機的相同 IP 區段,Host 與虛擬機互連

三種虛擬交換器

  • 外部(External):會橋接到實體機器的網路卡,讓虛擬機可以透過實體機的網路卡連線到外部網路
  • 內部(Internal):可以跟所有虛擬機器互通,且可以和宿主主機網路互通
  • 私人(Private):虛擬機器的網路設定在相同區段時可以透過這個虛擬交換器互通

實驗環境

  • Host: Windows 10 Pro (IP:192.168.100.1)
  • Hyper-V: 二台虛擬機
    1. win2019: Windows 2019 Standard (IP: 192.168.200.2)
    2. ubuntu1804: Ubuntu 18.04.1 (IP: 192.168.200.3)

實驗1:私人虛擬交換器

IP Address:

  • win2019: 192.168.200.2
  • ubuntu1804: 192.168.200.3

Step 1.1. 新增「虛擬交換器」

新增一個私人虛擬交換器(Private Virtual Switch),名稱為「PrivateSwitch」

New-VMSwitch -Name 'PrivateSwitch' -SwitchType Private

Step 1.2. 查看 win2019 虛擬機的網路介面卡設定,將其改成 PrivateSwitch

Get-VM "win2019" | Get-VMNetworkAdapter

Get-VM "win2019" | Get-VMNetworkAdapter | Connect-VMNetworkAdapter -SwitchName "PrivateSwitch"

Get-VM "win2019" | Get-VMNetworkAdapter

Step 1.3. 查看 ubuntu1804 虛擬機的網路介面卡設定,將其改成 PrivateSwitch

Get-VM "ubuntu1804" | Get-VMNetworkAdapter

Get-VM "ubuntu1804" | Get-VMNetworkAdapter | Connect-VMNetworkAdapter -SwitchName "PrivateSwitch"

Get-VM "ubuntu1804" | Get-VMNetworkAdapter

Step 1.4. 設定 win2019 虛擬機的網路介面卡 IP Address

   Description . . . . . . . . . . . : Microsoft Hyper-V Network Adapter
   DHCP Enabled. . . . . . . . . . . : No
   IPv4 Address. . . . . . . . . . . : 192.168.200.2
   Subnet Mask . . . . . . . . . . . : 255.255.255.0
   Default Gateway . . . . . . . . . : 192.168.200.1
   DNS Servers . . . . . . . . . . . : 192.168.200.1

Step 1.5. 設定 ubuntu1804虛擬機的網路介面卡 IP Address

   Description . . . . . . . . . . . : Microsoft Hyper-V Network Adapter
   DHCP Enabled. . . . . . . . . . . : No
   IPv4 Address. . . . . . . . . . . : 192.168.200.3
   Subnet Mask . . . . . . . . . . . : 255.255.255.0
   Default Gateway . . . . . . . . . : 192.168.200.1
   DNS Servers . . . . . . . . . . . : 192.168.200.1

查看網路介面卡名稱

ifconfig

這裡我要修改的目標網路介面卡名稱是 eth0

在 ubuntu1804 透過 netplan 修改網卡設定。

# 備份原本的設定檔
sudo cp /etc/netplan/50-cloud-init.yaml /etc/netplan/50.cloud-init.yaml.bak

編輯 50-cloud-init.yaml,將 50-cloud-init.yaml 設定改成下面內容

network:
    ethernets:
        eth0:
            addresses: [192.168.200.3/24]
            gateway4: 192.168.200.1
            nameservers:
                    addresses: [192.168.200.1]
            dhcp4: no
    version: 2

套用設定

# 檢查設定
sudo netplan --debug apply
# 套用設定
sudo netplan apply

Step 1.6. 測試連線,win2019 ping ubuntu1804

在 win2019 開啟命令提示字元

ping 192.168.200.3

應該回應正常

Step 1.7. 測試連線,ubuntu1804 ping win2019

在 ubuntu1804 的 Terminal

ping 192.168.200.2

測試連到 win2019,此時連線應該會失敗,win2019 沒有回應,是因為預設 windows 伺服器會開啟防火牆,所以 ICMP 是會被擋掉的。這裡測試時可以暫時停用防火牆。

在 win2019 虛擬機中執行,停用防火牆:

Set-NetFirewallProfile -Profile Domain,Public,Private -Enabled False

再一次測試 ubuntu1804 ping win2019,應該成功了

ping 192.168.200.2

在 win2019 虛擬機中執行,啟用防火牆:

Set-NetFirewallProfile -Profile Domain,Public,Private -Enabled True

如果要啟用 ICMP 通過防火牆,可以用下面命令

New-NetFirewallRule -DisplayName "Allow inbound ICMPv4" -Direction Inbound -Protocol ICMPv4 -IcmpType 8 -RemoteAddress <localsubnet> -Action Allow
New-NetFirewallRule -DisplayName "Allow inbound ICMPv6" -Direction Inbound -Protocol ICMPv6 -IcmpType 8 -RemoteAddress <localsubnet> -Action Allow

#IPv4
netsh advfirewall firewall add rule name="ICMP Allow incoming V4 echo request" protocol="icmpv4:8,any" dir=in action=allow

#IPv6
netsh advfirewall firewall add rule name="ICMP Allow incoming V6 echo request" protocol="icmpv6:8,any" dir=in action=allow

實驗二:內部虛擬交換器

IP Address:

  • Host: 192.168.100.1, vEthernet (InternalSwitch): 192.168.200.1
  • win2019: 192.168.200.2
  • ubuntu1804: 192.168.200.3

Step 2.1. 新增內部虛擬交換器

New-VMSwitch -Name 'InternalSwitch' -SwitchType Internal

執行後會新增一個名稱為vEthernet (InternalSwitch)的網路介面卡

Step 2.2. 設定 vEthernet (InternalSwitch) 的 IP Address

New-NetIPAddress -IPAddress 192.168.200.1 -PrefixLength 24 -InterfaceAlias vEthernet (InternalSwitch)”

然後配置將在虛擬交換器上運行的NAT網路的網路地址; 這是虛擬機將在抽象虛擬交換機中使用的私有地址範圍。請注意,上一步中的IPv4地址必須在此範圍內。

New-NetNAT -Name "NATNetwork" -InternalIPInterfaceAddressPrefix 192.168.200.0/24

Step 2.3. 查看 win2019 虛擬機的網路介面卡設定,將其改成 InternalSwitch

Get-VM "win2019" | Get-VMNetworkAdapter

Get-VM "win2019" | Get-VMNetworkAdapter | Connect-VMNetworkAdapter -SwitchName "InternalSwitch"

Get-VM "win2019" | Get-VMNetworkAdapter

Step 2.4. 查看 ubuntu1804 虛擬機的網路介面卡設定,將其改成 InternalSwitch

Get-VM "ubuntu1804" | Get-VMNetworkAdapter

Get-VM "ubuntu1804" | Get-VMNetworkAdapter | Connect-VMNetworkAdapter -SwitchName "InternalSwitch"

Get-VM "ubuntu1804" | Get-VMNetworkAdapter

Step 2.5. 設定 win2019 虛擬機的網路介面卡 IP Address

   Description . . . . . . . . . . . : Microsoft Hyper-V Network Adapter
   DHCP Enabled. . . . . . . . . . . : No
   IPv4 Address. . . . . . . . . . . : 192.168.200.2
   Subnet Mask . . . . . . . . . . . : 255.255.255.0
   Default Gateway . . . . . . . . . : 192.168.200.1
   DNS Servers . . . . . . . . . . . : 192.168.200.1

這裡 Gateway 和 DNS 是指定 vEthernet (InternalSwitch)的網路介面卡 IP

Step 2.6. 設定 ubuntu1804虛擬機的網路介面卡 IP Address(設定方式參考 Step 1.5)

   Description . . . . . . . . . . . : Microsoft Hyper-V Network Adapter
   DHCP Enabled. . . . . . . . . . . : No
   IPv4 Address. . . . . . . . . . . : 192.168.200.3
   Subnet Mask . . . . . . . . . . . : 255.255.255.0
   Default Gateway . . . . . . . . . : 192.168.200.1
   DNS Servers . . . . . . . . . . . : 192.168.200.1

這裡 Gateway 和 DNS 是指定 vEthernet (InternalSwitch)的網路介面卡 IP

測試連線

先暫時停用 host 和 win2019 的防火牆

Set-NetFirewallProfile -Profile Domain,Public,Private -Enabled False

測試連線:win2019 ping ubuntu1804

ping 192.168.200.3

測試連線:win2019 ping host

ping 192.168.100.1

測試連線:ubuntu1804 ping win2019

ping 192.168.200.2

測試連線:ubuntu1804 ping host

ping 192.168.100.1

測試連線:host ping ubuntu1804

ping 192.168.200.3

測試連線:host ping win2019

ping 192.168.200.2

測試完,記得再啟用防火牆

Set-NetFirewallProfile -Profile Domain,Public,Private -Enabled True

實驗三:外部虛擬交換器

此範例只示範設定 win2019 使用外部虛擬交換器連線

IP Address:

  • Host: 被橋接後原設定套用到 vEthernet (ExternalSwitch), vEthernet (ExternalSwitch): 192.168.100.1
  • win2019: 192.168.100.2

Step 3.1. 新增外部虛擬交換器

New-VMSwitch -Name 'ExternalSwitch' -NetAdapterName 'Ethernet' -AllowManagementOS $true

-Name: 要新增的虛擬交換器名稱 ExternalSwitch -NetAdapterName: 透過Ethernet 的網路卡橋接連線 -AllowManagementOS: 允許

Step 3.2. 查看 win2019 虛擬機的網路介面卡設定,將其改成 ExternalSwitch

Get-VM "win2019" | Get-VMNetworkAdapter

Get-VM "win2019" | Get-VMNetworkAdapter | Connect-VMNetworkAdapter -SwitchName "ExternalSwitch"

Get-VM "win2019" | Get-VMNetworkAdapter

Step 3.2. 修改 win2019 的 IP Address

如果外部 DHCP 配發 IP ,則 win2019 虛擬機中網路介面卡的 IP 與 DNS 可自動取得。

若要指定IP,則依Host 主機的網路介面卡設定方式設定,例如:

   Description . . . . . . . . . . . : Microsoft Hyper-V Network Adapter
   DHCP Enabled. . . . . . . . . . . : No
   IPv4 Address. . . . . . . . . . . : 192.168.100.2
   Subnet Mask . . . . . . . . . . . : 255.255.255.0
   Default Gateway . . . . . . . . . : 192.168.100.254
   DNS Servers . . . . . . . . . . . : 168.95.1.1

這裡的範例 DNS Servers 是指定成 Hinet 的 168.95.1.1。也可以指定成你慣用或自架的 DNS。


參考:

2019-03-04

vlmcsd setup on Ubuntu 18.04

在 ubuntu 18.04.1 架 kms 服務,啟用大量授權的系統

自建 kms 是使用 Open Source 的專案 vlmcsd,以下使用虛擬機測試,IP是在虛擬的IP區段。

環境 Hyper-V 中建立二台VM:

  • ubuntu 18.04.1 (VM) IP: 192.168.123.101
  • Windows Server 2019 (VM) IP: 192.168.123.102

搭載 kms

下載 vlmcsd 已編譯好的檔案

wget https://github.com/Wind4/vlmcsd/releases/download/svn1112/binaries.tar.gz

解壓縮

tar -zxvf binaries.tar.gz

切換至解壓縮的目錄

cd binaries

目錄中會有各個作業系統的資料夾

Android  DragonFly  FreeBSD  Hurd  iOS  Linux  MacOSX  Minix  NetBSD  OpenBSD  Solaris  Windows

選擇需要的版本,這裡使用 Ubuntu 為例,將 `vlmcsd-x64-musl-static 複製為 kms,然後將 kms 移到 /usr/bin 資料夾。賦與 kms 的執行權限

cd Linux/intel/static
cp vlmcsd-x64-musl-static kms &amp;&amp; sudo mv kms /usr/bin
chmod +x /usr/bin/kms

然後直接輸入 kms 即可運行服務

kms

執行的服務通訊埠為 1688,確認是否運行成功

netstat -an | grep 1688

設定防火牆放行 1688 port

使用 ufw

sudo ufw enable
# 查看狀態
sudo ufw status
# 允許 1688
# sudo ufw allow from <target> to <destination> port <port number=""> proto <protocol name="">
sudo ufw allow from 192.168.123.0/24 to any port 1688 proto tcp

使用 firewall-cmd 設定允許 1688 port 連入

firewall-cmd --zone=public --add-port=1688/tcp
firewall-cmd --zone=public --permanent --add-port=1688/tcp
firewall-cmd --reload

使用 iptables 設定允許 1688 port 連入,(註2)

iptables -I INPUT -p tcp -m state --state NEW -m tcp --dport 1688 -j ACCEPT
sudo iptables-save &gt; ~/iptables.conf
sudo iptables-restore &lt; ~/iptables.conf 

建立開機啟動

# 建立資料夾
mkdir /usr/lib/systemd/system
# 編輯檔案
vim /usr/lib/systemd/system/kms.service

貼上以下內容

[Unit]  
Description=KMS Service 
After=network.target
Wants=network.target
[Service]  
Type=forking
ExecStart=/usr/bin/kms
ExecStop=/usr/bin/killall kms

[Install]  
WantedBy=multi-user.target  

加入開機自啟動 kms.service

systemctl enable kms.service

啟動 kms

systemctl start kms.service

停止 kms

systemctl stop kms.service

或使用 rc.local 來開機自啟

vim /etc/rc.local

加入

/usr/bin/kms

激活金鑰

以下用操作皆使用管理員身份運行命令

啟用

解除原先金鑰 (如果安裝時序號是正確的不需此行)
slmgr.vbs -upk
選擇金鑰,請依照底下的金鑰列表作選擇 (如果安裝時序號是正確的不需此行)
slmgr.vbs -ipk xxxxx-xxxxx-xxxxx-xxxxx-xxxxx
設定KMS伺服器(我這裡kms架在 ubuntu 192.168.123.101:1688)
slmgr.vbs -skms 192.168.123.101
激活
slmgr.vbs -ato
顯示KMS相關資訊
slmgr.vbs -dlv

啟用 office 2010/2013/2016

if exist "C:\Program Files (x86)\Microsoft Office\Office14\ospp.vbs" (cd "C:\Program Files (x86)\Microsoft Office\Office14") else (cd "c:\Program Files\Microsoft Office\Office14")
if exist "C:\Program Files (x86)\Microsoft Office\Office15\ospp.vbs" (cd "C:\Program Files (x86)\Microsoft Office\Office15") else (cd "c:\Program Files\Microsoft Office\Office15")
if exist "C:\Program Files (x86)\Microsoft Office\Office16\ospp.vbs" (cd "C:\Program Files (x86)\Microsoft Office\Office16") else (cd "c:\Program Files\Microsoft Office\Office16")
cscript ospp.vbs /osppsvcauto
cscript ospp.vbs /sethst:192.168.123.101
cscript ospp.vbs /act
cscript ospp.vbs /dstatus

微軟官方 KMS 列表

https://docs.microsoft.com/en-us/previous-versions/windows/it-pro/windows-server-2012-R2-and-2012/jj612867(v=ws.11)

註1. 'Service' Command not found

The service command is part of the sysvinit-utils package.

Install it with:

apt-get install sysvinit-utils

But most probably, it is already installed in /usr/sbin/service.

If it's missing in your $PATH, add this line to your ~/.bashrc:

PATH=$PATH:/usr/sbin

註2. iptables: unrecognized service

檢查 iptables 是否安裝

sudo whereis iptables

出現 iptables: /sbin/iptables /usr/share/iptables /usr/share/man/man8/iptables.8.gz 表示已經安裝了 iptables。 如果沒有安裝,可以通過以下命令安裝

sudo apt-get install iptables

參考

adsense