 就是因為常常沒有足夠的經費給我們購買好用的工具,所以需要尋找替代方案,這裡就用 OpenVAS 來進行系統弱點掃描。
詳細圖文看 [OpenVAS Docker Image](https://github.com/WenWei/docs/blob/master/OpenVAS_Docker_Image/OpenVAS_Docker_Image.md)
就是因為常常沒有足夠的經費給我們購買好用的工具,所以需要尋找替代方案,這裡就用 OpenVAS 來進行系統弱點掃描。
詳細圖文看 [OpenVAS Docker Image](https://github.com/WenWei/docs/blob/master/OpenVAS_Docker_Image/OpenVAS_Docker_Image.md)
2019-10-04
openvas image for docker 的安裝和掃描
markdown
這篇文章介紹使用 OpenVAS 作為系統的弱點掃描工具,掃描單一IP 或是 IP 區段,這裡使用建立在 Docker 環境的 openvas 容器執行弱點掃描。
# OpenVAS image for Docker
在資訊安全領域中 Nessus 是被人熟知的系統弱點掃描工具,CVE 的涵蓋範圍和掃描準確度都高於業界的類似軟體,我們在工作中有可能會需要這樣的工具協助我們發現問題。大家一定都知道:「錢能解決的問題都不是問題」,這在資訊領域也通用,像是機器負荷不了,花錢提昇機器硬體。
 就是因為常常沒有足夠的經費給我們購買好用的工具,所以需要尋找替代方案,這裡就用 OpenVAS 來進行系統弱點掃描。
詳細圖文看 [OpenVAS Docker Image](https://github.com/WenWei/docs/blob/master/OpenVAS_Docker_Image/OpenVAS_Docker_Image.md)
就是因為常常沒有足夠的經費給我們購買好用的工具,所以需要尋找替代方案,這裡就用 OpenVAS 來進行系統弱點掃描。
詳細圖文看 [OpenVAS Docker Image](https://github.com/WenWei/docs/blob/master/OpenVAS_Docker_Image/OpenVAS_Docker_Image.md)
就是因為常常沒有足夠的經費給我們購買好用的工具,所以需要尋找替代方案,這裡就用 OpenVAS 來進行系統弱點掃描。
詳細圖文看 [OpenVAS Docker Image](https://github.com/WenWei/docs/blob/master/OpenVAS_Docker_Image/OpenVAS_Docker_Image.md)
2019-06-21
使用 SSH 連入 Windows 10 的 docker VM (MobyLinuxVM)
markdown
因為使用 `docker volume create --name voluem_name` 指令建立的內容會儲存在 docker vm 中,上網查到連入 docker vm 的連線方式:
docker run --privileged -it -v /var/run/docker.sock:/var/run/docker.sock jongallant/ubuntu-docker-client
docker run --net=host --ipc=host --uts=host --pid=host -it --security-opt=seccomp=unconfined --privileged --rm -v /:/host alpine /bin/sh
chroot /host2019-06-20
PostgreSQL 的資料庫名稱帶 \r 的刪除方式
markdown
在 postgresql 命令操作下查資料庫名稱
```
Name |
------------------|
DATABASE_NAME\r |
```
資料庫名後面帶有 `\r`,多出 `\r` 的原因是建立資料時透過 shell script,而這個 shell script 是在 Windows 環境的IDE編輯。所以覆製到 ubuntu 環境執行造成資料庫名稱多帶 `\r`。
`\r` 的 byte 值是數值 `13`,13 轉 16進位(HEX 字串) 是 `0D`,
要移除資料庫的指令是將資料庫名指定 unicode 格式,將 `\r` 轉為 unicode 格式的 `\000D`,完整指令如下:
drop database U&"DATABASE_NAME\000D";或是更改資料庫名稱
alter database U&"DATABASE_NAME\000D" rename to "DATABASE_NAME_NEW";
2019-06-10
javascript 前端,使用 google-protobuf,後端用 asp.net core 2 接收
markdown
這篇是記錄在 Windows 10 環境中的 ASP.Net Core 的 WebAPI 使用 protobuf 取代 json 的資料傳輸
[本文範例程式碼](https://github.com/WenWei/ProtobufWebSample)
系統中需已預安裝:
- 安裝 .NET Core 2.2
- 安裝 protoc.exe
- 安裝 Browserify
## protoc.exe 安裝
到 GitHub 的 [Protocol Buffers Releases](https://github.com/protocolbuffers/protobuf/releases) [下載 protoc-3.8.0-win64.zip](https://github.com/protocolbuffers/protobuf/releases/download/v3.8.0/protoc-3.8.0-win64.zip)
我是解壓到 C:\bin,這裡的 c:\bin 是已加到環境變數 PATH 中。
```
C:\bin
├───include
│ └───google
│ └───protobuf
└───protoc.exe
```
## Browserify 安裝
```
npm install browserify -g
```
## 專案檔案結構
此文建立的範例專案名稱: ProtobufWebSample 省略部份檔案和目錄後結構如下:
```
~/ProtobufWebSample
├───ProtobufWeb
│ ├───Controllers
│ │ └───EchoController.cs
│ └───ProtobufWeb.csproj
└───protos
├───EchoData.proto
└───gen.bat
```
## 新增 asp.net core 的 WebAPI 專案
Post([FromBody] EchoData value)
{
value.Text = $"ECHO: {value.Text}";
return value;
}
}
}
```
## 要能接收和傳送 protobuf 格式,要建立 formatter
`ProtobufWeb/Formatters/ProtobufFormatter.cs`
```
namespace ProtobufWeb.Formatters
{
using Google.Protobuf;
using Microsoft.AspNetCore.Mvc;
using Microsoft.AspNetCore.Mvc.Formatters;
using Microsoft.Extensions.DependencyInjection;
using Microsoft.Net.Http.Headers;
using System.Threading.Tasks;
using System.Collections.Generic;
using System;
public static class ServicesConfiguration
{
public static void AddProtobufFormatter(this IServiceCollection services)
{
services.Configure(options =>
{
options.InputFormatters.Add(new ProtobufInputFormatter(new ProtobufFormatterOptions()));
options.OutputFormatters.Add(new ProtobufOutputFormatter(new ProtobufFormatterOptions()));
options.FormatterMappings.SetMediaTypeMappingForFormat("protobuf", Microsoft.Net.Http.Headers.MediaTypeHeaderValue.Parse("application/x-protobuf"));
});
}
}
public class ProtobufFormatterOptions
{
public HashSet SupportedContentTypes { get; set; } = new HashSet { "application/x-protobuf", "application/protobuf", "application/x-google-protobuf" };
public HashSet SupportedExtensions { get; set; } = new HashSet { "proto" };
public bool SuppressReadBuffering { get; set; } = false;
}
public class ProtobufInputFormatter : InputFormatter
{
private readonly ProtobufFormatterOptions _options;
public ProtobufInputFormatter(ProtobufFormatterOptions protobufFormatterOptions)
{
_options = protobufFormatterOptions ?? throw new ArgumentNullException(nameof(protobufFormatterOptions));
foreach (var contentType in protobufFormatterOptions.SupportedContentTypes)
{
SupportedMediaTypes.Add(new MediaTypeHeaderValue(contentType));
}
}
public override Task ReadRequestBodyAsync(InputFormatterContext context)
{
try
{
var request = context.HttpContext.Request;
var obj = (IMessage)Activator.CreateInstance(context.ModelType);
obj.MergeFrom(request.Body);
return InputFormatterResult.SuccessAsync(obj);
}
catch (Exception ex)
{
Console.WriteLine("Exception: " + ex);
return InputFormatterResult.FailureAsync();
}
}
}
public class ProtobufOutputFormatter : OutputFormatter
{
private readonly ProtobufFormatterOptions _options;
public string ContentType { get; private set; }
public ProtobufOutputFormatter(ProtobufFormatterOptions protobufFormatterOptions)
{
ContentType = "application/x-protobuf";
_options = protobufFormatterOptions ?? throw new ArgumentNullException(nameof(protobufFormatterOptions));
foreach (var contentType in protobufFormatterOptions.SupportedContentTypes)
{
SupportedMediaTypes.Add(new MediaTypeHeaderValue(contentType));
}
}
public override Task WriteResponseBodyAsync(OutputFormatterWriteContext context)
{
var response = context.HttpContext.Response;
// Proto-encode
var protoObj = context.Object as IMessage;
var serialized = protoObj.ToByteArray();
return response.Body.WriteAsync(serialized, 0, serialized.Length);
}
}
}
```
到 startup.cs 加入 `services.AddProtobufFormatter();`,startup.cs 完整內容如下:
```
using System;
using System.Collections.Generic;
using System.Linq;
using System.Threading.Tasks;
using Microsoft.AspNetCore.Builder;
using Microsoft.AspNetCore.Hosting;
using Microsoft.AspNetCore.HttpsPolicy;
using Microsoft.AspNetCore.Mvc;
using Microsoft.Extensions.Configuration;
using Microsoft.Extensions.DependencyInjection;
using Microsoft.Extensions.Logging;
using Microsoft.Extensions.Options;
using ProtobufWeb.Formatters;
namespace ProtobufWeb
{
public class Startup
{
public Startup(IConfiguration configuration)
{
Configuration = configuration;
}
public IConfiguration Configuration { get; }
// This method gets called by the runtime. Use this method to add services to the container.
public void ConfigureServices(IServiceCollection services)
{
services.AddMvc().SetCompatibilityVersion(CompatibilityVersion.Version_2_2);
services.AddProtobufFormatter();
}
// This method gets called by the runtime. Use this method to configure the HTTP request pipeline.
public void Configure(IApplicationBuilder app, IHostingEnvironment env)
{
if (env.IsDevelopment())
{
app.UseDeveloperExceptionPage();
}
else
{
// The default HSTS value is 30 days. You may want to change this for production scenarios, see https://aka.ms/aspnetcore-hsts.
app.UseHsts();
}
DefaultFilesOptions options = new DefaultFilesOptions();
options.DefaultFileNames.Clear();
options.DefaultFileNames.Add("index.html");
app.UseDefaultFiles(options);
app.UseStaticFiles();
app.UseHttpsRedirection();
app.UseMvc();
}
}
}
```
## 建立測試頁 `ProtobufWebSample/ProtobufWeb/wwwroot/index.html`
```
mkdir wwwroot
mkdir wwwroot/scripts
```
將 bundle.js 移到 wwwroot/scripts 資料夾
建立 index.html 內容如下
```
Document
```
## 執行網站,啟動 開發者工具查看結果
啟動網站
```
dotnet run
```
瀏覽器開啟 http://localhost:5001/index.html
使用開發者工具查看 Network 欄位的傳送結果
## 參考資料
* [Protocol Buffers - C# Generated Code](https://developers.google.com/protocol-buffers/docs/reference/csharp-generated)
* [Protocol Buffers - JavaScript Generated Code](https://developers.google.com/protocol-buffers/docs/reference/javascript-generated)
* [protobuf 前端怎么使用 - 蝈蝈250 - 2017/11/21](https://blog.csdn.net/vteihlll/article/details/78592976)
mkdir ProtobufWebSample
cd ProtobufWebSample
mkdir ProtobufWeb
cd ProtobufWeb
dotnet new webapidotnet add package Google.Protobufprotoc.exe --proto_path=路徑\ProtobufWebSample\protos --js_out=路徑\ProtobufWebSample\protos\gen\csharp 路徑\ProtobufWebSample\protos\EchoData.protoprotoc.exe --proto_path=路徑\ProtobufWebSample\protos --csharp_out=路徑\ProtobufWebSample\protos\gen\js路徑\ProtobufWebSample\protos\EchoData.proto2019-05-04
在 Windows 10 的 GoLang 使用 sqlite3 出現 gcc executable file not found in %PATH%
markdown
# go 使用 go-sqlite3 出現錯誤
執行 `go get github.com/mattn/go-sqlite3` 出現以下錯誤
```
exec: "gcc": executable file not found in %PATH%
```
原因是 sqlite3 是個 cgo 庫,需要使用 gcd 編譯 c 的源碼,
所以需要下載安裝tdm-gcc即可正常編譯。
[下載Windows版本 TDM-GCC](http://tdm-gcc.tdragon.net/download)
這裡下載 `tdm64-gcc-5.1.0-2.exe` 後進行安裝,預設安裝到 `C:\TDM-GCC-64`
安裝的介面中預設已有勾選將 `C:\TDM-GCC-64\bin` 加入系統環境變數 `%PATH%` 中
2019-03-29
在 Ubuntu 18.04.1 安裝 dotnet-sdk-2.2 出現依類項目不符無法安裝
markdown
將dotnet-sdk-2.2 安裝到 Ubuntu 18.04.1 時失敗。以
# 官網安裝方法(安裝失敗)
[Install .NET Core SDK on Linux Ubuntu 18.04 - x64](https://dotnet.microsoft.com/download/linux-package-manager/ubuntu18-04/sdk-current)
wget -q https://packages.microsoft.com/config/ubuntu/18.04/packages-microsoft-prod.deb
sudo dpkg -i packages-microsoft-prod.deb
sudo add-apt-repository universe
sudo apt-get install apt-transport-https
sudo apt-get update
sudo apt-get install dotnet-sdk-2.2curl https://packages.microsoft.com/keys/microsoft.asc | gpg --dearmor > microsoft.gpg
sudo mv microsoft.gpg /etc/apt/trusted.gpg.d/microsoft.gpg
sudo sh -c 'echo "deb [arch=amd64] https://packages.microsoft.com/repos/microsoft-ubuntu-bionic-prod bionic main" > /etc/apt/sources.list.d/dotnetdev.list'
sudo apt-get install apt-transport-https
sudo apt-get update
sudo apt-get install dotnet-sdk-2.22019-03-15
在 Ubuntu 18.04.1 的 IBus 上安裝大易(DAYI)輸入法
markdown
# 在 Ubuntu 18.04.1 的 IBus 上安裝大易輸入法
### 下載安裝腳本
```
$ wget https://raw.githubusercontent.com/Alger23/ubuntu_dayi_for_ibus/master/dayisetup.sh
```
### 下載大易三碼字根檔
```
$ wget https://raw.githubusercontent.com/Alger23/ubuntu_dayi_for_ibus/master/dayi3.cin
```
### 執行安裝腳本
```
$ chmod u+x dayisetup.sh
$ sudo ./dayisetup.sh
```
### ibus 設定大易輸入法
```
$ ibus-setup
```
* 經由 ibus-setup 指令開啟的 ibus 設定畫面
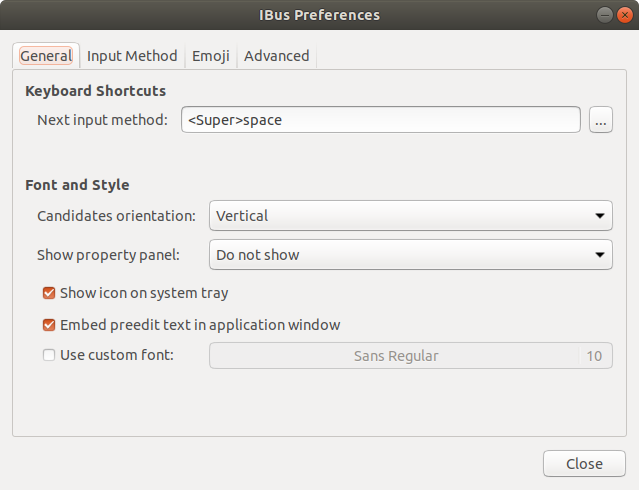 * 切換到 Input Method 頁籤
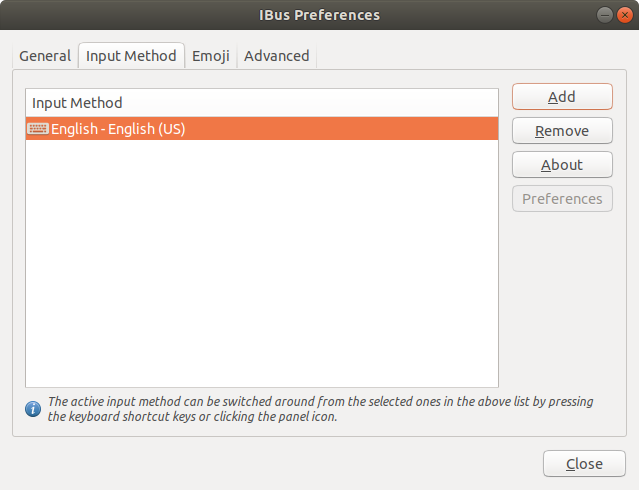 * 選取 Chinese
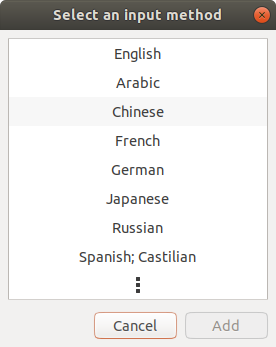 * 選取 dayi,按下 【Add】
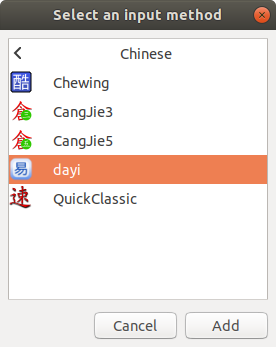 * 選取 Chinese-dayi ,設定【Preferences】
 * 將 Chinese mode: 設定為 Traditional Chinese,按下【Close】
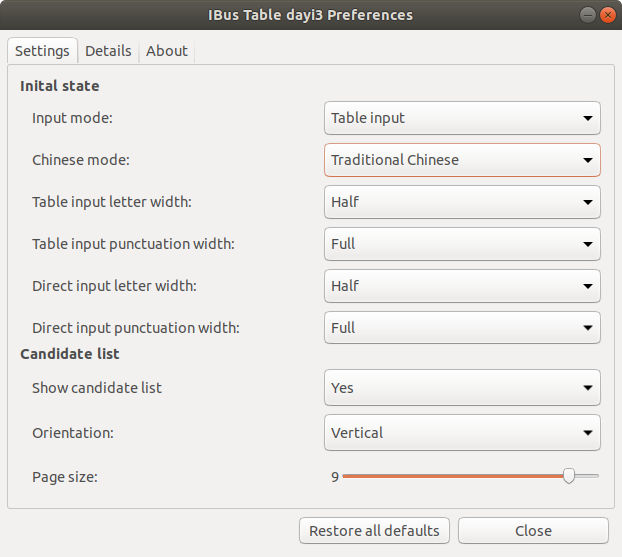 * IBus Preferences 畫面再按下【Close】,完成 ibus 的大易輸入法設定
* 右上角的小工具,展開,選擇設定(Settings)。
* IBus Preferences 畫面再按下【Close】,完成 ibus 的大易輸入法設定
* 右上角的小工具,展開,選擇設定(Settings)。
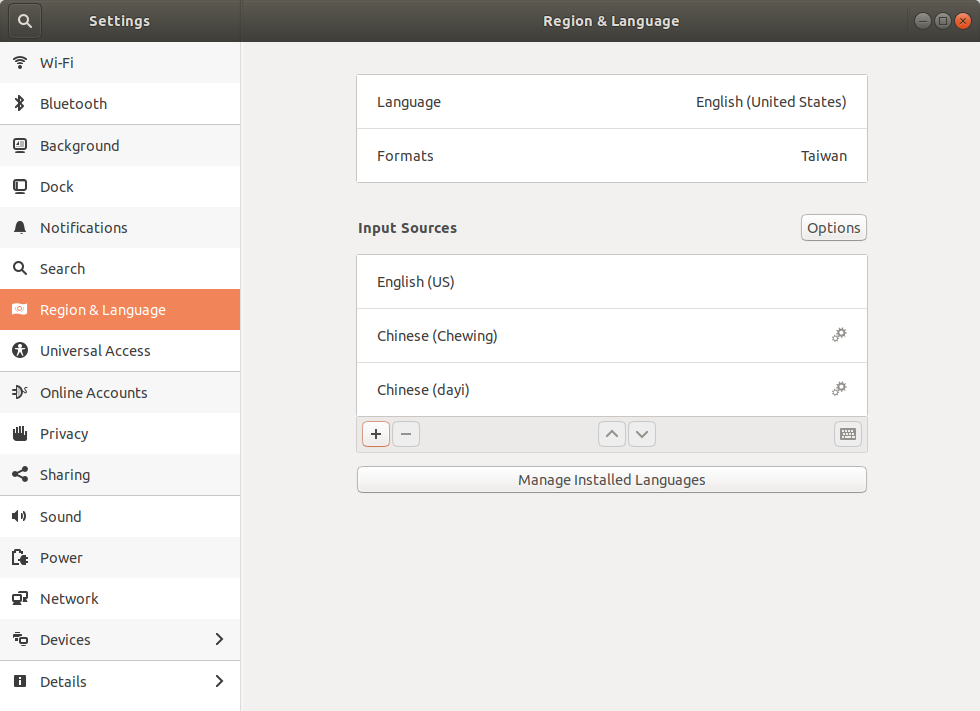
 * 選取區域和語言(Region & Language),在輸入來源(Input Sources)點選「加號」
 * 選擇輸入來源為「Chinese (Taiwan)」
2019-03-20 補充:此步驟在 Ubuntu 18.04.2 直接查 Chinese,會列出 Chinese(輸入法),國別名稱那層不見了
* 選擇輸入來源為「Chinese (Taiwan)」
2019-03-20 補充:此步驟在 Ubuntu 18.04.2 直接查 Chinese,會列出 Chinese(輸入法),國別名稱那層不見了
 * 選擇 Chinese (dayi),然後按下【Add】
 * 此時可以在 Input Sources 的區域看到新加入的大易輸入法「Chinese (dayi)」,關閉此視窗
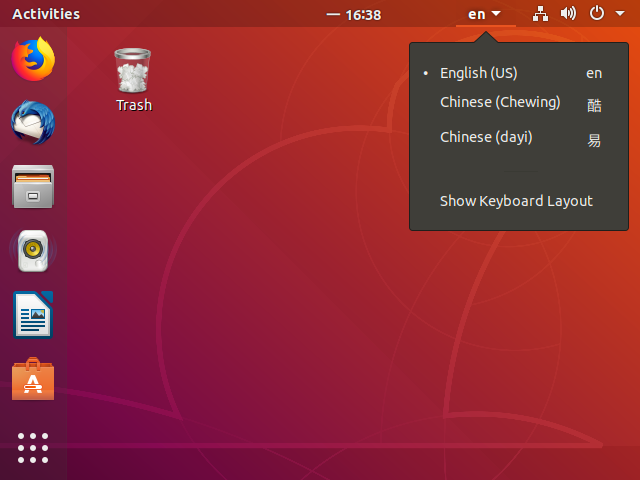
 * 在右上角的輸入法已經能切換至大易輸入法了
 ## 己知打不出來的字
如果在 Chinese mode 選擇繁體中文,已知下列字打不出來
```
/mo 向
o8 只
```
所以將 Chinese mode 選擇 All Chinese Characters,字會出來但排序不同
## 己知打不出來的字
如果在 Chinese mode 選擇繁體中文,已知下列字打不出來
```
/mo 向
o8 只
```
所以將 Chinese mode 選擇 All Chinese Characters,字會出來但排序不同
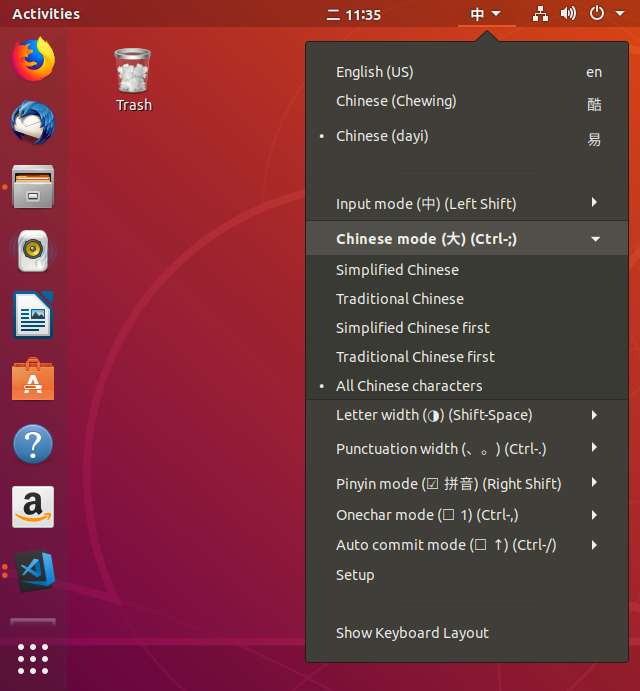 ## 已知問題
* 無法用 '[]-\ 選字,要用 Ctrl + 數字
## 已知問題
* 無法用 '[]-\ 選字,要用 Ctrl + 數字
* 切換到 Input Method 頁籤
* 選取 Chinese
* 選取 dayi,按下 【Add】
* 選取 Chinese-dayi ,設定【Preferences】
* 將 Chinese mode: 設定為 Traditional Chinese,按下【Close】
* IBus Preferences 畫面再按下【Close】,完成 ibus 的大易輸入法設定
* 右上角的小工具,展開,選擇設定(Settings)。
* 選取區域和語言(Region & Language),在輸入來源(Input Sources)點選「加號」
* 選擇輸入來源為「Chinese (Taiwan)」
2019-03-20 補充:此步驟在 Ubuntu 18.04.2 直接查 Chinese,會列出 Chinese(輸入法),國別名稱那層不見了
* 選擇 Chinese (dayi),然後按下【Add】
* 此時可以在 Input Sources 的區域看到新加入的大易輸入法「Chinese (dayi)」,關閉此視窗
* 在右上角的輸入法已經能切換至大易輸入法了
## 己知打不出來的字
如果在 Chinese mode 選擇繁體中文,已知下列字打不出來
```
/mo 向
o8 只
```
所以將 Chinese mode 選擇 All Chinese Characters,字會出來但排序不同
## 已知問題
* 無法用 '[]-\ 選字,要用 Ctrl + 數字
2019-03-13
Ubuntu 18.04 設定靜態 IP
markdown
設定 Ubuntu 18.04 靜態 IP
先要查出網卡的名稱
mtu 1500
inet 172.17.0.1 netmask 255.255.0.0 broadcast 172.17.255.255
ether 02:42:54:82:ea:09 txqueuelen 0 (Ethernet)
RX packets 0 bytes 0 (0.0 B)
RX errors 0 dropped 0 overruns 0 frame 0
TX packets 0 bytes 0 (0.0 B)
TX errors 0 dropped 0 overruns 0 carrier 0 collisions 0
eth0: flags=4163 mtu 1500
inet 192.168.88.88 netmask 255.255.240.0 broadcast 192.168.95.255
inet6 fe80::215:5dff:fe58:7316 prefixlen 64 scopeid 0x20
ether 00:15:5d:58:73:16 txqueuelen 1000 (Ethernet)
RX packets 609415 bytes 783165377 (783.1 MB)
RX errors 0 dropped 3521 overruns 0 frame 0
TX packets 94741 bytes 7497987 (7.4 MB)
TX errors 0 dropped 0 overruns 0 carrier 0 collisions 0
lo: flags=73 mtu 65536
inet 127.0.0.1 netmask 255.0.0.0
inet6 ::1 prefixlen 128 scopeid 0x10
loop txqueuelen 1000 (Local Loopback)
RX packets 170 bytes 13177 (13.1 KB)
RX errors 0 dropped 0 overruns 0 frame 0
TX packets 170 bytes 13177 (13.1 KB)
TX errors 0 dropped 0 overruns 0 carrier 0 collisions 0
```
在我的環境中能看到三個網路介面卡,docker0 是安裝 docker 產生的虛擬交換器,是要給docker的容器使用的。lo 是 loop back 的介面卡。這邊實際要設定的網路卡名稱是 eth0。
如果在 /etc/netplan/ 路徑中沒有設定檔,那可能你安裝系統時就沒有網路卡,所以 ubuntu 沒有自動產生。那就要自己用 `sudo netplan generate` 指令產生一個設定檔。
if config -asudo netplan generatecat /etc/netplan/50-cloud-init.yaml# This file is generated from information provided by
# the datasource. Changes to it will not persist across an instance.
# To disable cloud-init's network configuration capabilities, write a file
# /etc/cloud/cloud.cfg.d/99-disable-network-config.cfg with the following:
# network: {config: disabled}
network:
ethernets:
eth0:
dhcp4: true
version: 2sudo netplan apply2019-03-08
Docker 基本操作指令
markdown
# 映像檔(Image)
## 從搜尋遠端倉庫中公開的映像檔 search
```
$ docker search ubuntu
$ docker search --automated=true -s 3 ubuntu
Flag --automated has been deprecated, use --filter=is-automated=true instead
Flag --stars has been deprecated, use --filter=stars=3 instead
NAME DESCRIPTION STARS OFFICIAL AUTOMATED
dorowu/ubuntu-desktop-lxde-vnc Docker image to provide HTML5 VNC interface … 275 [OK]
rastasheep/ubuntu-sshd Dockerized SSH service, built on top of offi… 205 [OK]
consol/ubuntu-xfce-vnc Ubuntu container with "headless" VNC session… 158 [OK]
ansible/ubuntu14.04-ansible Ubuntu 14.04 LTS with ansible 96 [OK]
1and1internet/ubuntu-16-nginx-php-phpmyadmin-mysql-5 ubuntu-16-nginx-php-phpmyadmin-mysql-5 49 [OK]
nuagebec/ubuntu Simple always updated Ubuntu docker images w… 23 [OK]
1and1internet/ubuntu-16-apache-php-7.0 ubuntu-16-apache-php-7.0 13 [OK]
eclipse/ubuntu_jdk8 Ubuntu, JDK8, Maven 3, git, curl, nmap, mc, … 8 [OK]
codenvy/ubuntu_jdk8 Ubuntu, JDK8, Maven 3, git, curl, nmap, mc, … 5 [OK]
darksheer/ubuntu Base Ubuntu Image -- Updated hourly 5 [OK]
```
## 取得映像檔 pull
```
$ docker pull ubuntu
$ docker pull ubuntu:latest
$ docker pull ubuntu:18.04
```
## 查看映像檔訊息 images
```
$ docker images
REPOSITORY TAG IMAGE ID CREATED SIZE
ubuntu 18.04 47b19964fb50 4 weeks ago 88.1MB
ubuntu latest 47b19964fb50 4 weeks ago 88.1MB
```
## 增加映像檔標籤 tag
```
$ docker tag ubuntu:latest newtagubuntu:latest
$ docker images
REPOSITORY TAG IMAGE ID CREATED SIZE
ubuntu 18.04 47b19964fb50 4 weeks ago 88.1MB
ubuntu latest 47b19964fb50 4 weeks ago 88.1MB
newtagubuntu latest 47b19964fb50 4 weeks ago 88.1MB
```
## 查看詳細資訊 inspect
```
$ docker inspect ubuntu:18.04
[
{
"Id": "sha256:47b19964fb500f3158ae57f20d16d8784cc4af37c52c49d3b4f5bc5eede49541",
"RepoTags": [
"ubuntu:18.04",
"ubuntu:latest"
],
"RepoDigests": [
"ubuntu@sha256:7a47ccc3bbe8a451b500d2b53104868b46d60ee8f5b35a24b41a86077c650210"
],
"Parent": "",
"Comment": "",
"Created": "2019-02-06T03:37:51.599085524Z",
"Container": "4fcabd24a4d0668c251f05105af1d986b1841713e7af90bf51df172ecefae2fa",
"ContainerConfig": {
"Hostname": "4fcabd24a4d0",
"Domainname": "",
"User": "",
"AttachStdin": false,
"AttachStdout": false,
"AttachStderr": false,
"Tty": false,
"OpenStdin": false,
"StdinOnce": false,
"Env": [
"PATH=/usr/local/sbin:/usr/local/bin:/usr/sbin:/usr/bin:/sbin:/bin"
],
"Cmd": [
"/bin/sh",
"-c",
"#(nop) ",
"CMD [\"/bin/bash\"]"
],
"ArgsEscaped": true,
"Image": "sha256:5bbf4643e91ac20eb0ec60930e6d56e36eedab0ae09930a4bd414bb227590d28",
"Volumes": null,
"WorkingDir": "",
"Entrypoint": null,
"OnBuild": null,
"Labels": {}
},
"DockerVersion": "18.06.1-ce",
"Author": "",
"Config": {
"Hostname": "",
"Domainname": "",
"User": "",
"AttachStdin": false,
"AttachStdout": false,
"AttachStderr": false,
"Tty": false,
"OpenStdin": false,
"StdinOnce": false,
"Env": [
"PATH=/usr/local/sbin:/usr/local/bin:/usr/sbin:/usr/bin:/sbin:/bin"
],
"Cmd": [
"/bin/bash"
],
"ArgsEscaped": true,
"Image": "sha256:5bbf4643e91ac20eb0ec60930e6d56e36eedab0ae09930a4bd414bb227590d28",
"Volumes": null,
"WorkingDir": "",
"Entrypoint": null,
"OnBuild": null,
"Labels": null
},
"Architecture": "amd64",
"Os": "linux",
"Size": 88140808,
"VirtualSize": 88140808,
"GraphDriver": {
"Data": null,
"Name": "aufs"
},
"RootFS": {
"Type": "layers",
"Layers": [
"sha256:bebe7ce6215aee349bee5d67222abeb5c5a834bbeaa2f2f5d05363d9fd68db41",
"sha256:283fb404ea9415ab48456fd8a82b153b1a719491cdf7b806d1853b047d00f27f",
"sha256:663e8522d78b5b767f15b2e43885da5975068e3195bbbfa8fc3a082297a361c1",
"sha256:4b7d93055d8781d27259ba5780938e6a78d8ef691c94ee9abc3616c1b009ec4a"
]
},
"Metadata": {
"LastTagTime": "0001-01-01T00:00:00Z"
}
}
]
```
## 查看建置歷史 history
```
$ docker history ubuntu:18.04
Got permission denied while trying to connect to the Docker daemon socket at unix:///var/run/docker.sock: Get http://%2Fvar%2Frun%2Fdocker.sock/v1.38/images/ubuntu:18.04/history: dial unix /var/run/docker.sock: connect: permission denied
alger@ocr:~$ sudo docker history ubuntu:18.04
IMAGE CREATED CREATED BY SIZE COMMENT
47b19964fb50 4 weeks ago /bin/sh -c #(nop) CMD ["/bin/bash"] 0B
4 weeks ago /bin/sh -c mkdir -p /run/systemd && echo 'do… 7B
4 weeks ago /bin/sh -c rm -rf /var/lib/apt/lists/* 0B
4 weeks ago /bin/sh -c set -xe && echo '#!/bin/sh' > /… 745B
4 weeks ago /bin/sh -c #(nop) ADD file:529264c6593975a61… 88.1MB
```
## 刪除映像檔 rmi
```
$ docker images
REPOSITORY TAG IMAGE ID CREATED SIZE
ubuntu 18.04 47b19964fb50 4 weeks ago 88.1MB
ubuntu latest 47b19964fb50 4 weeks ago 88.1MB
$ docker rmi ubuntu:latest
$ docker rmi 47b19964fb50
```
## 建立映像檔 commit
### 1. 從現有映像檔建立
步驟是先啟動一個映像檔,在其中進行修改操作,然後退出;再來使用 commit 命令建立一個新映像檔。
```
$ sudo docker run -it ubuntu:18.04 /bin/bash
root@f4aa7204185f:/# cd ~
root@f4aa7204185f:~# ls
root@f4aa7204185f:~# touch test
root@f4aa7204185f:~# exit
exit
$ sudo docker commit -m "Added a new file" -a "cww" f4aa7204185f test:0.1
sha256:15917e0e189ccb879ef19989046f132b2ddadd1ddb0674ce397baafe6951e9d7
```
commit 的選項:
* -a, --author="": 作者資訊
* -c, --change=[]:commit 的時候執行 Dockerfile 指令,包括 CMD|ENTRYPOINT|ENV|EXPOSE|LABEL|ONBUILD|USER|VOLUME|WORKDIR 等
* -m, --message="":新增訊息
* -p, --pause=true:commit 時暫停容器運作
### 2. 基於 Linux 容器 (LXC) 範例匯入
docker import [OPTIONS] file|URL|-[REPOSITORY[:tag]]
使用 OpenVZ 提供的範本來建立,OpenVZ 的範本下載位址 http://openvz.org/Download/templates/precreated
```
$ cat ubuntu-18.04-x86_64-minimal.tar.gz | docker import - ubuntu:18.04
或
$ docker import http://download.openvz.org/template/precreated/ubuntu-18.04-x86_64-minimal.tar.gz ubuntu:18.04
```
然後查看新匯入的映像檔,會看到已存在本地端了。
```
$ docker images
```
## 儲存和載入映像檔 save & load
本機上的 ubuntu:18.04 映像檔儲存為 ubuntu_18.04.tar 檔案
```
$ docker save -o ubuntu_18.04.tar ubuntu:18.04
```
載入映像檔,將儲存的 tar 檔案匯入本機的映像檔中
```
$ docker load --input ubuntu_18.04.tar
或
$ docker load < ubuntu_18.04.tar
```
> 可以透過 ssh 將映像檔傳送到遠端伺服器
>$ sudo docker save ubuntu:latest | ssh user@remote-server sudo docker load
## 上傳映像檔 push
指令語法
> docker push NAME[:TAG] | [REGISTRY_HOST[:REGISTRY_PORT]/]NAME[:TAG]
### dockerhub
先在[docker hub](https://cloud.docker.com/)註冊帳號,我這裡注冊的名稱是 `alger23`,然後用命令方式登入
```
$ docker login
Login with your Docker ID to push and pull images from Docker Hub. If you don't have a Docker ID, head over to https://hub.docker.com to create one.
Username: alger23
Password:
Login Succeeded
```
然後透過以下命令上傳映像檔到 docker hub 倉庫中
可先在 docker hub 網頁操作建立 Repository 後上傳到倉庫。
也可以不在網頁上建立倉庫,直接上傳。這裡先把要上傳的 test:映像檔建立新的 tag 名稱 `alger23/test:0.1`,然後再將用 push 指令上傳到倉庫。
```
$ docker tag test:0.1 alger23/test:0.1
$ docker push alger23/test:0.1
```
# 容器 (Container)
## 查看容器 ps
查看本機上存在的所有容器
```
$ docker ps -a
CONTAINER ID IMAGE COMMAND CREATED STATUS PORTS NAMES
f4aa7204185f ubuntu:18.04 "/bin/bash" 2 hours ago Exited (0) 2 hours ago epic_keller
```
```
$ docker container ls -a
CONTAINER ID IMAGE COMMAND CREATED STATUS PORTS NAMES
f4aa7204185f ubuntu:18.04 "/bin/bash" 2 hours ago Exited (0) 2 hours ago epic_keller
```
## 建立容器 create
```
$ docker create -it ubuntu:18.04
192aa1379e21446c1b2668fdb32bca24fef0dee2d847ed2afe84231cede38559
```
使用 docker create 命令建立的容器處於停止狀態,可以使用 docker start 指令來啟動它。
```
$ docker container ls -a
CONTAINER ID IMAGE COMMAND CREATED STATUS PORTS NAMES
192aa1379e21 ubuntu:18.04 "/bin/bash" 11 seconds ago Created infallible_bohr
$ docker start 192aa1379e21
192aa1379e21
$ docker container ls -a
CONTAINER ID IMAGE COMMAND CREATED STATUS PORTS NAMES
192aa1379e21 ubuntu:18.04 "/bin/bash" About a minute ago Up 55 seconds infallible_bohr
```
## 建立並啟動容器 run
利用 Image ubuntu:18.04 執行文字輸出
```
$ docker run ubuntu:18.04 echo 'hello!'
hello!
```
添加 -d 參數讓容易背景執行
```
$ docker run -d ubuntu /bin/sh -c "while true; do echo hello world; sleep 1; done"
264a8dce7deb5de83dcd3f198b56d1cba169988e6f1c214f43020633261e271c
```
要查看容易的輸出資訊
```
$ docker log 264a8dce7
hello world
hello world
...
```
## 停止容器 stop
```
$ docker stop 264a8dce7
```
## 重啟容器 restart
```
$ docker restart 264a8dce7
```
## 進入容器進行操作
### 1. attach
> 指令格式
> docker attach [--detach-keys[=[]]] [--no-stdin] [--sig-proxy[=true]] CONTAINER
使用範例
```
$ sudo docker run -itd ubuntu
b210e0160499a48494c0f0e04b5b927cd62477c2122ff66121ef3b64d0776b99
$ sudo docker ps
CONTAINER ID IMAGE COMMAND CREATED STATUS PORTS NAMES
b210e0160499 ubuntu "/bin/bash" 6 seconds ago Up 4 seconds condescending_payne
$ sudo docker attach condescending_payne
root@b210e0160499:/#
```
使用 attach 指令有時候並不方便,當多個視窗同時用 attach 到同一個容器時,所有視窗都會同步顯示。當某個視窗因命令雍塞時,其它視窗也無法執行操作。
### 2. exec
Docker 1.3.0 版起提供 exec 指令,可以在容器內直接執行任意命令
> 指令格式
> docker exec [-d|--detach] [--detach-keys[=[]]] [-i|--interactive] [--privileged] [-t|--tty] [-u|--user[=USER]] CONTAINER COMMAND [ARG...]
例如
```
$ docker exec -it b210 /bin/bash
root@b210e0160499:/# exit
```
### 3. nsenter
在 util-linux 套件版本 2.23 之後包含 nsenter 工具。
要使用 nsenter 連接到容器,需要容器程序的 PID,透過以下指令取得:
> PID=$(docker inspect --format "{{ .State.Pid }}" )
完整範例
```
$ docker ps
CONTAINER ID IMAGE COMMAND CREATED STATUS PORTS NAMES
b210e0160499 ubuntu "/bin/bash" 28 minutes ago Up 18 minutes condescending_payne
$ docker inspect --format "{{ .State.Pid }}" b210e0160499
18903
$ nsenter --target 18903 --mount --uts --ipc --net --pid
root@b210e0160499:/#
```
查看使用者和程序資訊
```
root@b210e0160499:/# w
07:04:48 up 20:35, 0 users, load average: 0.01, 0.01, 0.00
USER TTY FROM LOGIN@ IDLE JCPU PCPU WHAT
root@b210e0160499:/# ps -ef
UID PID PPID C STIME TTY TIME CMD
root 1 0 0 06:44 pts/0 00:00:00 /bin/bash
root 26 0 0 07:03 pts/0 00:00:00 -bash
root 32 26 0 07:05 pts/0 00:00:00 ps -ef
```
## 移除容器
> docker rm [-f|--force] [-l|--link] [-v|--volumes] CONTAINER [CONTAINER...]
* -f, --force=false: 是否強制停止並刪除執行中的容器
* -l, --link=false: 刪除容器連接,但保留容器
* -v, --volumes=false: 刪除容器掛載的 volume
```
$ docker container rm f4aa7204185f
f4aa7204185f
或
$ docker rm f4aa7204185f
f4aa7204185f
```
## 匯入和匯出容器 import & export
要將容器搬遷至另一個系統時可以使用Docker 的匯出和匯入功能。
### 1. 匯出容器 export
> docker export [-o|--output[=""]] CONTAINER
範例
```
$ docker ps
CONTAINER ID IMAGE COMMAND CREATED STATUS PORTS NAMES
b210e0160499 ubuntu "/bin/bash" 41 minutes ago Up 31 minutes condescending_payne
$ docker export -o test.tar b210
或
$ docker export b210 > test.tar
```
### 2. 匯入容器 import
> docker import [-c|--change[=[]]] [-m|--message[=MESSAGE]] file|URL|-[REPOSITORY[:TAG]]
```
$ cat test.tar | docker import - test/ubuntu:123
```
# 倉庫 (Repository)
## 搜尋
```
$ docker search ubuntu
```
2019-03-07
Hyper-V 內部虛擬交換器 NAT Static Mapping
markdown
在Hyper-V 中安裝好虛擬機後,若是使用內部虛擬交換器(Internal Virtual Switch)則需要將 Host 的 port 對應到虛擬機的 port,外部的主機才能透過 Host 的 IP:port 連線到虛擬機的服務。這裡透過 Powershell 命令建立 NAT 的規則。
# 建立 NAT Static Mapping
## 實驗環境
* Host: Windows 10 Pro (IP:192.168.100.1)
* Hyper-V: 二台虛擬機
1. win2019: Windows 2019 Standard (IP: 192.168.200.2)
2. ubuntu1804: Ubuntu 18.04.1 (IP: 192.168.200.3)
虛擬交換器的建立方式,請參考[Hyper-V 虛擬網路交換器設定](https://uzch.blogspot.com/2019/03/hyper-v.html),此文中 Step 2.2 有使用 `New-NetNAT` 指令建立 NAT,在此文中有用到。
我在 Hyper-V 已建立內部虛擬交換器,名稱`InternalSwitch`:
```
IPv4 Address. . . . . . . . . . . : 192.168.200.1
Subnet Mask . . . . . . . . . . . : 255.255.255.0
```
## 新增 NetNAT
先確認是否有已有建立好與網路介面卡名稱`vEthernet(InternalSwitch)` 所設定的私有地址範圍相同的 NAT。 我這裡 vEthernet(InternalSwitch) 設定的地址範圍是 `192.168.200.0/24`。
```
Get-NetNat
```
取回的NAT設定結果
 如果 Get-NetNat 的結果為空的,需要配置一個NAT網路的地址範圍, `-Name "NATNetwork"` 的 NATNetwork 可以更改為易於識別的名稱。
```
New-NetNAT -Name "NATNetwork" -InternalIPInterfaceAddressPrefix 192.168.200.0/24
```
配置將在虛擬交換器上運行的NAT網路的網路地址; 這是虛擬機將在抽象虛擬交換機中使用的私有地址範圍。請注意,上一步中的IPv4地址必須在此範圍內
## NAT 規則範例
如果要讓外部能連到虛擬機的網頁服務,則要能連到虛擬機的 port:80,參閱以下範例:
* 外部IP(ExternalIPAddress): 0.0.0.0
* 外部通訊埠(ExternalPort): 80
* 內部IP(InternalIPAddress): 192.168.200.2
* 內部通訊埠(InternalPort): 80
```
Add-NetNatStaticMapping -ExternalIPAddress "0.0.0.0/0" -ExternalPort 80 -Protocol TCP -InternalIPAddress "192.168.200.2" -InternalPort 80 -NatName NATNetwork
```
* ExternalIPAddress: 這是指定要轉送的來源IP,這裡指的是 Host 主機設定的 IP;這可以是特定的實體 IP 或是 0.0.0.0/0 這是 Host 主機上全部 IP 。
* ExternalPort: 這是要接收轉送的通訊埠,例如 Web 是 80,遠端桌面是 3389.
* Protocol: 這只能是 TCP 或 UDP.
* InternalIPAddress: 這是指定要轉送給已啟用 NAT 對應的虛擬機的IP.
* InternalPort: 這是指定虛擬機的通訊埠.
## 通訊埠轉送
在前一個例子中,只建立了一個使用 TCP 80 的 NAT 規則,此時只有虛擬交換器只有轉送監聽單一個 80 port。
以下我們使用二台虛擬機將外部的通訊埠請求轉送到內部,這裡 VM1 的遠端桌面(3389) 和 VM2 的 SSH(22) 要設定可連入:
* VM1 win2019: Windows 2019 Standard (IP: 192.168.200.2 通訊埠 3389) 外部通訊埠 60002
* VM2 ubuntu1804: Ubuntu 18.04.1 (IP: 192.168.200.3 通訊埠 22) 外部通訊埠 60003
```
Add-NetNatStaticMapping -ExternalIPAddress "0.0.0.0/24" -ExternalPort 60002 -Protocol TCP -InternalIPAddress "192.168.200.2" -InternalPort 3389 -NatName NATNetwork
Add-NetNatStaticMapping -ExternalIPAddress "0.0.0.0/24" -ExternalPort 60003 -Protocol TCP -InternalIPAddress "192.168.200.3" -InternalPort 22 -NatName NATNetwork
```
就可以從其它主機連線,使用遠端桌面連線到 VM1
```
mstsc /v:192.168.88.82:60002
```
使用 win10 的 ssh 指令連到 VM2
```
ssh username@192.168.88.82 -p 60003
```
這裡 ubuntu 記得要開防火牆允許連入 port 22
開啟防火牆 允許 192.168.100.8 連入 22
```
sudo ufw allow from 192.168.100.8 to any port 22 proto tcp
```
刪除防火牆設定
```
sudo ufw delete allow from 192.168.100.8 to any port 22 proto tcp
```
## 參考:
* [Using a NAT Virtual Switch with Hyper-V](https://www.petri.com/using-nat-virtual-switch-hyper-v) - March 17, 2017 by [Aidan Finn](https://www.petri.com/author/aidan-finn)
* [Create NAT Rules for the Hyper-V NAT Virtual Switch](https://www.petri.com/create-nat-rules-hyper-v-nat-virtual-switch) - April 10, 2017 by [Aidan Finn](https://www.petri.com/author/aidan-finn)
如果 Get-NetNat 的結果為空的,需要配置一個NAT網路的地址範圍, `-Name "NATNetwork"` 的 NATNetwork 可以更改為易於識別的名稱。
```
New-NetNAT -Name "NATNetwork" -InternalIPInterfaceAddressPrefix 192.168.200.0/24
```
配置將在虛擬交換器上運行的NAT網路的網路地址; 這是虛擬機將在抽象虛擬交換機中使用的私有地址範圍。請注意,上一步中的IPv4地址必須在此範圍內
## NAT 規則範例
如果要讓外部能連到虛擬機的網頁服務,則要能連到虛擬機的 port:80,參閱以下範例:
* 外部IP(ExternalIPAddress): 0.0.0.0
* 外部通訊埠(ExternalPort): 80
* 內部IP(InternalIPAddress): 192.168.200.2
* 內部通訊埠(InternalPort): 80
```
Add-NetNatStaticMapping -ExternalIPAddress "0.0.0.0/0" -ExternalPort 80 -Protocol TCP -InternalIPAddress "192.168.200.2" -InternalPort 80 -NatName NATNetwork
```
* ExternalIPAddress: 這是指定要轉送的來源IP,這裡指的是 Host 主機設定的 IP;這可以是特定的實體 IP 或是 0.0.0.0/0 這是 Host 主機上全部 IP 。
* ExternalPort: 這是要接收轉送的通訊埠,例如 Web 是 80,遠端桌面是 3389.
* Protocol: 這只能是 TCP 或 UDP.
* InternalIPAddress: 這是指定要轉送給已啟用 NAT 對應的虛擬機的IP.
* InternalPort: 這是指定虛擬機的通訊埠.
## 通訊埠轉送
在前一個例子中,只建立了一個使用 TCP 80 的 NAT 規則,此時只有虛擬交換器只有轉送監聽單一個 80 port。
以下我們使用二台虛擬機將外部的通訊埠請求轉送到內部,這裡 VM1 的遠端桌面(3389) 和 VM2 的 SSH(22) 要設定可連入:
* VM1 win2019: Windows 2019 Standard (IP: 192.168.200.2 通訊埠 3389) 外部通訊埠 60002
* VM2 ubuntu1804: Ubuntu 18.04.1 (IP: 192.168.200.3 通訊埠 22) 外部通訊埠 60003
```
Add-NetNatStaticMapping -ExternalIPAddress "0.0.0.0/24" -ExternalPort 60002 -Protocol TCP -InternalIPAddress "192.168.200.2" -InternalPort 3389 -NatName NATNetwork
Add-NetNatStaticMapping -ExternalIPAddress "0.0.0.0/24" -ExternalPort 60003 -Protocol TCP -InternalIPAddress "192.168.200.3" -InternalPort 22 -NatName NATNetwork
```
就可以從其它主機連線,使用遠端桌面連線到 VM1
```
mstsc /v:192.168.88.82:60002
```
使用 win10 的 ssh 指令連到 VM2
```
ssh username@192.168.88.82 -p 60003
```
這裡 ubuntu 記得要開防火牆允許連入 port 22
開啟防火牆 允許 192.168.100.8 連入 22
```
sudo ufw allow from 192.168.100.8 to any port 22 proto tcp
```
刪除防火牆設定
```
sudo ufw delete allow from 192.168.100.8 to any port 22 proto tcp
```
## 參考:
* [Using a NAT Virtual Switch with Hyper-V](https://www.petri.com/using-nat-virtual-switch-hyper-v) - March 17, 2017 by [Aidan Finn](https://www.petri.com/author/aidan-finn)
* [Create NAT Rules for the Hyper-V NAT Virtual Switch](https://www.petri.com/create-nat-rules-hyper-v-nat-virtual-switch) - April 10, 2017 by [Aidan Finn](https://www.petri.com/author/aidan-finn)
2019-03-06
Hyper-V 虛擬網路交換器設定
markdown
說明 hyper-v 裡的三種虛擬網路設定差異,實作三個虛擬網路交換器實驗,讓虛擬機器互連。
1. 私人虛擬交換器:二台虛擬機互連
2. 內部虛擬交換器:二台虛擬機互連且 Host 也可連 二台虛擬機
3. 外部虛擬交換器:讓虛擬機設定跟 Host 主機的相同 IP 區段,Host 與虛擬機互連
# 三種虛擬交換器
* 外部(External):會橋接到實體機器的網路卡,讓虛擬機可以透過實體機的網路卡連線到外部網路
* 內部(Internal):可以跟所有虛擬機器互通,且可以和宿主主機網路互通
* 私人(Private):虛擬機器的網路設定在相同區段時可以透過這個虛擬交換器互通
# 實驗環境
* Host: Windows 10 Pro (IP:192.168.100.1)
* Hyper-V: 二台虛擬機
1. win2019: Windows 2019 Standard (IP: 192.168.200.2)
2. ubuntu1804: Ubuntu 18.04.1 (IP: 192.168.200.3)
---
# 實驗1:私人虛擬交換器
IP Address:
* win2019: 192.168.200.2
* ubuntu1804: 192.168.200.3
## Step 1.1. 新增「虛擬交換器」
新增一個私人虛擬交換器(Private Virtual Switch),名稱為「PrivateSwitch」
```
New-VMSwitch -Name 'PrivateSwitch' -SwitchType Private
```
## Step 1.2. 查看 win2019 虛擬機的網路介面卡設定,將其改成 `PrivateSwitch`
```
Get-VM "win2019" | Get-VMNetworkAdapter
Get-VM "win2019" | Get-VMNetworkAdapter | Connect-VMNetworkAdapter -SwitchName "PrivateSwitch"
Get-VM "win2019" | Get-VMNetworkAdapter
```
## Step 1.3. 查看 ubuntu1804 虛擬機的網路介面卡設定,將其改成 `PrivateSwitch`
```
Get-VM "ubuntu1804" | Get-VMNetworkAdapter
Get-VM "ubuntu1804" | Get-VMNetworkAdapter | Connect-VMNetworkAdapter -SwitchName "PrivateSwitch"
Get-VM "ubuntu1804" | Get-VMNetworkAdapter
```
## Step 1.4. 設定 win2019 虛擬機的網路介面卡 IP Address
```
Description . . . . . . . . . . . : Microsoft Hyper-V Network Adapter
DHCP Enabled. . . . . . . . . . . : No
IPv4 Address. . . . . . . . . . . : 192.168.200.2
Subnet Mask . . . . . . . . . . . : 255.255.255.0
Default Gateway . . . . . . . . . : 192.168.200.1
DNS Servers . . . . . . . . . . . : 192.168.200.1
```
## Step 1.5. 設定 ubuntu1804虛擬機的網路介面卡 IP Address
```
Description . . . . . . . . . . . : Microsoft Hyper-V Network Adapter
DHCP Enabled. . . . . . . . . . . : No
IPv4 Address. . . . . . . . . . . : 192.168.200.3
Subnet Mask . . . . . . . . . . . : 255.255.255.0
Default Gateway . . . . . . . . . : 192.168.200.1
DNS Servers . . . . . . . . . . . : 192.168.200.1
```
查看網路介面卡名稱
```
ifconfig
```
這裡我要修改的目標網路介面卡名稱是 `eth0`
 在 ubuntu1804 透過 netplan 修改網卡設定。
```
# 備份原本的設定檔
sudo cp /etc/netplan/50-cloud-init.yaml /etc/netplan/50.cloud-init.yaml.bak
```
編輯 50-cloud-init.yaml,將 50-cloud-init.yaml 設定改成下面內容
```
network:
ethernets:
eth0:
addresses: [192.168.200.3/24]
gateway4: 192.168.200.1
nameservers:
addresses: [192.168.200.1]
dhcp4: no
version: 2
```
套用設定
```
# 檢查設定
sudo netplan --debug apply
# 套用設定
sudo netplan apply
```
## Step 1.6. 測試連線,win2019 ping ubuntu1804
在 win2019 開啟命令提示字元
```
ping 192.168.200.3
```
應該回應正常
## Step 1.7. 測試連線,ubuntu1804 ping win2019
在 ubuntu1804 的 Terminal
```
ping 192.168.200.2
```
測試連到 win2019,此時連線應該會失敗,win2019 沒有回應,是因為預設 windows 伺服器會開啟防火牆,所以 ICMP 是會被擋掉的。這裡測試時可以暫時停用防火牆。
在 win2019 虛擬機中執行,停用防火牆:
```powershell
Set-NetFirewallProfile -Profile Domain,Public,Private -Enabled False
```
再一次測試 ubuntu1804 ping win2019,應該成功了
```
ping 192.168.200.2
```
在 win2019 虛擬機中執行,啟用防火牆:
```powershell
Set-NetFirewallProfile -Profile Domain,Public,Private -Enabled True
```
如果要啟用 ICMP 通過防火牆,可以用下面命令
```
New-NetFirewallRule -DisplayName "Allow inbound ICMPv4" -Direction Inbound -Protocol ICMPv4 -IcmpType 8 -RemoteAddress
在 ubuntu1804 透過 netplan 修改網卡設定。
```
# 備份原本的設定檔
sudo cp /etc/netplan/50-cloud-init.yaml /etc/netplan/50.cloud-init.yaml.bak
```
編輯 50-cloud-init.yaml,將 50-cloud-init.yaml 設定改成下面內容
```
network:
ethernets:
eth0:
addresses: [192.168.200.3/24]
gateway4: 192.168.200.1
nameservers:
addresses: [192.168.200.1]
dhcp4: no
version: 2
```
套用設定
```
# 檢查設定
sudo netplan --debug apply
# 套用設定
sudo netplan apply
```
## Step 1.6. 測試連線,win2019 ping ubuntu1804
在 win2019 開啟命令提示字元
```
ping 192.168.200.3
```
應該回應正常
## Step 1.7. 測試連線,ubuntu1804 ping win2019
在 ubuntu1804 的 Terminal
```
ping 192.168.200.2
```
測試連到 win2019,此時連線應該會失敗,win2019 沒有回應,是因為預設 windows 伺服器會開啟防火牆,所以 ICMP 是會被擋掉的。這裡測試時可以暫時停用防火牆。
在 win2019 虛擬機中執行,停用防火牆:
```powershell
Set-NetFirewallProfile -Profile Domain,Public,Private -Enabled False
```
再一次測試 ubuntu1804 ping win2019,應該成功了
```
ping 192.168.200.2
```
在 win2019 虛擬機中執行,啟用防火牆:
```powershell
Set-NetFirewallProfile -Profile Domain,Public,Private -Enabled True
```
如果要啟用 ICMP 通過防火牆,可以用下面命令
```
New-NetFirewallRule -DisplayName "Allow inbound ICMPv4" -Direction Inbound -Protocol ICMPv4 -IcmpType 8 -RemoteAddress -Action Allow
New-NetFirewallRule -DisplayName "Allow inbound ICMPv6" -Direction Inbound -Protocol ICMPv6 -IcmpType 8 -RemoteAddress -Action Allow
```
或
```
#IPv4
netsh advfirewall firewall add rule name="ICMP Allow incoming V4 echo request" protocol="icmpv4:8,any" dir=in action=allow
#IPv6
netsh advfirewall firewall add rule name="ICMP Allow incoming V6 echo request" protocol="icmpv6:8,any" dir=in action=allow
```
---
# 實驗二:內部虛擬交換器
IP Address:
* Host: 192.168.100.1, vEthernet (InternalSwitch): 192.168.200.1
* win2019: 192.168.200.2
* ubuntu1804: 192.168.200.3
## Step 2.1. 新增內部虛擬交換器
```
New-VMSwitch -Name 'InternalSwitch' -SwitchType Internal
```
執行後會新增一個名稱為`vEthernet (InternalSwitch)`的網路介面卡
## Step 2.2. 設定 vEthernet (InternalSwitch) 的 IP Address
```
New-NetIPAddress -IPAddress 192.168.200.1 -PrefixLength 24 -InterfaceAlias “vEthernet (InternalSwitch)”
```
然後配置將在虛擬交換器上運行的NAT網路的網路地址; 這是虛擬機將在抽象虛擬交換機中使用的私有地址範圍。請注意,上一步中的IPv4地址必須在此範圍內。
```
New-NetNAT -Name "NATNetwork" -InternalIPInterfaceAddressPrefix 192.168.200.0/24
```
## Step 2.3. 查看 win2019 虛擬機的網路介面卡設定,將其改成 `InternalSwitch`
```
Get-VM "win2019" | Get-VMNetworkAdapter
Get-VM "win2019" | Get-VMNetworkAdapter | Connect-VMNetworkAdapter -SwitchName "InternalSwitch"
Get-VM "win2019" | Get-VMNetworkAdapter
```
## Step 2.4. 查看 ubuntu1804 虛擬機的網路介面卡設定,將其改成 `InternalSwitch`
```
Get-VM "ubuntu1804" | Get-VMNetworkAdapter
Get-VM "ubuntu1804" | Get-VMNetworkAdapter | Connect-VMNetworkAdapter -SwitchName "InternalSwitch"
Get-VM "ubuntu1804" | Get-VMNetworkAdapter
```
## Step 2.5. 設定 win2019 虛擬機的網路介面卡 IP Address
```
Description . . . . . . . . . . . : Microsoft Hyper-V Network Adapter
DHCP Enabled. . . . . . . . . . . : No
IPv4 Address. . . . . . . . . . . : 192.168.200.2
Subnet Mask . . . . . . . . . . . : 255.255.255.0
Default Gateway . . . . . . . . . : 192.168.200.1
DNS Servers . . . . . . . . . . . : 192.168.200.1
```
這裡 Gateway 和 DNS 是指定 `vEthernet (InternalSwitch)`的網路介面卡 IP
## Step 2.6. 設定 ubuntu1804虛擬機的網路介面卡 IP Address(設定方式參考 Step 1.5)
```
Description . . . . . . . . . . . : Microsoft Hyper-V Network Adapter
DHCP Enabled. . . . . . . . . . . : No
IPv4 Address. . . . . . . . . . . : 192.168.200.3
Subnet Mask . . . . . . . . . . . : 255.255.255.0
Default Gateway . . . . . . . . . : 192.168.200.1
DNS Servers . . . . . . . . . . . : 192.168.200.1
```
這裡 Gateway 和 DNS 是指定 `vEthernet (InternalSwitch)`的網路介面卡 IP
## 測試連線
### 先暫時停用 host 和 win2019 的防火牆
```powershell
Set-NetFirewallProfile -Profile Domain,Public,Private -Enabled False
```
### 測試連線:win2019 ping ubuntu1804
```
ping 192.168.200.3
```
### 測試連線:win2019 ping host
```
ping 192.168.100.1
```
### 測試連線:ubuntu1804 ping win2019
```
ping 192.168.200.2
```
### 測試連線:ubuntu1804 ping host
```
ping 192.168.100.1
```
### 測試連線:host ping ubuntu1804
```
ping 192.168.200.3
```
### 測試連線:host ping win2019
```
ping 192.168.200.2
```
### 測試完,記得再啟用防火牆
```powershell
Set-NetFirewallProfile -Profile Domain,Public,Private -Enabled True
```
---
# 實驗三:外部虛擬交換器
此範例只示範設定 win2019 使用外部虛擬交換器連線
IP Address:
* Host: 被橋接後原設定套用到 `vEthernet (ExternalSwitch)`, vEthernet (ExternalSwitch): 192.168.100.1
* win2019: 192.168.100.2
## Step 3.1. 新增外部虛擬交換器
```
New-VMSwitch -Name 'ExternalSwitch' -NetAdapterName 'Ethernet' -AllowManagementOS $true
```
-Name: 要新增的虛擬交換器名稱 `ExternalSwitch`
-NetAdapterName: 透過`Ethernet` 的網路卡橋接連線
-AllowManagementOS: 允許
## Step 3.2. 查看 win2019 虛擬機的網路介面卡設定,將其改成 `ExternalSwitch`
```
Get-VM "win2019" | Get-VMNetworkAdapter
Get-VM "win2019" | Get-VMNetworkAdapter | Connect-VMNetworkAdapter -SwitchName "ExternalSwitch"
Get-VM "win2019" | Get-VMNetworkAdapter
```
## Step 3.2. 修改 win2019 的 IP Address
如果外部 DHCP 配發 IP ,則 win2019 虛擬機中網路介面卡的 IP 與 DNS 可自動取得。
若要指定IP,則依Host 主機的網路介面卡設定方式設定,例如:
```
Description . . . . . . . . . . . : Microsoft Hyper-V Network Adapter
DHCP Enabled. . . . . . . . . . . : No
IPv4 Address. . . . . . . . . . . : 192.168.100.2
Subnet Mask . . . . . . . . . . . : 255.255.255.0
Default Gateway . . . . . . . . . : 192.168.100.254
DNS Servers . . . . . . . . . . . : 168.95.1.1
```
這裡的範例 DNS Servers 是指定成 Hinet 的 168.95.1.1。也可以指定成你慣用或自架的 DNS。
---
# 參考:
* 微軟文件[新增虛擬交換器](https://docs.microsoft.com/en-us/windows-server/virtualization/hyper-v/get-started/create-a-virtual-switch-for-hyper-v-virtual-machines)
* [What is the Hyper-V Virtual Switch and how does it work?](https://www.altaro.com/hyper-v/the-hyper-v-virtual-switch-explained-part-1//) 28 Jun 2016 by [Eric Siron](https://www.altaro.com/hyper-v/author/eric-siron/)
* [Managing the Hyper-V Default Switch in Windows 10 version 1709 and higher with PowerShell](https://mikefrobbins.com/2018/11/08/managing-the-hyper-v-default-switch-in-windows-10-version-1709-and-higher-with-powershell/) [MIKE F ROBBINS](https://mikefrobbins.com/author/mikefrobbins/) NOVEMBER 8, 2018
* Windows Server 2012 新手村 [(05) 規劃與設定 Hyper-V 虛擬網路](https://channel9.msdn.com/Series/Windows-Server-2012-Entry-Level/Windows-Server-2012-Entry-Level-5)
 在 ubuntu1804 透過 netplan 修改網卡設定。
```
# 備份原本的設定檔
sudo cp /etc/netplan/50-cloud-init.yaml /etc/netplan/50.cloud-init.yaml.bak
```
編輯 50-cloud-init.yaml,將 50-cloud-init.yaml 設定改成下面內容
```
network:
ethernets:
eth0:
addresses: [192.168.200.3/24]
gateway4: 192.168.200.1
nameservers:
addresses: [192.168.200.1]
dhcp4: no
version: 2
```
套用設定
```
# 檢查設定
sudo netplan --debug apply
# 套用設定
sudo netplan apply
```
## Step 1.6. 測試連線,win2019 ping ubuntu1804
在 win2019 開啟命令提示字元
```
ping 192.168.200.3
```
應該回應正常
## Step 1.7. 測試連線,ubuntu1804 ping win2019
在 ubuntu1804 的 Terminal
```
ping 192.168.200.2
```
測試連到 win2019,此時連線應該會失敗,win2019 沒有回應,是因為預設 windows 伺服器會開啟防火牆,所以 ICMP 是會被擋掉的。這裡測試時可以暫時停用防火牆。
在 win2019 虛擬機中執行,停用防火牆:
```powershell
Set-NetFirewallProfile -Profile Domain,Public,Private -Enabled False
```
再一次測試 ubuntu1804 ping win2019,應該成功了
```
ping 192.168.200.2
```
在 win2019 虛擬機中執行,啟用防火牆:
```powershell
Set-NetFirewallProfile -Profile Domain,Public,Private -Enabled True
```
如果要啟用 ICMP 通過防火牆,可以用下面命令
```
New-NetFirewallRule -DisplayName "Allow inbound ICMPv4" -Direction Inbound -Protocol ICMPv4 -IcmpType 8 -RemoteAddress
在 ubuntu1804 透過 netplan 修改網卡設定。
```
# 備份原本的設定檔
sudo cp /etc/netplan/50-cloud-init.yaml /etc/netplan/50.cloud-init.yaml.bak
```
編輯 50-cloud-init.yaml,將 50-cloud-init.yaml 設定改成下面內容
```
network:
ethernets:
eth0:
addresses: [192.168.200.3/24]
gateway4: 192.168.200.1
nameservers:
addresses: [192.168.200.1]
dhcp4: no
version: 2
```
套用設定
```
# 檢查設定
sudo netplan --debug apply
# 套用設定
sudo netplan apply
```
## Step 1.6. 測試連線,win2019 ping ubuntu1804
在 win2019 開啟命令提示字元
```
ping 192.168.200.3
```
應該回應正常
## Step 1.7. 測試連線,ubuntu1804 ping win2019
在 ubuntu1804 的 Terminal
```
ping 192.168.200.2
```
測試連到 win2019,此時連線應該會失敗,win2019 沒有回應,是因為預設 windows 伺服器會開啟防火牆,所以 ICMP 是會被擋掉的。這裡測試時可以暫時停用防火牆。
在 win2019 虛擬機中執行,停用防火牆:
```powershell
Set-NetFirewallProfile -Profile Domain,Public,Private -Enabled False
```
再一次測試 ubuntu1804 ping win2019,應該成功了
```
ping 192.168.200.2
```
在 win2019 虛擬機中執行,啟用防火牆:
```powershell
Set-NetFirewallProfile -Profile Domain,Public,Private -Enabled True
```
如果要啟用 ICMP 通過防火牆,可以用下面命令
```
New-NetFirewallRule -DisplayName "Allow inbound ICMPv4" -Direction Inbound -Protocol ICMPv4 -IcmpType 8 -RemoteAddress 2019-03-04
vlmcsd setup on Ubuntu 18.04
markdown
在 ubuntu 18.04.1 架 kms 服務,啟用大量授權的系統
自建 kms 是使用 Open Source 的專案 [vlmcsd](https://github.com/Wind4/vlmcsd),以下使用虛擬機測試,IP是在虛擬的IP區段。
環境 Hyper-V 中建立二台VM:
* ubuntu 18.04.1 (VM) IP: 192.168.123.101
* Windows Server 2019 (VM) IP: 192.168.123.102
搭載 kms
下載 vlmcsd 已編譯好的檔案
```
wget https://github.com/Wind4/vlmcsd/releases/download/svn1112/binaries.tar.gz
```
解壓縮
```
tar -zxvf binaries.tar.gz
```
切換至解壓縮的目錄
```
cd binaries
```
目錄中會有各個作業系統的資料夾
```
Android DragonFly FreeBSD Hurd iOS Linux MacOSX Minix NetBSD OpenBSD Solaris Windows
```
選擇需要的版本,這裡使用 Ubuntu 為例,將 `vlmcsd-x64-musl-static 複製為 kms,然後將 kms 移到 /usr/bin 資料夾。賦與 kms 的執行權限
```
cd Linux/intel/static
cp vlmcsd-x64-musl-static kms && sudo mv kms /usr/bin
chmod +x /usr/bin/kms
```
然後直接輸入 kms 即可運行服務
```
kms
```
執行的服務通訊埠為 1688,確認是否運行成功
```
netstat -an | grep 1688
```
## 設定防火牆放行 1688 port
### 使用 ufw
```
sudo ufw enable
# 查看狀態
sudo ufw status
# 允許 1688
# sudo ufw allow from to port proto
sudo ufw allow from 192.168.123.0/24 to any port 1688 proto tcp
```
### 使用 firewall-cmd 設定允許 1688 port 連入
```
firewall-cmd --zone=public --add-port=1688/tcp
firewall-cmd --zone=public --permanent --add-port=1688/tcp
firewall-cmd --reload
```
或
### 使用 iptables 設定允許 1688 port 連入,(註2)
```
iptables -I INPUT -p tcp -m state --state NEW -m tcp --dport 1688 -j ACCEPT
sudo iptables-save > ~/iptables.conf
sudo iptables-restore < ~/iptables.conf
```
## 建立開機啟動
```
# 建立資料夾
mkdir /usr/lib/systemd/system
# 編輯檔案
vim /usr/lib/systemd/system/kms.service
```
貼上以下內容
```
[Unit]
Description=KMS Service
After=network.target
Wants=network.target
[Service]
Type=forking
ExecStart=/usr/bin/kms
ExecStop=/usr/bin/killall kms
[Install]
WantedBy=multi-user.target
```
加入開機自啟動 kms.service
```
systemctl enable kms.service
```
啟動 kms
```
systemctl start kms.service
```
停止 kms
```
systemctl stop kms.service
```
或使用 rc.local 來開機自啟
```
vim /etc/rc.local
```
加入
```
/usr/bin/kms
```
## 激活金鑰
以下用操作皆使用管理員身份運行命令
啟用
```
解除原先金鑰 (如果安裝時序號是正確的不需此行)
slmgr.vbs -upk
選擇金鑰,請依照底下的金鑰列表作選擇 (如果安裝時序號是正確的不需此行)
slmgr.vbs -ipk xxxxx-xxxxx-xxxxx-xxxxx-xxxxx
設定KMS伺服器(我這裡kms架在 ubuntu 192.168.123.101:1688)
slmgr.vbs -skms 192.168.123.101
激活
slmgr.vbs -ato
顯示KMS相關資訊
slmgr.vbs -dlv
```
啟用 office 2010/2013/2016
```
if exist "C:\Program Files (x86)\Microsoft Office\Office14\ospp.vbs" (cd "C:\Program Files (x86)\Microsoft Office\Office14") else (cd "c:\Program Files\Microsoft Office\Office14")
if exist "C:\Program Files (x86)\Microsoft Office\Office15\ospp.vbs" (cd "C:\Program Files (x86)\Microsoft Office\Office15") else (cd "c:\Program Files\Microsoft Office\Office15")
if exist "C:\Program Files (x86)\Microsoft Office\Office16\ospp.vbs" (cd "C:\Program Files (x86)\Microsoft Office\Office16") else (cd "c:\Program Files\Microsoft Office\Office16")
cscript ospp.vbs /osppsvcauto
cscript ospp.vbs /sethst:192.168.123.101
cscript ospp.vbs /act
cscript ospp.vbs /dstatus
```
[微軟官方 KMS 列表](https://docs.microsoft.com/en-us/previous-versions/windows/it-pro/windows-server-2012-R2-and-2012/jj612867(v=ws.11))
```
https://docs.microsoft.com/en-us/previous-versions/windows/it-pro/windows-server-2012-R2-and-2012/jj612867(v=ws.11)
```
### 註1. 'Service' Command not found
The `service` command is part of the [sysvinit-utils](https://packages.debian.org/jessie/sysvinit-utils) package.
Install it with:
```
apt-get install sysvinit-utils
```
But most probably, it is already installed in `/usr/sbin/service`.
If it's missing in your `$PATH`, add this line to your `~/.bashrc`:
```
PATH=$PATH:/usr/sbin
```
### 註2. iptables: unrecognized service
檢查 iptables 是否安裝
```
sudo whereis iptables
```
出現 `iptables: /sbin/iptables /usr/share/iptables /usr/share/man/man8/iptables.8.gz` 表示已經安裝了 iptables。
如果沒有安裝,可以通過以下命令安裝
```
sudo apt-get install iptables
```
## 參考
* [Wind4/vlmcsd - GITHUB](https://github.com/Wind4/vlmcsd)
* [Ubuntu 伺服器指南:Firewall](https://help.ubuntu.com/lts/serverguide/firewall.html#firewall-ufw)
* [Ubuntu - UFW](https://help.ubuntu.com/community/UFW)
* [Linux上利用vlmcsd搭建KMS伺服器](https://wijtb.nctu.me/archives/54/)
* [Ubuntu 14.04 Iptables](http://www.cnblogs.com/general0878/p/5757377.html)
* [Ubuntu based GNU/Linux 上的防火牆 (ufw) 基本設定 - Peter Dave](https://www.peterdavehello.org/2016/01/ubuntu-based-gnulinux-firewall-ufw-essential-config/)
* [Ubuntu使用iptables配置防火墙提示:unrecognized service(Ubuntu配置iptables防火墙)](https://www.cnblogs.com/EasonJim/p/6851007.html)
* [Linux開機啟動管理—systemd使用](https://codertw.com/%E7%A8%8B%E5%BC%8F%E8%AA%9E%E8%A8%80/470748/)
2019-02-27
Hyper-V 的虛擬機中再安裝 Hyper-V
markdown
Windows 10 中使用 Hyper-V 架設虛擬機(Windows Server 2019),然後再虛擬機中再安裝 Hyper-V。
# Windows 10 宿主系統使用 Hyper-V,加一台 Windows Server 2019 的 Guest,再Guest系統中再安裝 Hyper-V。
## 環境
Host: Windows 10; 此篇文章後面簡稱 Win10
Guest: Windows Server 2019; 此篇文章後面簡稱 WinServer2019
已在 Hyper-V 中安裝好 Windows Server 2019 Standard 版本,虛擬機的名稱為 `win2019`
 新增角色和功能
 安裝角色為主的功能
 選擇目前這台 Win2019 虛擬伺服器
 找到 `Hyper-V` 勾選它
 會詳細顯示要安裝的功能,按下「加入功能(Add Features)」
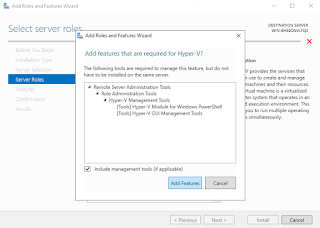 因為是在 win2019 裡面安裝 Hyper-V 時會出現錯誤,訊息如下:「Hyper-V cannot be installed: The processor does not have required virtualization capabilities.」,提示沒有辦法使用硬體支援虛擬化技術。
 為了讓 Guest 虛擬機 win2019 能夠再安裝上 Hyper-V,需要在宿主系統啟用 ExposeVirtualizationExtensions 給 win2019 的虛擬機。
將 win2019 關機
回到宿主系統,以管理者權限開啟 powershell,會透過以下二行指令操作改變 ExposeVirtualizationExtensions 的設定值。
```text
Get-VMProcessor -VMName
為了讓 Guest 虛擬機 win2019 能夠再安裝上 Hyper-V,需要在宿主系統啟用 ExposeVirtualizationExtensions 給 win2019 的虛擬機。
將 win2019 關機
回到宿主系統,以管理者權限開啟 powershell,會透過以下二行指令操作改變 ExposeVirtualizationExtensions 的設定值。
```text
Get-VMProcessor -VMName | fl *
Set-VMProcessor -VMName -ExposeVirtualizationExtensions $true
```
我這裡的 Guest(Target VM's name) 名稱是 `win2019`
```
Get-VMProcessor -VMName win2019 | fl *
Set-VMProcessor -VMName win2019 -ExposeVirtualizationExtensions $true
```
執行 `Get-VMProcessor -VMName win2019 | fl *`,列出 win2019 虛擬機的設定,可以看到 ExposeVirtualizationExtensions 目前的狀態是 false
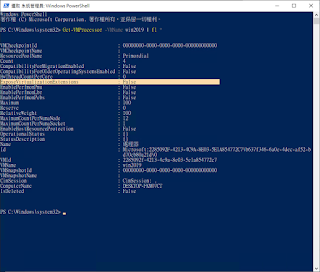 執行 `Set-VMProcessor -VMName win2019 -ExposeVirtualizationExtensions $true`,將 ExposeVirtualizationExtensions 啟用。
 完成上述操作後,再次啟動 win2019 ,再加入 Hyper-V 的功能,即可將 Hyper-V 功能加入 win2019 虛擬機中。
 ## 資料參考
* [Creating Nested Hyper-V machines with Windows Server 2016 ](https://www.altaro.com/hyper-v/creating-nested-hyper-v-windows-server-2016/)
## 資料參考
* [Creating Nested Hyper-V machines with Windows Server 2016 ](https://www.altaro.com/hyper-v/creating-nested-hyper-v-windows-server-2016/)
 新增角色和功能
 安裝角色為主的功能
 選擇目前這台 Win2019 虛擬伺服器
 找到 `Hyper-V` 勾選它
 會詳細顯示要安裝的功能,按下「加入功能(Add Features)」
 因為是在 win2019 裡面安裝 Hyper-V 時會出現錯誤,訊息如下:「Hyper-V cannot be installed: The processor does not have required virtualization capabilities.」,提示沒有辦法使用硬體支援虛擬化技術。
 為了讓 Guest 虛擬機 win2019 能夠再安裝上 Hyper-V,需要在宿主系統啟用 ExposeVirtualizationExtensions 給 win2019 的虛擬機。
將 win2019 關機
回到宿主系統,以管理者權限開啟 powershell,會透過以下二行指令操作改變 ExposeVirtualizationExtensions 的設定值。
```text
Get-VMProcessor -VMName
為了讓 Guest 虛擬機 win2019 能夠再安裝上 Hyper-V,需要在宿主系統啟用 ExposeVirtualizationExtensions 給 win2019 的虛擬機。
將 win2019 關機
回到宿主系統,以管理者權限開啟 powershell,會透過以下二行指令操作改變 ExposeVirtualizationExtensions 的設定值。
```text
Get-VMProcessor -VMName  執行 `Set-VMProcessor -VMName win2019 -ExposeVirtualizationExtensions $true`,將 ExposeVirtualizationExtensions 啟用。
 完成上述操作後,再次啟動 win2019 ,再加入 Hyper-V 的功能,即可將 Hyper-V 功能加入 win2019 虛擬機中。
 ## 資料參考
* [Creating Nested Hyper-V machines with Windows Server 2016 ](https://www.altaro.com/hyper-v/creating-nested-hyper-v-windows-server-2016/)
## 資料參考
* [Creating Nested Hyper-V machines with Windows Server 2016 ](https://www.altaro.com/hyper-v/creating-nested-hyper-v-windows-server-2016/)
2019-02-18
在 ubuntu, kali 系統安裝 Golang
markdown
# 在 ubuntu, kali 系統安裝 Golang
## 下載安裝檔
到[Go Programming Language下載頁](https://golang.org/dl/)下載 go1.11.5.linux-amd64.tar.gz。
```sh
curl -O https://dl.google.com/go/go1.11.5.linux-amd64.tar.gz
```
解壓縮到 /urs/local 資料夾,/urs/local 需要 sudo 權限
```sh
tar -C /usr/local -xzf go1.11.5.linux-amd64.tar.gz
```
將 /usr/local/go/bin 加入 PATH,編輯 `~/.profile` 加入下面這行
```text
export PATH=$PATH:/usr/local/go/bin
```
重載設定
```
source ~/.profile
```
可以使用 go 的版本查詢指令確認是否安裝成功
```bash
go version
```
顯示結果
```
go version go1.11.5 linux/amd64
```
查看環境設定
```
go env
```
```
GOARCH="amd64"
GOBIN=""
GOCACHE="/home/cww/.cache/go-build"
GOEXE=""
GOFLAGS=""
GOHOSTARCH="amd64"
GOHOSTOS="linux"
GOOS="linux"
GOPATH="/home/cww/go"
GOPROXY=""
GORACE=""
GOROOT="/usr/local/go"
GOTMPDIR=""
GOTOOLDIR="/usr/local/go/pkg/tool/linux_amd64"
GCCGO="gccgo"
CC="gcc"
CXX="g++"
CGO_ENABLED="1"
GOMOD=""
CGO_CFLAGS="-g -O2"
CGO_CPPFLAGS=""
CGO_CXXFLAGS="-g -O2"
CGO_FFLAGS="-g -O2"
CGO_LDFLAGS="-g -O2"
PKG_CONFIG="pkg-config"
GOGCCFLAGS="-fPIC -m64 -pthread -fmessage-length=0 -fdebug-prefix-map=/tmp/go-build806834644=/tmp/go-build -gno-record-gcc-switches"
```
GOROOT 是主程式的安裝路徑
GOPATH 是集中管理 code, package 和執行檔的目錄
若要更改 GOPATH 可以用下面指令更改
```
export GOPATH=$HOME/golang
```
通常在 GOPATH 中會有三個資料夾
* src - 放Go程式碼的地方
* pkg - 放Go package的地方
* bin - 編譯好的執行檔會放在這裡
訂閱:
意見 (Atom)