 如果 Get-NetNat 的結果為空的,需要配置一個NAT網路的地址範圍, `-Name "NATNetwork"` 的 NATNetwork 可以更改為易於識別的名稱。
```
New-NetNAT -Name "NATNetwork" -InternalIPInterfaceAddressPrefix 192.168.200.0/24
```
配置將在虛擬交換器上運行的NAT網路的網路地址; 這是虛擬機將在抽象虛擬交換機中使用的私有地址範圍。請注意,上一步中的IPv4地址必須在此範圍內
## NAT 規則範例
如果要讓外部能連到虛擬機的網頁服務,則要能連到虛擬機的 port:80,參閱以下範例:
* 外部IP(ExternalIPAddress): 0.0.0.0
* 外部通訊埠(ExternalPort): 80
* 內部IP(InternalIPAddress): 192.168.200.2
* 內部通訊埠(InternalPort): 80
```
Add-NetNatStaticMapping -ExternalIPAddress "0.0.0.0/0" -ExternalPort 80 -Protocol TCP -InternalIPAddress "192.168.200.2" -InternalPort 80 -NatName NATNetwork
```
* ExternalIPAddress: 這是指定要轉送的來源IP,這裡指的是 Host 主機設定的 IP;這可以是特定的實體 IP 或是 0.0.0.0/0 這是 Host 主機上全部 IP 。
* ExternalPort: 這是要接收轉送的通訊埠,例如 Web 是 80,遠端桌面是 3389.
* Protocol: 這只能是 TCP 或 UDP.
* InternalIPAddress: 這是指定要轉送給已啟用 NAT 對應的虛擬機的IP.
* InternalPort: 這是指定虛擬機的通訊埠.
## 通訊埠轉送
在前一個例子中,只建立了一個使用 TCP 80 的 NAT 規則,此時只有虛擬交換器只有轉送監聽單一個 80 port。
以下我們使用二台虛擬機將外部的通訊埠請求轉送到內部,這裡 VM1 的遠端桌面(3389) 和 VM2 的 SSH(22) 要設定可連入:
* VM1 win2019: Windows 2019 Standard (IP: 192.168.200.2 通訊埠 3389) 外部通訊埠 60002
* VM2 ubuntu1804: Ubuntu 18.04.1 (IP: 192.168.200.3 通訊埠 22) 外部通訊埠 60003
```
Add-NetNatStaticMapping -ExternalIPAddress "0.0.0.0/24" -ExternalPort 60002 -Protocol TCP -InternalIPAddress "192.168.200.2" -InternalPort 3389 -NatName NATNetwork
Add-NetNatStaticMapping -ExternalIPAddress "0.0.0.0/24" -ExternalPort 60003 -Protocol TCP -InternalIPAddress "192.168.200.3" -InternalPort 22 -NatName NATNetwork
```
就可以從其它主機連線,使用遠端桌面連線到 VM1
```
mstsc /v:192.168.88.82:60002
```
使用 win10 的 ssh 指令連到 VM2
```
ssh username@192.168.88.82 -p 60003
```
這裡 ubuntu 記得要開防火牆允許連入 port 22
開啟防火牆 允許 192.168.100.8 連入 22
```
sudo ufw allow from 192.168.100.8 to any port 22 proto tcp
```
刪除防火牆設定
```
sudo ufw delete allow from 192.168.100.8 to any port 22 proto tcp
```
## 參考:
* [Using a NAT Virtual Switch with Hyper-V](https://www.petri.com/using-nat-virtual-switch-hyper-v) - March 17, 2017 by [Aidan Finn](https://www.petri.com/author/aidan-finn)
* [Create NAT Rules for the Hyper-V NAT Virtual Switch](https://www.petri.com/create-nat-rules-hyper-v-nat-virtual-switch) - April 10, 2017 by [Aidan Finn](https://www.petri.com/author/aidan-finn)
如果 Get-NetNat 的結果為空的,需要配置一個NAT網路的地址範圍, `-Name "NATNetwork"` 的 NATNetwork 可以更改為易於識別的名稱。
```
New-NetNAT -Name "NATNetwork" -InternalIPInterfaceAddressPrefix 192.168.200.0/24
```
配置將在虛擬交換器上運行的NAT網路的網路地址; 這是虛擬機將在抽象虛擬交換機中使用的私有地址範圍。請注意,上一步中的IPv4地址必須在此範圍內
## NAT 規則範例
如果要讓外部能連到虛擬機的網頁服務,則要能連到虛擬機的 port:80,參閱以下範例:
* 外部IP(ExternalIPAddress): 0.0.0.0
* 外部通訊埠(ExternalPort): 80
* 內部IP(InternalIPAddress): 192.168.200.2
* 內部通訊埠(InternalPort): 80
```
Add-NetNatStaticMapping -ExternalIPAddress "0.0.0.0/0" -ExternalPort 80 -Protocol TCP -InternalIPAddress "192.168.200.2" -InternalPort 80 -NatName NATNetwork
```
* ExternalIPAddress: 這是指定要轉送的來源IP,這裡指的是 Host 主機設定的 IP;這可以是特定的實體 IP 或是 0.0.0.0/0 這是 Host 主機上全部 IP 。
* ExternalPort: 這是要接收轉送的通訊埠,例如 Web 是 80,遠端桌面是 3389.
* Protocol: 這只能是 TCP 或 UDP.
* InternalIPAddress: 這是指定要轉送給已啟用 NAT 對應的虛擬機的IP.
* InternalPort: 這是指定虛擬機的通訊埠.
## 通訊埠轉送
在前一個例子中,只建立了一個使用 TCP 80 的 NAT 規則,此時只有虛擬交換器只有轉送監聽單一個 80 port。
以下我們使用二台虛擬機將外部的通訊埠請求轉送到內部,這裡 VM1 的遠端桌面(3389) 和 VM2 的 SSH(22) 要設定可連入:
* VM1 win2019: Windows 2019 Standard (IP: 192.168.200.2 通訊埠 3389) 外部通訊埠 60002
* VM2 ubuntu1804: Ubuntu 18.04.1 (IP: 192.168.200.3 通訊埠 22) 外部通訊埠 60003
```
Add-NetNatStaticMapping -ExternalIPAddress "0.0.0.0/24" -ExternalPort 60002 -Protocol TCP -InternalIPAddress "192.168.200.2" -InternalPort 3389 -NatName NATNetwork
Add-NetNatStaticMapping -ExternalIPAddress "0.0.0.0/24" -ExternalPort 60003 -Protocol TCP -InternalIPAddress "192.168.200.3" -InternalPort 22 -NatName NATNetwork
```
就可以從其它主機連線,使用遠端桌面連線到 VM1
```
mstsc /v:192.168.88.82:60002
```
使用 win10 的 ssh 指令連到 VM2
```
ssh username@192.168.88.82 -p 60003
```
這裡 ubuntu 記得要開防火牆允許連入 port 22
開啟防火牆 允許 192.168.100.8 連入 22
```
sudo ufw allow from 192.168.100.8 to any port 22 proto tcp
```
刪除防火牆設定
```
sudo ufw delete allow from 192.168.100.8 to any port 22 proto tcp
```
## 參考:
* [Using a NAT Virtual Switch with Hyper-V](https://www.petri.com/using-nat-virtual-switch-hyper-v) - March 17, 2017 by [Aidan Finn](https://www.petri.com/author/aidan-finn)
* [Create NAT Rules for the Hyper-V NAT Virtual Switch](https://www.petri.com/create-nat-rules-hyper-v-nat-virtual-switch) - April 10, 2017 by [Aidan Finn](https://www.petri.com/author/aidan-finn)
2019-03-07
Hyper-V 內部虛擬交換器 NAT Static Mapping
markdown
在Hyper-V 中安裝好虛擬機後,若是使用內部虛擬交換器(Internal Virtual Switch)則需要將 Host 的 port 對應到虛擬機的 port,外部的主機才能透過 Host 的 IP:port 連線到虛擬機的服務。這裡透過 Powershell 命令建立 NAT 的規則。
# 建立 NAT Static Mapping
## 實驗環境
* Host: Windows 10 Pro (IP:192.168.100.1)
* Hyper-V: 二台虛擬機
1. win2019: Windows 2019 Standard (IP: 192.168.200.2)
2. ubuntu1804: Ubuntu 18.04.1 (IP: 192.168.200.3)
虛擬交換器的建立方式,請參考[Hyper-V 虛擬網路交換器設定](https://uzch.blogspot.com/2019/03/hyper-v.html),此文中 Step 2.2 有使用 `New-NetNAT` 指令建立 NAT,在此文中有用到。
我在 Hyper-V 已建立內部虛擬交換器,名稱`InternalSwitch`:
```
IPv4 Address. . . . . . . . . . . : 192.168.200.1
Subnet Mask . . . . . . . . . . . : 255.255.255.0
```
## 新增 NetNAT
先確認是否有已有建立好與網路介面卡名稱`vEthernet(InternalSwitch)` 所設定的私有地址範圍相同的 NAT。 我這裡 vEthernet(InternalSwitch) 設定的地址範圍是 `192.168.200.0/24`。
```
Get-NetNat
```
取回的NAT設定結果
 如果 Get-NetNat 的結果為空的,需要配置一個NAT網路的地址範圍, `-Name "NATNetwork"` 的 NATNetwork 可以更改為易於識別的名稱。
```
New-NetNAT -Name "NATNetwork" -InternalIPInterfaceAddressPrefix 192.168.200.0/24
```
配置將在虛擬交換器上運行的NAT網路的網路地址; 這是虛擬機將在抽象虛擬交換機中使用的私有地址範圍。請注意,上一步中的IPv4地址必須在此範圍內
## NAT 規則範例
如果要讓外部能連到虛擬機的網頁服務,則要能連到虛擬機的 port:80,參閱以下範例:
* 外部IP(ExternalIPAddress): 0.0.0.0
* 外部通訊埠(ExternalPort): 80
* 內部IP(InternalIPAddress): 192.168.200.2
* 內部通訊埠(InternalPort): 80
```
Add-NetNatStaticMapping -ExternalIPAddress "0.0.0.0/0" -ExternalPort 80 -Protocol TCP -InternalIPAddress "192.168.200.2" -InternalPort 80 -NatName NATNetwork
```
* ExternalIPAddress: 這是指定要轉送的來源IP,這裡指的是 Host 主機設定的 IP;這可以是特定的實體 IP 或是 0.0.0.0/0 這是 Host 主機上全部 IP 。
* ExternalPort: 這是要接收轉送的通訊埠,例如 Web 是 80,遠端桌面是 3389.
* Protocol: 這只能是 TCP 或 UDP.
* InternalIPAddress: 這是指定要轉送給已啟用 NAT 對應的虛擬機的IP.
* InternalPort: 這是指定虛擬機的通訊埠.
## 通訊埠轉送
在前一個例子中,只建立了一個使用 TCP 80 的 NAT 規則,此時只有虛擬交換器只有轉送監聽單一個 80 port。
以下我們使用二台虛擬機將外部的通訊埠請求轉送到內部,這裡 VM1 的遠端桌面(3389) 和 VM2 的 SSH(22) 要設定可連入:
* VM1 win2019: Windows 2019 Standard (IP: 192.168.200.2 通訊埠 3389) 外部通訊埠 60002
* VM2 ubuntu1804: Ubuntu 18.04.1 (IP: 192.168.200.3 通訊埠 22) 外部通訊埠 60003
```
Add-NetNatStaticMapping -ExternalIPAddress "0.0.0.0/24" -ExternalPort 60002 -Protocol TCP -InternalIPAddress "192.168.200.2" -InternalPort 3389 -NatName NATNetwork
Add-NetNatStaticMapping -ExternalIPAddress "0.0.0.0/24" -ExternalPort 60003 -Protocol TCP -InternalIPAddress "192.168.200.3" -InternalPort 22 -NatName NATNetwork
```
就可以從其它主機連線,使用遠端桌面連線到 VM1
```
mstsc /v:192.168.88.82:60002
```
使用 win10 的 ssh 指令連到 VM2
```
ssh username@192.168.88.82 -p 60003
```
這裡 ubuntu 記得要開防火牆允許連入 port 22
開啟防火牆 允許 192.168.100.8 連入 22
```
sudo ufw allow from 192.168.100.8 to any port 22 proto tcp
```
刪除防火牆設定
```
sudo ufw delete allow from 192.168.100.8 to any port 22 proto tcp
```
## 參考:
* [Using a NAT Virtual Switch with Hyper-V](https://www.petri.com/using-nat-virtual-switch-hyper-v) - March 17, 2017 by [Aidan Finn](https://www.petri.com/author/aidan-finn)
* [Create NAT Rules for the Hyper-V NAT Virtual Switch](https://www.petri.com/create-nat-rules-hyper-v-nat-virtual-switch) - April 10, 2017 by [Aidan Finn](https://www.petri.com/author/aidan-finn)
如果 Get-NetNat 的結果為空的,需要配置一個NAT網路的地址範圍, `-Name "NATNetwork"` 的 NATNetwork 可以更改為易於識別的名稱。
```
New-NetNAT -Name "NATNetwork" -InternalIPInterfaceAddressPrefix 192.168.200.0/24
```
配置將在虛擬交換器上運行的NAT網路的網路地址; 這是虛擬機將在抽象虛擬交換機中使用的私有地址範圍。請注意,上一步中的IPv4地址必須在此範圍內
## NAT 規則範例
如果要讓外部能連到虛擬機的網頁服務,則要能連到虛擬機的 port:80,參閱以下範例:
* 外部IP(ExternalIPAddress): 0.0.0.0
* 外部通訊埠(ExternalPort): 80
* 內部IP(InternalIPAddress): 192.168.200.2
* 內部通訊埠(InternalPort): 80
```
Add-NetNatStaticMapping -ExternalIPAddress "0.0.0.0/0" -ExternalPort 80 -Protocol TCP -InternalIPAddress "192.168.200.2" -InternalPort 80 -NatName NATNetwork
```
* ExternalIPAddress: 這是指定要轉送的來源IP,這裡指的是 Host 主機設定的 IP;這可以是特定的實體 IP 或是 0.0.0.0/0 這是 Host 主機上全部 IP 。
* ExternalPort: 這是要接收轉送的通訊埠,例如 Web 是 80,遠端桌面是 3389.
* Protocol: 這只能是 TCP 或 UDP.
* InternalIPAddress: 這是指定要轉送給已啟用 NAT 對應的虛擬機的IP.
* InternalPort: 這是指定虛擬機的通訊埠.
## 通訊埠轉送
在前一個例子中,只建立了一個使用 TCP 80 的 NAT 規則,此時只有虛擬交換器只有轉送監聽單一個 80 port。
以下我們使用二台虛擬機將外部的通訊埠請求轉送到內部,這裡 VM1 的遠端桌面(3389) 和 VM2 的 SSH(22) 要設定可連入:
* VM1 win2019: Windows 2019 Standard (IP: 192.168.200.2 通訊埠 3389) 外部通訊埠 60002
* VM2 ubuntu1804: Ubuntu 18.04.1 (IP: 192.168.200.3 通訊埠 22) 外部通訊埠 60003
```
Add-NetNatStaticMapping -ExternalIPAddress "0.0.0.0/24" -ExternalPort 60002 -Protocol TCP -InternalIPAddress "192.168.200.2" -InternalPort 3389 -NatName NATNetwork
Add-NetNatStaticMapping -ExternalIPAddress "0.0.0.0/24" -ExternalPort 60003 -Protocol TCP -InternalIPAddress "192.168.200.3" -InternalPort 22 -NatName NATNetwork
```
就可以從其它主機連線,使用遠端桌面連線到 VM1
```
mstsc /v:192.168.88.82:60002
```
使用 win10 的 ssh 指令連到 VM2
```
ssh username@192.168.88.82 -p 60003
```
這裡 ubuntu 記得要開防火牆允許連入 port 22
開啟防火牆 允許 192.168.100.8 連入 22
```
sudo ufw allow from 192.168.100.8 to any port 22 proto tcp
```
刪除防火牆設定
```
sudo ufw delete allow from 192.168.100.8 to any port 22 proto tcp
```
## 參考:
* [Using a NAT Virtual Switch with Hyper-V](https://www.petri.com/using-nat-virtual-switch-hyper-v) - March 17, 2017 by [Aidan Finn](https://www.petri.com/author/aidan-finn)
* [Create NAT Rules for the Hyper-V NAT Virtual Switch](https://www.petri.com/create-nat-rules-hyper-v-nat-virtual-switch) - April 10, 2017 by [Aidan Finn](https://www.petri.com/author/aidan-finn)
如果 Get-NetNat 的結果為空的,需要配置一個NAT網路的地址範圍, `-Name "NATNetwork"` 的 NATNetwork 可以更改為易於識別的名稱。
```
New-NetNAT -Name "NATNetwork" -InternalIPInterfaceAddressPrefix 192.168.200.0/24
```
配置將在虛擬交換器上運行的NAT網路的網路地址; 這是虛擬機將在抽象虛擬交換機中使用的私有地址範圍。請注意,上一步中的IPv4地址必須在此範圍內
## NAT 規則範例
如果要讓外部能連到虛擬機的網頁服務,則要能連到虛擬機的 port:80,參閱以下範例:
* 外部IP(ExternalIPAddress): 0.0.0.0
* 外部通訊埠(ExternalPort): 80
* 內部IP(InternalIPAddress): 192.168.200.2
* 內部通訊埠(InternalPort): 80
```
Add-NetNatStaticMapping -ExternalIPAddress "0.0.0.0/0" -ExternalPort 80 -Protocol TCP -InternalIPAddress "192.168.200.2" -InternalPort 80 -NatName NATNetwork
```
* ExternalIPAddress: 這是指定要轉送的來源IP,這裡指的是 Host 主機設定的 IP;這可以是特定的實體 IP 或是 0.0.0.0/0 這是 Host 主機上全部 IP 。
* ExternalPort: 這是要接收轉送的通訊埠,例如 Web 是 80,遠端桌面是 3389.
* Protocol: 這只能是 TCP 或 UDP.
* InternalIPAddress: 這是指定要轉送給已啟用 NAT 對應的虛擬機的IP.
* InternalPort: 這是指定虛擬機的通訊埠.
## 通訊埠轉送
在前一個例子中,只建立了一個使用 TCP 80 的 NAT 規則,此時只有虛擬交換器只有轉送監聽單一個 80 port。
以下我們使用二台虛擬機將外部的通訊埠請求轉送到內部,這裡 VM1 的遠端桌面(3389) 和 VM2 的 SSH(22) 要設定可連入:
* VM1 win2019: Windows 2019 Standard (IP: 192.168.200.2 通訊埠 3389) 外部通訊埠 60002
* VM2 ubuntu1804: Ubuntu 18.04.1 (IP: 192.168.200.3 通訊埠 22) 外部通訊埠 60003
```
Add-NetNatStaticMapping -ExternalIPAddress "0.0.0.0/24" -ExternalPort 60002 -Protocol TCP -InternalIPAddress "192.168.200.2" -InternalPort 3389 -NatName NATNetwork
Add-NetNatStaticMapping -ExternalIPAddress "0.0.0.0/24" -ExternalPort 60003 -Protocol TCP -InternalIPAddress "192.168.200.3" -InternalPort 22 -NatName NATNetwork
```
就可以從其它主機連線,使用遠端桌面連線到 VM1
```
mstsc /v:192.168.88.82:60002
```
使用 win10 的 ssh 指令連到 VM2
```
ssh username@192.168.88.82 -p 60003
```
這裡 ubuntu 記得要開防火牆允許連入 port 22
開啟防火牆 允許 192.168.100.8 連入 22
```
sudo ufw allow from 192.168.100.8 to any port 22 proto tcp
```
刪除防火牆設定
```
sudo ufw delete allow from 192.168.100.8 to any port 22 proto tcp
```
## 參考:
* [Using a NAT Virtual Switch with Hyper-V](https://www.petri.com/using-nat-virtual-switch-hyper-v) - March 17, 2017 by [Aidan Finn](https://www.petri.com/author/aidan-finn)
* [Create NAT Rules for the Hyper-V NAT Virtual Switch](https://www.petri.com/create-nat-rules-hyper-v-nat-virtual-switch) - April 10, 2017 by [Aidan Finn](https://www.petri.com/author/aidan-finn)


2019-03-06
Hyper-V 虛擬網路交換器設定
markdown
說明 hyper-v 裡的三種虛擬網路設定差異,實作三個虛擬網路交換器實驗,讓虛擬機器互連。
1. 私人虛擬交換器:二台虛擬機互連
2. 內部虛擬交換器:二台虛擬機互連且 Host 也可連 二台虛擬機
3. 外部虛擬交換器:讓虛擬機設定跟 Host 主機的相同 IP 區段,Host 與虛擬機互連
# 三種虛擬交換器
* 外部(External):會橋接到實體機器的網路卡,讓虛擬機可以透過實體機的網路卡連線到外部網路
* 內部(Internal):可以跟所有虛擬機器互通,且可以和宿主主機網路互通
* 私人(Private):虛擬機器的網路設定在相同區段時可以透過這個虛擬交換器互通
# 實驗環境
* Host: Windows 10 Pro (IP:192.168.100.1)
* Hyper-V: 二台虛擬機
1. win2019: Windows 2019 Standard (IP: 192.168.200.2)
2. ubuntu1804: Ubuntu 18.04.1 (IP: 192.168.200.3)
---
# 實驗1:私人虛擬交換器
IP Address:
* win2019: 192.168.200.2
* ubuntu1804: 192.168.200.3
## Step 1.1. 新增「虛擬交換器」
新增一個私人虛擬交換器(Private Virtual Switch),名稱為「PrivateSwitch」
```
New-VMSwitch -Name 'PrivateSwitch' -SwitchType Private
```
## Step 1.2. 查看 win2019 虛擬機的網路介面卡設定,將其改成 `PrivateSwitch`
```
Get-VM "win2019" | Get-VMNetworkAdapter
Get-VM "win2019" | Get-VMNetworkAdapter | Connect-VMNetworkAdapter -SwitchName "PrivateSwitch"
Get-VM "win2019" | Get-VMNetworkAdapter
```
## Step 1.3. 查看 ubuntu1804 虛擬機的網路介面卡設定,將其改成 `PrivateSwitch`
```
Get-VM "ubuntu1804" | Get-VMNetworkAdapter
Get-VM "ubuntu1804" | Get-VMNetworkAdapter | Connect-VMNetworkAdapter -SwitchName "PrivateSwitch"
Get-VM "ubuntu1804" | Get-VMNetworkAdapter
```
## Step 1.4. 設定 win2019 虛擬機的網路介面卡 IP Address
```
Description . . . . . . . . . . . : Microsoft Hyper-V Network Adapter
DHCP Enabled. . . . . . . . . . . : No
IPv4 Address. . . . . . . . . . . : 192.168.200.2
Subnet Mask . . . . . . . . . . . : 255.255.255.0
Default Gateway . . . . . . . . . : 192.168.200.1
DNS Servers . . . . . . . . . . . : 192.168.200.1
```
## Step 1.5. 設定 ubuntu1804虛擬機的網路介面卡 IP Address
```
Description . . . . . . . . . . . : Microsoft Hyper-V Network Adapter
DHCP Enabled. . . . . . . . . . . : No
IPv4 Address. . . . . . . . . . . : 192.168.200.3
Subnet Mask . . . . . . . . . . . : 255.255.255.0
Default Gateway . . . . . . . . . : 192.168.200.1
DNS Servers . . . . . . . . . . . : 192.168.200.1
```
查看網路介面卡名稱
```
ifconfig
```
這裡我要修改的目標網路介面卡名稱是 `eth0`
 在 ubuntu1804 透過 netplan 修改網卡設定。
```
# 備份原本的設定檔
sudo cp /etc/netplan/50-cloud-init.yaml /etc/netplan/50.cloud-init.yaml.bak
```
編輯 50-cloud-init.yaml,將 50-cloud-init.yaml 設定改成下面內容
```
network:
ethernets:
eth0:
addresses: [192.168.200.3/24]
gateway4: 192.168.200.1
nameservers:
addresses: [192.168.200.1]
dhcp4: no
version: 2
```
套用設定
```
# 檢查設定
sudo netplan --debug apply
# 套用設定
sudo netplan apply
```
## Step 1.6. 測試連線,win2019 ping ubuntu1804
在 win2019 開啟命令提示字元
```
ping 192.168.200.3
```
應該回應正常
## Step 1.7. 測試連線,ubuntu1804 ping win2019
在 ubuntu1804 的 Terminal
```
ping 192.168.200.2
```
測試連到 win2019,此時連線應該會失敗,win2019 沒有回應,是因為預設 windows 伺服器會開啟防火牆,所以 ICMP 是會被擋掉的。這裡測試時可以暫時停用防火牆。
在 win2019 虛擬機中執行,停用防火牆:
```powershell
Set-NetFirewallProfile -Profile Domain,Public,Private -Enabled False
```
再一次測試 ubuntu1804 ping win2019,應該成功了
```
ping 192.168.200.2
```
在 win2019 虛擬機中執行,啟用防火牆:
```powershell
Set-NetFirewallProfile -Profile Domain,Public,Private -Enabled True
```
如果要啟用 ICMP 通過防火牆,可以用下面命令
```
New-NetFirewallRule -DisplayName "Allow inbound ICMPv4" -Direction Inbound -Protocol ICMPv4 -IcmpType 8 -RemoteAddress
在 ubuntu1804 透過 netplan 修改網卡設定。
```
# 備份原本的設定檔
sudo cp /etc/netplan/50-cloud-init.yaml /etc/netplan/50.cloud-init.yaml.bak
```
編輯 50-cloud-init.yaml,將 50-cloud-init.yaml 設定改成下面內容
```
network:
ethernets:
eth0:
addresses: [192.168.200.3/24]
gateway4: 192.168.200.1
nameservers:
addresses: [192.168.200.1]
dhcp4: no
version: 2
```
套用設定
```
# 檢查設定
sudo netplan --debug apply
# 套用設定
sudo netplan apply
```
## Step 1.6. 測試連線,win2019 ping ubuntu1804
在 win2019 開啟命令提示字元
```
ping 192.168.200.3
```
應該回應正常
## Step 1.7. 測試連線,ubuntu1804 ping win2019
在 ubuntu1804 的 Terminal
```
ping 192.168.200.2
```
測試連到 win2019,此時連線應該會失敗,win2019 沒有回應,是因為預設 windows 伺服器會開啟防火牆,所以 ICMP 是會被擋掉的。這裡測試時可以暫時停用防火牆。
在 win2019 虛擬機中執行,停用防火牆:
```powershell
Set-NetFirewallProfile -Profile Domain,Public,Private -Enabled False
```
再一次測試 ubuntu1804 ping win2019,應該成功了
```
ping 192.168.200.2
```
在 win2019 虛擬機中執行,啟用防火牆:
```powershell
Set-NetFirewallProfile -Profile Domain,Public,Private -Enabled True
```
如果要啟用 ICMP 通過防火牆,可以用下面命令
```
New-NetFirewallRule -DisplayName "Allow inbound ICMPv4" -Direction Inbound -Protocol ICMPv4 -IcmpType 8 -RemoteAddress -Action Allow
New-NetFirewallRule -DisplayName "Allow inbound ICMPv6" -Direction Inbound -Protocol ICMPv6 -IcmpType 8 -RemoteAddress -Action Allow
```
或
```
#IPv4
netsh advfirewall firewall add rule name="ICMP Allow incoming V4 echo request" protocol="icmpv4:8,any" dir=in action=allow
#IPv6
netsh advfirewall firewall add rule name="ICMP Allow incoming V6 echo request" protocol="icmpv6:8,any" dir=in action=allow
```
---
# 實驗二:內部虛擬交換器
IP Address:
* Host: 192.168.100.1, vEthernet (InternalSwitch): 192.168.200.1
* win2019: 192.168.200.2
* ubuntu1804: 192.168.200.3
## Step 2.1. 新增內部虛擬交換器
```
New-VMSwitch -Name 'InternalSwitch' -SwitchType Internal
```
執行後會新增一個名稱為`vEthernet (InternalSwitch)`的網路介面卡
## Step 2.2. 設定 vEthernet (InternalSwitch) 的 IP Address
```
New-NetIPAddress -IPAddress 192.168.200.1 -PrefixLength 24 -InterfaceAlias “vEthernet (InternalSwitch)”
```
然後配置將在虛擬交換器上運行的NAT網路的網路地址; 這是虛擬機將在抽象虛擬交換機中使用的私有地址範圍。請注意,上一步中的IPv4地址必須在此範圍內。
```
New-NetNAT -Name "NATNetwork" -InternalIPInterfaceAddressPrefix 192.168.200.0/24
```
## Step 2.3. 查看 win2019 虛擬機的網路介面卡設定,將其改成 `InternalSwitch`
```
Get-VM "win2019" | Get-VMNetworkAdapter
Get-VM "win2019" | Get-VMNetworkAdapter | Connect-VMNetworkAdapter -SwitchName "InternalSwitch"
Get-VM "win2019" | Get-VMNetworkAdapter
```
## Step 2.4. 查看 ubuntu1804 虛擬機的網路介面卡設定,將其改成 `InternalSwitch`
```
Get-VM "ubuntu1804" | Get-VMNetworkAdapter
Get-VM "ubuntu1804" | Get-VMNetworkAdapter | Connect-VMNetworkAdapter -SwitchName "InternalSwitch"
Get-VM "ubuntu1804" | Get-VMNetworkAdapter
```
## Step 2.5. 設定 win2019 虛擬機的網路介面卡 IP Address
```
Description . . . . . . . . . . . : Microsoft Hyper-V Network Adapter
DHCP Enabled. . . . . . . . . . . : No
IPv4 Address. . . . . . . . . . . : 192.168.200.2
Subnet Mask . . . . . . . . . . . : 255.255.255.0
Default Gateway . . . . . . . . . : 192.168.200.1
DNS Servers . . . . . . . . . . . : 192.168.200.1
```
這裡 Gateway 和 DNS 是指定 `vEthernet (InternalSwitch)`的網路介面卡 IP
## Step 2.6. 設定 ubuntu1804虛擬機的網路介面卡 IP Address(設定方式參考 Step 1.5)
```
Description . . . . . . . . . . . : Microsoft Hyper-V Network Adapter
DHCP Enabled. . . . . . . . . . . : No
IPv4 Address. . . . . . . . . . . : 192.168.200.3
Subnet Mask . . . . . . . . . . . : 255.255.255.0
Default Gateway . . . . . . . . . : 192.168.200.1
DNS Servers . . . . . . . . . . . : 192.168.200.1
```
這裡 Gateway 和 DNS 是指定 `vEthernet (InternalSwitch)`的網路介面卡 IP
## 測試連線
### 先暫時停用 host 和 win2019 的防火牆
```powershell
Set-NetFirewallProfile -Profile Domain,Public,Private -Enabled False
```
### 測試連線:win2019 ping ubuntu1804
```
ping 192.168.200.3
```
### 測試連線:win2019 ping host
```
ping 192.168.100.1
```
### 測試連線:ubuntu1804 ping win2019
```
ping 192.168.200.2
```
### 測試連線:ubuntu1804 ping host
```
ping 192.168.100.1
```
### 測試連線:host ping ubuntu1804
```
ping 192.168.200.3
```
### 測試連線:host ping win2019
```
ping 192.168.200.2
```
### 測試完,記得再啟用防火牆
```powershell
Set-NetFirewallProfile -Profile Domain,Public,Private -Enabled True
```
---
# 實驗三:外部虛擬交換器
此範例只示範設定 win2019 使用外部虛擬交換器連線
IP Address:
* Host: 被橋接後原設定套用到 `vEthernet (ExternalSwitch)`, vEthernet (ExternalSwitch): 192.168.100.1
* win2019: 192.168.100.2
## Step 3.1. 新增外部虛擬交換器
```
New-VMSwitch -Name 'ExternalSwitch' -NetAdapterName 'Ethernet' -AllowManagementOS $true
```
-Name: 要新增的虛擬交換器名稱 `ExternalSwitch`
-NetAdapterName: 透過`Ethernet` 的網路卡橋接連線
-AllowManagementOS: 允許
## Step 3.2. 查看 win2019 虛擬機的網路介面卡設定,將其改成 `ExternalSwitch`
```
Get-VM "win2019" | Get-VMNetworkAdapter
Get-VM "win2019" | Get-VMNetworkAdapter | Connect-VMNetworkAdapter -SwitchName "ExternalSwitch"
Get-VM "win2019" | Get-VMNetworkAdapter
```
## Step 3.2. 修改 win2019 的 IP Address
如果外部 DHCP 配發 IP ,則 win2019 虛擬機中網路介面卡的 IP 與 DNS 可自動取得。
若要指定IP,則依Host 主機的網路介面卡設定方式設定,例如:
```
Description . . . . . . . . . . . : Microsoft Hyper-V Network Adapter
DHCP Enabled. . . . . . . . . . . : No
IPv4 Address. . . . . . . . . . . : 192.168.100.2
Subnet Mask . . . . . . . . . . . : 255.255.255.0
Default Gateway . . . . . . . . . : 192.168.100.254
DNS Servers . . . . . . . . . . . : 168.95.1.1
```
這裡的範例 DNS Servers 是指定成 Hinet 的 168.95.1.1。也可以指定成你慣用或自架的 DNS。
---
# 參考:
* 微軟文件[新增虛擬交換器](https://docs.microsoft.com/en-us/windows-server/virtualization/hyper-v/get-started/create-a-virtual-switch-for-hyper-v-virtual-machines)
* [What is the Hyper-V Virtual Switch and how does it work?](https://www.altaro.com/hyper-v/the-hyper-v-virtual-switch-explained-part-1//) 28 Jun 2016 by [Eric Siron](https://www.altaro.com/hyper-v/author/eric-siron/)
* [Managing the Hyper-V Default Switch in Windows 10 version 1709 and higher with PowerShell](https://mikefrobbins.com/2018/11/08/managing-the-hyper-v-default-switch-in-windows-10-version-1709-and-higher-with-powershell/) [MIKE F ROBBINS](https://mikefrobbins.com/author/mikefrobbins/) NOVEMBER 8, 2018
* Windows Server 2012 新手村 [(05) 規劃與設定 Hyper-V 虛擬網路](https://channel9.msdn.com/Series/Windows-Server-2012-Entry-Level/Windows-Server-2012-Entry-Level-5)
 在 ubuntu1804 透過 netplan 修改網卡設定。
```
# 備份原本的設定檔
sudo cp /etc/netplan/50-cloud-init.yaml /etc/netplan/50.cloud-init.yaml.bak
```
編輯 50-cloud-init.yaml,將 50-cloud-init.yaml 設定改成下面內容
```
network:
ethernets:
eth0:
addresses: [192.168.200.3/24]
gateway4: 192.168.200.1
nameservers:
addresses: [192.168.200.1]
dhcp4: no
version: 2
```
套用設定
```
# 檢查設定
sudo netplan --debug apply
# 套用設定
sudo netplan apply
```
## Step 1.6. 測試連線,win2019 ping ubuntu1804
在 win2019 開啟命令提示字元
```
ping 192.168.200.3
```
應該回應正常
## Step 1.7. 測試連線,ubuntu1804 ping win2019
在 ubuntu1804 的 Terminal
```
ping 192.168.200.2
```
測試連到 win2019,此時連線應該會失敗,win2019 沒有回應,是因為預設 windows 伺服器會開啟防火牆,所以 ICMP 是會被擋掉的。這裡測試時可以暫時停用防火牆。
在 win2019 虛擬機中執行,停用防火牆:
```powershell
Set-NetFirewallProfile -Profile Domain,Public,Private -Enabled False
```
再一次測試 ubuntu1804 ping win2019,應該成功了
```
ping 192.168.200.2
```
在 win2019 虛擬機中執行,啟用防火牆:
```powershell
Set-NetFirewallProfile -Profile Domain,Public,Private -Enabled True
```
如果要啟用 ICMP 通過防火牆,可以用下面命令
```
New-NetFirewallRule -DisplayName "Allow inbound ICMPv4" -Direction Inbound -Protocol ICMPv4 -IcmpType 8 -RemoteAddress
在 ubuntu1804 透過 netplan 修改網卡設定。
```
# 備份原本的設定檔
sudo cp /etc/netplan/50-cloud-init.yaml /etc/netplan/50.cloud-init.yaml.bak
```
編輯 50-cloud-init.yaml,將 50-cloud-init.yaml 設定改成下面內容
```
network:
ethernets:
eth0:
addresses: [192.168.200.3/24]
gateway4: 192.168.200.1
nameservers:
addresses: [192.168.200.1]
dhcp4: no
version: 2
```
套用設定
```
# 檢查設定
sudo netplan --debug apply
# 套用設定
sudo netplan apply
```
## Step 1.6. 測試連線,win2019 ping ubuntu1804
在 win2019 開啟命令提示字元
```
ping 192.168.200.3
```
應該回應正常
## Step 1.7. 測試連線,ubuntu1804 ping win2019
在 ubuntu1804 的 Terminal
```
ping 192.168.200.2
```
測試連到 win2019,此時連線應該會失敗,win2019 沒有回應,是因為預設 windows 伺服器會開啟防火牆,所以 ICMP 是會被擋掉的。這裡測試時可以暫時停用防火牆。
在 win2019 虛擬機中執行,停用防火牆:
```powershell
Set-NetFirewallProfile -Profile Domain,Public,Private -Enabled False
```
再一次測試 ubuntu1804 ping win2019,應該成功了
```
ping 192.168.200.2
```
在 win2019 虛擬機中執行,啟用防火牆:
```powershell
Set-NetFirewallProfile -Profile Domain,Public,Private -Enabled True
```
如果要啟用 ICMP 通過防火牆,可以用下面命令
```
New-NetFirewallRule -DisplayName "Allow inbound ICMPv4" -Direction Inbound -Protocol ICMPv4 -IcmpType 8 -RemoteAddress 2019-03-04
vlmcsd setup on Ubuntu 18.04
markdown
在 ubuntu 18.04.1 架 kms 服務,啟用大量授權的系統
自建 kms 是使用 Open Source 的專案 [vlmcsd](https://github.com/Wind4/vlmcsd),以下使用虛擬機測試,IP是在虛擬的IP區段。
環境 Hyper-V 中建立二台VM:
* ubuntu 18.04.1 (VM) IP: 192.168.123.101
* Windows Server 2019 (VM) IP: 192.168.123.102
搭載 kms
下載 vlmcsd 已編譯好的檔案
```
wget https://github.com/Wind4/vlmcsd/releases/download/svn1112/binaries.tar.gz
```
解壓縮
```
tar -zxvf binaries.tar.gz
```
切換至解壓縮的目錄
```
cd binaries
```
目錄中會有各個作業系統的資料夾
```
Android DragonFly FreeBSD Hurd iOS Linux MacOSX Minix NetBSD OpenBSD Solaris Windows
```
選擇需要的版本,這裡使用 Ubuntu 為例,將 `vlmcsd-x64-musl-static 複製為 kms,然後將 kms 移到 /usr/bin 資料夾。賦與 kms 的執行權限
```
cd Linux/intel/static
cp vlmcsd-x64-musl-static kms && sudo mv kms /usr/bin
chmod +x /usr/bin/kms
```
然後直接輸入 kms 即可運行服務
```
kms
```
執行的服務通訊埠為 1688,確認是否運行成功
```
netstat -an | grep 1688
```
## 設定防火牆放行 1688 port
### 使用 ufw
```
sudo ufw enable
# 查看狀態
sudo ufw status
# 允許 1688
# sudo ufw allow from to port proto
sudo ufw allow from 192.168.123.0/24 to any port 1688 proto tcp
```
### 使用 firewall-cmd 設定允許 1688 port 連入
```
firewall-cmd --zone=public --add-port=1688/tcp
firewall-cmd --zone=public --permanent --add-port=1688/tcp
firewall-cmd --reload
```
或
### 使用 iptables 設定允許 1688 port 連入,(註2)
```
iptables -I INPUT -p tcp -m state --state NEW -m tcp --dport 1688 -j ACCEPT
sudo iptables-save > ~/iptables.conf
sudo iptables-restore < ~/iptables.conf
```
## 建立開機啟動
```
# 建立資料夾
mkdir /usr/lib/systemd/system
# 編輯檔案
vim /usr/lib/systemd/system/kms.service
```
貼上以下內容
```
[Unit]
Description=KMS Service
After=network.target
Wants=network.target
[Service]
Type=forking
ExecStart=/usr/bin/kms
ExecStop=/usr/bin/killall kms
[Install]
WantedBy=multi-user.target
```
加入開機自啟動 kms.service
```
systemctl enable kms.service
```
啟動 kms
```
systemctl start kms.service
```
停止 kms
```
systemctl stop kms.service
```
或使用 rc.local 來開機自啟
```
vim /etc/rc.local
```
加入
```
/usr/bin/kms
```
## 激活金鑰
以下用操作皆使用管理員身份運行命令
啟用
```
解除原先金鑰 (如果安裝時序號是正確的不需此行)
slmgr.vbs -upk
選擇金鑰,請依照底下的金鑰列表作選擇 (如果安裝時序號是正確的不需此行)
slmgr.vbs -ipk xxxxx-xxxxx-xxxxx-xxxxx-xxxxx
設定KMS伺服器(我這裡kms架在 ubuntu 192.168.123.101:1688)
slmgr.vbs -skms 192.168.123.101
激活
slmgr.vbs -ato
顯示KMS相關資訊
slmgr.vbs -dlv
```
啟用 office 2010/2013/2016
```
if exist "C:\Program Files (x86)\Microsoft Office\Office14\ospp.vbs" (cd "C:\Program Files (x86)\Microsoft Office\Office14") else (cd "c:\Program Files\Microsoft Office\Office14")
if exist "C:\Program Files (x86)\Microsoft Office\Office15\ospp.vbs" (cd "C:\Program Files (x86)\Microsoft Office\Office15") else (cd "c:\Program Files\Microsoft Office\Office15")
if exist "C:\Program Files (x86)\Microsoft Office\Office16\ospp.vbs" (cd "C:\Program Files (x86)\Microsoft Office\Office16") else (cd "c:\Program Files\Microsoft Office\Office16")
cscript ospp.vbs /osppsvcauto
cscript ospp.vbs /sethst:192.168.123.101
cscript ospp.vbs /act
cscript ospp.vbs /dstatus
```
[微軟官方 KMS 列表](https://docs.microsoft.com/en-us/previous-versions/windows/it-pro/windows-server-2012-R2-and-2012/jj612867(v=ws.11))
```
https://docs.microsoft.com/en-us/previous-versions/windows/it-pro/windows-server-2012-R2-and-2012/jj612867(v=ws.11)
```
### 註1. 'Service' Command not found
The `service` command is part of the [sysvinit-utils](https://packages.debian.org/jessie/sysvinit-utils) package.
Install it with:
```
apt-get install sysvinit-utils
```
But most probably, it is already installed in `/usr/sbin/service`.
If it's missing in your `$PATH`, add this line to your `~/.bashrc`:
```
PATH=$PATH:/usr/sbin
```
### 註2. iptables: unrecognized service
檢查 iptables 是否安裝
```
sudo whereis iptables
```
出現 `iptables: /sbin/iptables /usr/share/iptables /usr/share/man/man8/iptables.8.gz` 表示已經安裝了 iptables。
如果沒有安裝,可以通過以下命令安裝
```
sudo apt-get install iptables
```
## 參考
* [Wind4/vlmcsd - GITHUB](https://github.com/Wind4/vlmcsd)
* [Ubuntu 伺服器指南:Firewall](https://help.ubuntu.com/lts/serverguide/firewall.html#firewall-ufw)
* [Ubuntu - UFW](https://help.ubuntu.com/community/UFW)
* [Linux上利用vlmcsd搭建KMS伺服器](https://wijtb.nctu.me/archives/54/)
* [Ubuntu 14.04 Iptables](http://www.cnblogs.com/general0878/p/5757377.html)
* [Ubuntu based GNU/Linux 上的防火牆 (ufw) 基本設定 - Peter Dave](https://www.peterdavehello.org/2016/01/ubuntu-based-gnulinux-firewall-ufw-essential-config/)
* [Ubuntu使用iptables配置防火墙提示:unrecognized service(Ubuntu配置iptables防火墙)](https://www.cnblogs.com/EasonJim/p/6851007.html)
* [Linux開機啟動管理—systemd使用](https://codertw.com/%E7%A8%8B%E5%BC%8F%E8%AA%9E%E8%A8%80/470748/)
2019-02-27
Hyper-V 的虛擬機中再安裝 Hyper-V
markdown
Windows 10 中使用 Hyper-V 架設虛擬機(Windows Server 2019),然後再虛擬機中再安裝 Hyper-V。
# Windows 10 宿主系統使用 Hyper-V,加一台 Windows Server 2019 的 Guest,再Guest系統中再安裝 Hyper-V。
## 環境
Host: Windows 10; 此篇文章後面簡稱 Win10
Guest: Windows Server 2019; 此篇文章後面簡稱 WinServer2019
已在 Hyper-V 中安裝好 Windows Server 2019 Standard 版本,虛擬機的名稱為 `win2019`
 新增角色和功能
 安裝角色為主的功能
 選擇目前這台 Win2019 虛擬伺服器
 找到 `Hyper-V` 勾選它
 會詳細顯示要安裝的功能,按下「加入功能(Add Features)」
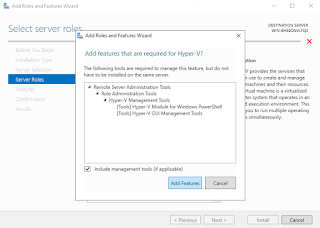 因為是在 win2019 裡面安裝 Hyper-V 時會出現錯誤,訊息如下:「Hyper-V cannot be installed: The processor does not have required virtualization capabilities.」,提示沒有辦法使用硬體支援虛擬化技術。
 為了讓 Guest 虛擬機 win2019 能夠再安裝上 Hyper-V,需要在宿主系統啟用 ExposeVirtualizationExtensions 給 win2019 的虛擬機。
將 win2019 關機
回到宿主系統,以管理者權限開啟 powershell,會透過以下二行指令操作改變 ExposeVirtualizationExtensions 的設定值。
```text
Get-VMProcessor -VMName
為了讓 Guest 虛擬機 win2019 能夠再安裝上 Hyper-V,需要在宿主系統啟用 ExposeVirtualizationExtensions 給 win2019 的虛擬機。
將 win2019 關機
回到宿主系統,以管理者權限開啟 powershell,會透過以下二行指令操作改變 ExposeVirtualizationExtensions 的設定值。
```text
Get-VMProcessor -VMName | fl *
Set-VMProcessor -VMName -ExposeVirtualizationExtensions $true
```
我這裡的 Guest(Target VM's name) 名稱是 `win2019`
```
Get-VMProcessor -VMName win2019 | fl *
Set-VMProcessor -VMName win2019 -ExposeVirtualizationExtensions $true
```
執行 `Get-VMProcessor -VMName win2019 | fl *`,列出 win2019 虛擬機的設定,可以看到 ExposeVirtualizationExtensions 目前的狀態是 false
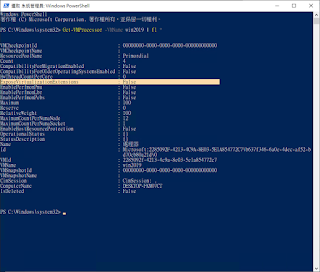 執行 `Set-VMProcessor -VMName win2019 -ExposeVirtualizationExtensions $true`,將 ExposeVirtualizationExtensions 啟用。
 完成上述操作後,再次啟動 win2019 ,再加入 Hyper-V 的功能,即可將 Hyper-V 功能加入 win2019 虛擬機中。
 ## 資料參考
* [Creating Nested Hyper-V machines with Windows Server 2016 ](https://www.altaro.com/hyper-v/creating-nested-hyper-v-windows-server-2016/)
## 資料參考
* [Creating Nested Hyper-V machines with Windows Server 2016 ](https://www.altaro.com/hyper-v/creating-nested-hyper-v-windows-server-2016/)
 新增角色和功能
 安裝角色為主的功能
 選擇目前這台 Win2019 虛擬伺服器
 找到 `Hyper-V` 勾選它
 會詳細顯示要安裝的功能,按下「加入功能(Add Features)」
 因為是在 win2019 裡面安裝 Hyper-V 時會出現錯誤,訊息如下:「Hyper-V cannot be installed: The processor does not have required virtualization capabilities.」,提示沒有辦法使用硬體支援虛擬化技術。
 為了讓 Guest 虛擬機 win2019 能夠再安裝上 Hyper-V,需要在宿主系統啟用 ExposeVirtualizationExtensions 給 win2019 的虛擬機。
將 win2019 關機
回到宿主系統,以管理者權限開啟 powershell,會透過以下二行指令操作改變 ExposeVirtualizationExtensions 的設定值。
```text
Get-VMProcessor -VMName
為了讓 Guest 虛擬機 win2019 能夠再安裝上 Hyper-V,需要在宿主系統啟用 ExposeVirtualizationExtensions 給 win2019 的虛擬機。
將 win2019 關機
回到宿主系統,以管理者權限開啟 powershell,會透過以下二行指令操作改變 ExposeVirtualizationExtensions 的設定值。
```text
Get-VMProcessor -VMName  執行 `Set-VMProcessor -VMName win2019 -ExposeVirtualizationExtensions $true`,將 ExposeVirtualizationExtensions 啟用。
 完成上述操作後,再次啟動 win2019 ,再加入 Hyper-V 的功能,即可將 Hyper-V 功能加入 win2019 虛擬機中。
 ## 資料參考
* [Creating Nested Hyper-V machines with Windows Server 2016 ](https://www.altaro.com/hyper-v/creating-nested-hyper-v-windows-server-2016/)
## 資料參考
* [Creating Nested Hyper-V machines with Windows Server 2016 ](https://www.altaro.com/hyper-v/creating-nested-hyper-v-windows-server-2016/)
2019-02-18
在 ubuntu, kali 系統安裝 Golang
markdown
# 在 ubuntu, kali 系統安裝 Golang
## 下載安裝檔
到[Go Programming Language下載頁](https://golang.org/dl/)下載 go1.11.5.linux-amd64.tar.gz。
```sh
curl -O https://dl.google.com/go/go1.11.5.linux-amd64.tar.gz
```
解壓縮到 /urs/local 資料夾,/urs/local 需要 sudo 權限
```sh
tar -C /usr/local -xzf go1.11.5.linux-amd64.tar.gz
```
將 /usr/local/go/bin 加入 PATH,編輯 `~/.profile` 加入下面這行
```text
export PATH=$PATH:/usr/local/go/bin
```
重載設定
```
source ~/.profile
```
可以使用 go 的版本查詢指令確認是否安裝成功
```bash
go version
```
顯示結果
```
go version go1.11.5 linux/amd64
```
查看環境設定
```
go env
```
```
GOARCH="amd64"
GOBIN=""
GOCACHE="/home/cww/.cache/go-build"
GOEXE=""
GOFLAGS=""
GOHOSTARCH="amd64"
GOHOSTOS="linux"
GOOS="linux"
GOPATH="/home/cww/go"
GOPROXY=""
GORACE=""
GOROOT="/usr/local/go"
GOTMPDIR=""
GOTOOLDIR="/usr/local/go/pkg/tool/linux_amd64"
GCCGO="gccgo"
CC="gcc"
CXX="g++"
CGO_ENABLED="1"
GOMOD=""
CGO_CFLAGS="-g -O2"
CGO_CPPFLAGS=""
CGO_CXXFLAGS="-g -O2"
CGO_FFLAGS="-g -O2"
CGO_LDFLAGS="-g -O2"
PKG_CONFIG="pkg-config"
GOGCCFLAGS="-fPIC -m64 -pthread -fmessage-length=0 -fdebug-prefix-map=/tmp/go-build806834644=/tmp/go-build -gno-record-gcc-switches"
```
GOROOT 是主程式的安裝路徑
GOPATH 是集中管理 code, package 和執行檔的目錄
若要更改 GOPATH 可以用下面指令更改
```
export GOPATH=$HOME/golang
```
通常在 GOPATH 中會有三個資料夾
* src - 放Go程式碼的地方
* pkg - 放Go package的地方
* bin - 編譯好的執行檔會放在這裡
2018-12-18
解決應用程式語系不同顯示亂碼 在Windows 10 使用 Locale Emulator (取代 AppLocale)
以前開發的軟體通常不是 Unicode 編碼,不同的語系都有不一樣的編碼格式,像是中文就區分簡體 GB2312、GBK 和 GB18030,繁體中文 BIG5,和統一的 Unicode 與 UTF8。如果是文件檔案,可以透過轉換編碼閱讀,但如果是應用程式的操作介面,程式倘若不支援多語系切換功能,當我們打開應用程式時可能看到的是亂碼文字,以前可以使用微軟提供的 AppLocale 程式,讓程式啟動後顯示正確的語系,但 Windows 10 已經無法直接使用 AppLocale (可以透過覆雜的設定使用) ,所以找了另一個 Locale Emulator 能讓應用程式的介面文字顯示正常。
當開啟 GBK 編碼的應用程式時顯示亂碼

Locale Emulator 使用上很像微軟的 AppLocale,可以針對應用程式所使用的編碼來進行轉換。但是功能上他還能讓特定的應用程式以虛擬的區域來進行模擬運作,像是在設定為台灣、繁體中文作業系統的電腦上,讓軟體待在一個虛擬為日文作業系統、日本時區的系統上運作,用這樣的方式可以越過許多限制。
1. 到 github 下載最新版本軟體

2. 解壓縮後執行「LEInstaller.exe」進行快捷選單的安裝

3. 當顯示下面這個視窗後,點選「Install for current user」,會在檔案總管關聯按右鍵選單。

4. 選單關聯好會跳出這個視窗,如果你是從舊版本安裝更新,會需要重開機。

5. 設定快速切換語系,執行「LEGUI.exe」,因為我使用的是英文版的Windows 10,所以顯示的是英文,如果是中文作業系統顯示的是中文介面

6. 設定模擬的語系,我選擇「簡體中文」

7. 如果要模擬語系的應用程式有限定時區使用,可以透過 Timezone 設定

8. 進階選項(Advanced Options) 依自己的需求勾選

9. 全部設定完畢後,點擊「Save As...」中文是「另存為...」

10. 取一個語系設定的名稱,然後儲存,當要啟動程式的時候可以透過這個名稱切換執行的語系

11. 設定成功後可以看到剛才儲存的選項「簡體中文」

12. 接著到目標的應用程式上,點選滑鼠右鍵,你會看到一個「Locale Emulator」的選項,在裡面你可以找到你剛剛設定好的「簡體中文」選項,由於我已經知道目標應用程式是簡體的,所以就直接點選囉

13. 如果語系和應用程式符合的話,軟體啟動後就可以看到顯示正確文字的介面了

Locale Emulator 是一套幫助應用程式轉換語系非常方便的軟體,但目前使用上已知有兩個狀況:
1. 部分防毒軟體可能會把他判定為問題軟體,那各位使用者要不要用,請自行決定。
2.有些軟體透過Locale Emulator執行後,可能會發生無法執行的狀況,這時候請確認你的檔案存放路徑是否有中文,如果有的話,請修改檔案路徑,或是將資料夾移到 C、D 磁碟的根目錄執行。
例如:將 C:\軟體\AsmTools\Run.exe 的 AsmTools 整個資料夾移至 C:\AsmTools\,此時的目標應用程式路徑為「C:\AsmTools\Run.exe」
相關連結:
官網:https://pooi.moe/Locale-Emulator/
下載:https://github.com/xupefei/Locale-Emulator/releases
當開啟 GBK 編碼的應用程式時顯示亂碼

Locale Emulator 使用上很像微軟的 AppLocale,可以針對應用程式所使用的編碼來進行轉換。但是功能上他還能讓特定的應用程式以虛擬的區域來進行模擬運作,像是在設定為台灣、繁體中文作業系統的電腦上,讓軟體待在一個虛擬為日文作業系統、日本時區的系統上運作,用這樣的方式可以越過許多限制。
1. 到 github 下載最新版本軟體

2. 解壓縮後執行「LEInstaller.exe」進行快捷選單的安裝


8. 進階選項(Advanced Options) 依自己的需求勾選


11. 設定成功後可以看到剛才儲存的選項「簡體中文」

12. 接著到目標的應用程式上,點選滑鼠右鍵,你會看到一個「Locale Emulator」的選項,在裡面你可以找到你剛剛設定好的「簡體中文」選項,由於我已經知道目標應用程式是簡體的,所以就直接點選囉

13. 如果語系和應用程式符合的話,軟體啟動後就可以看到顯示正確文字的介面了

Locale Emulator 是一套幫助應用程式轉換語系非常方便的軟體,但目前使用上已知有兩個狀況:
1. 部分防毒軟體可能會把他判定為問題軟體,那各位使用者要不要用,請自行決定。
2.有些軟體透過Locale Emulator執行後,可能會發生無法執行的狀況,這時候請確認你的檔案存放路徑是否有中文,如果有的話,請修改檔案路徑,或是將資料夾移到 C、D 磁碟的根目錄執行。
例如:將 C:\軟體\AsmTools\Run.exe 的 AsmTools 整個資料夾移至 C:\AsmTools\,此時的目標應用程式路徑為「C:\AsmTools\Run.exe」
相關連結:
官網:https://pooi.moe/Locale-Emulator/
下載:https://github.com/xupefei/Locale-Emulator/releases
2018-12-06
Windows 瀏覽器(IE, Chrome, Firefox) 憑證
朋友問我在 Windows 上的憑證匯入之後,要在哪裡能看到,都擷好圖了所以紀錄下來。
Chrome 會使用 Windows 相同的憑證管理。
Windows Step 1. 開啟控制台
Chrome 會使用 Windows 相同的憑證管理。
Windows Step 1. 開啟控制台

Windows Step 2. 網路和網際網路

Windows Step 3. 網際網路選項

Windows Step 4. 內容/憑證

Windows Step 5. 這裡可以進行匯入和刪除管理憑證

Chrome Step 1. 開啟設定

Chrome Step 2. 管理憑證

Chrome Step 3. 憑證管理頁,和 windows 的網際網路選項開啟的相同

Firefox Step 1. 開啟「選項」

Firefox Step 2. 開啟「隱私權與安全性」,然後畫面拉到最下面,點擊「檢視憑證」

Firefox Step 3. 顯示的是憑證管理頁

參考:
訂閱:
文章 (Atom)